Hello World
|
| Now that a basic understanding of a Windows Forms application and the Windows Forms Designer have been established, it is time to create your first Windows Forms application. In the following sections, you will learn to create, compile and run a simple Hello World application. Creating an Application Using the Windows Application WizardThe first step in creating this simple application is invoking the Windows Application Wizard from the Visual Studio .NET New Project dialog as shown in Figures 15.3 and 15.4. Figure 15.3. Select the File, New, Project menu item to invoke the Visual Studio .NET New Project dialog window.
Figure 15.4. Selecting the Windows Application Wizard.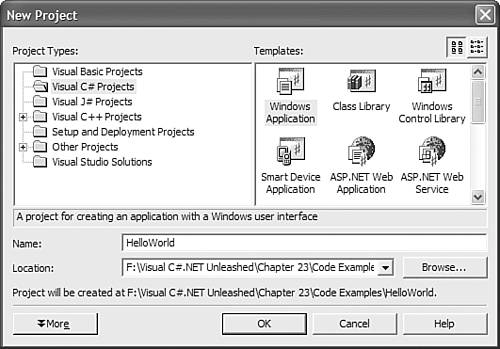 When the New Project dialog window appears, select the Windows Application Wizard shown in Figure 15.4 and type in the name and location of the project that you want to create. After you've entered all the required information, click the OK button and watch Visual Studio .NET create your application, as shown in Figure 15.5. Figure 15.5. Visual Studio .NET showing the newly created Windows Forms application.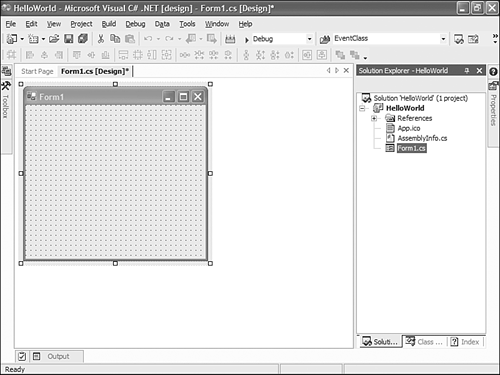 You will notice that the Solution Explorer contains three files. One file (App.ico) is the application icon. This file contains the icon image that will be used in your application. Another file (AssemblyInfo.cs) contains all information about the assembly, such as signing and general assembly and version information. The final file (Form1.cs) contains the Web Form that is the basis of our application. By default, it is a blank form that has the name Form1. Now that the basic application has been created, examine the Solution Explorer. If you want to change any of the basic information of this project, including the name of the icon file to be associated with it, you can invoke the application property pages by right-clicking on the project file in the Solution Explorer and selecting the Properties menu item. From these pages, you can change properties in Tables 15.1 and 15.2.
Figure 15.6. The Solution Explorer displaying the newly created Windows Forms application.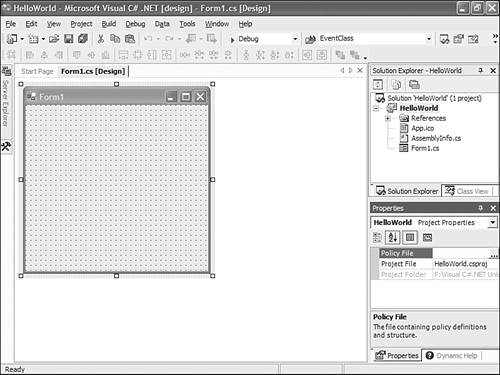 Setting the PropertiesNow that all the files that will be used in the project have been identified, the form must be loaded in the Design View window. To do that, simply right-click on the file in the Solution Explorer, and select the View Designer menu option. TIP Instead of right-clicking on the file and selecting the View Designer menu option to view the form in Design mode, you can simply double-click on the file and the Design View window will appear. Next, drag and drop a Label control from the Windows Forms tab in the toolbox to the form. After the Label control has been placed on the form (as shown in Figure 15.7), change the control's Text property to Welcome to Windows Forms Development!. Figure 15.7. The Windows Form with the default label.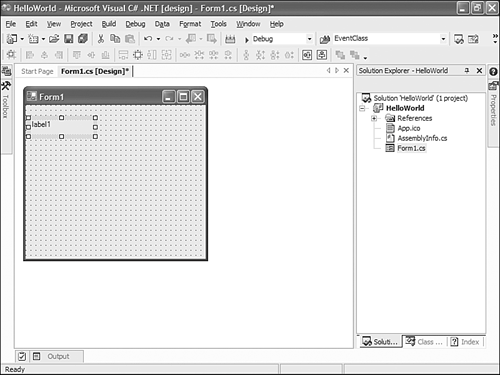 While you are in the Properties window, change the font size from its default value to a larger font size of 24. You will notice that the label now extends past the end of the form. That's okay; resize the form by clicking the mouse cursor on the lower-right side of the form and dragging to the right until the entire Label control can be seen (see Figure 15.8). Figure 15.8. The final look of the Hello World application.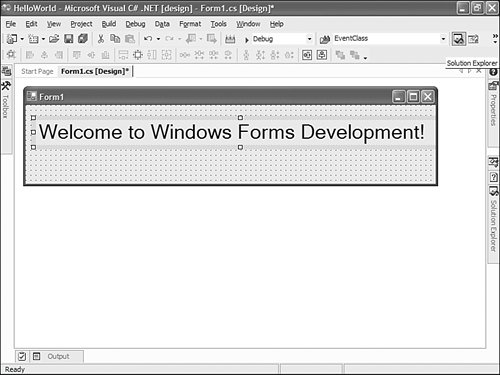 Compiling and Running the ApplicationAfter you have completed the visual design of the Hello World application, you must compile the application before it can be run. The compilation of a program can be accomplished in a few different ways: You can choose to compile the application from the keystroke Ctrl+Shift+B (assuming that you are using the default keystroke mapping); you can select the Build, Build <Project Name> menu option; or you can click the Build Solution toolbar button (by default, this button does not appear on the toolbar). Each of these techniques accomplishes the same thing, but seems faster than the other. Compile the program. Figure 15.9 shows the output of the compiler when it has successfully completed its task. Figure 15.9. Output of the compiler after a successful compilation.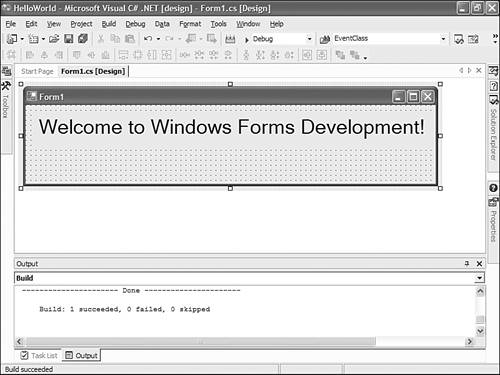 You have a few different options to run the application: You can press the F5 key; you can select the Debug, Start option from the main menu; or you can click the Start button on the toolbar. Using the F5 key seems faster than using the other options. TIP Instead of performing two different stepscompiling and then building the applicationyou can just click the Start button. If the application must be rebuilt, Visual Studio .NET will automatically perform this process. If the application does not require a rebuild, Visual Studio .NET simply starts it. After the application has been started, you can see your welcome message, as shown in Figure 15.10. Figure 15.10. The Hello World application in action.
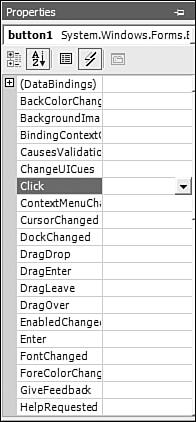
Responding to a Button ClickThe welcome message is a great start, but it is not very useful. In fact, displaying the message did not require any coding, so the example was perhaps too simple. In Chapter 10, "Events and Delegates," you learned what an event was and why it is used. By default, a Button control has several events ready for your use (see Figure 15.11). Figure 15.11. Default events of the Button control in the Properties window.
To add an event handler to any of the provided events, simply double-click the space next to the event name. The Forms Designer will automatically add the event handler, with a default name, in the Code View window and place your cursor inside the event handler method. All you have to do is add the code that you want to handle the event. To better illustrate this, add a Button control to the Hello World application form, as shown in Figure 15.12. Figure 15.12. Design view of the Hello World application after the addition of a Button control.
After the button has been added, add an event handler to the Button.Click event. When that has been accomplished, the Forms Designer should place your cursor in a method that resembles the following code snippet: private void button1_Click(object sender, System.EventArgs e) { } When that has been achieved, add the following line of code to this event handler: MessageBox.Show("Button Clicked!"); The event handler should now look something like this: private void button1_Click(object sender, System.EventArgs e) { MessageBox.Show("Button Clicked!"); } When the application is run, you will see the same welcome message with the addition of one Button control (see Figure 15.13). Figure 15.13. The new Hello World application in action.
If you click the button, you will see a MessageBox appear with the message Button Clicked!. Listing 15.1 contains all the code necessary to create the Hello World application. Listing 15.1. Form1.cs using System; using System.Drawing; using System.Collections; using System.ComponentModel; using System.Windows.Forms; using System.Data; namespace HelloWorld { /// <summary> /// Summary description for Form1. /// </summary> public class Form1 : System.Windows.Forms.Form { private System.Windows.Forms.Label label1; private System.Windows.Forms.Button button1; /// <summary> /// Required designer variable. /// </summary> private System.ComponentModel.Container components = null; public Form1() { // // Required for Windows Form Designer support // InitializeComponent(); // // TODO: Add any constructor code after InitializeComponent call // } /// <summary> /// Clean up any resources being used. /// </summary> protected override void Dispose( bool disposing ) { if( disposing ) { if (components != null) { components.Dispose(); } } base.Dispose( disposing ); } #region Windows Form Designer generated code /// <summary> /// Required method for Designer support - do not modify /// the contents of this method with the code editor. /// </summary> private void InitializeComponent() { this.label1 = new System.Windows.Forms.Label(); this.button1 = new System.Windows.Forms.Button(); this.SuspendLayout(); // // label1 // this.label1.Font = new System.Drawing.Font("Microsoft Sans Serif", 24F, System.Drawing.FontStyle.Regular, System.Drawing.GraphicsUnit.Point, ((System.Byte)(0))); this.label1.Location = new System.Drawing.Point(16, 24); this.label1.Name = "label1"; this.label1.Size = new System.Drawing.Size(656, 40); this.label1.TabIndex = 0; this.label1.Text = "Welcome to Windows Forms Development!"; // // button1 // this.button1.Location = new System.Drawing.Point(296, 80); this.button1.Name = "button1"; this.button1.TabIndex = 1; this.button1.Text = "Click Me!"; this.button1.Click += new System.EventHandler(this.button1_Click); // // Form1 // this.AutoScaleBaseSize = new System.Drawing.Size(5, 13); this.ClientSize = new System.Drawing.Size(656, 126); this.Controls.Add(this.button1); this.Controls.Add(this.label1); this.Name = "Form1"; this.Text = "Form1"; this.ResumeLayout(false); } #endregion /// <summary> /// The main entry point for the application. /// </summary> [STAThread] static void Main() { Application.Run(new Form1()); } private void button1_Click(object sender, System.EventArgs e) { MessageBox.Show("Button Clicked!"); } } } |
|


