User Interface Tailoring with Themes and Skins
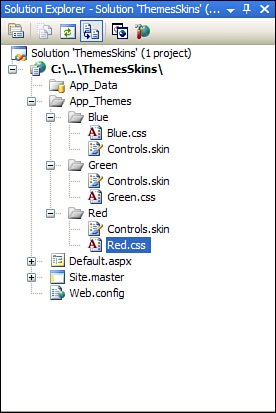
| Before ASP.NET 2.0, a developer had to hand-code the "engine" that provided support for user customization of look and feel. This engine typically resulted in the user selecting a theme from a list. Under the hood, the user's selection would be used to dynamically choose which Cascading Style Sheet (CSS) would be used to support the HTML output of a given page. If a user selected the 'Green' theme, the engine would dynamically decide to use Green.css as a page's style sheet, using various shades of green and complementary colors. Likewise, if the user chose the 'Red' theme, the page would be rendered using the Red.css style sheet. The good news for developers is that this dynamic theme engine is built into ASP.NET 2.0. All of the work required to dynamically change the look and feel of a page has been done for us, and much more. The creation of themes is the easy part. The hard part is populating the themes with the right styles and UI elements to make them compelling to your users. Themes are so modular that they can easily be created by a designer and then handed to the developer upon completion. ASP.NET has several custom folder names that it recognizes within an ASP.NET application. Each of these folders has a unique purpose. For example, the App_Code folder contains classes that will be compiled and visible to the entire application. For themes, the App_Themes folder contains all of the themes installed for a given application. To create a themes folder, first create an empty ASP.NET website called ThemesSkins. Then, right-click the project in Visual Studio, choose Add ASP.NET Folder, and then select Theme. This will create a new folder called App_Themes. To create a new theme, right-click the App_Themes folder and add a new folder. The name of the folder will be the name of the theme, so choose the folder name carefully. To this folder, you can add style sheets (.css files) and skin files. The purpose of the style sheet is fairly obvious: The ASP.NET theme engine reads all style sheets in the folder (determined by the page's current theme setting) and includes them as standard stylesheet links in the rendered output. Skin files contain control definitions. Within a theme, you can have multiple skins (represented by a unique ID). By using skin files, you can define the default behavior of a grid view based on a theme, and you can even define alternate UI settings for that grid view based on the skin ID. For example, the default behavior for a grid in the 'Blue' theme could be to display regular rows with a white background and alternating rows with a blue background. You could define an 'Inverse' skin that indicates that the grid view should be displayed with blue regular rows and white alternating rows. The possibilities are endless, and the power put in the hands of graphic designers and web designers is enormous. To get started and see how themes work, create three folders in your App_Themes directory: Blue, Red, and Green. In each of those folders, add a new style sheet of the same name, for example, Blue.css or Red.css. Finally, add a new skin file called Controls.skin to each of the folders. Then create a master page called Site.master, delete the standard default.aspx, and then create a new one that utilizes Site.master as its master page. After all this, you should have a directory structure that looks like the one shown in Figure 25.1. Figure 25.1. Creating a themed application. There are two ways to control what theme a page uses for rendering. The first is to use the <pages> element in the Web.config file, as shown in the following line: <pages theme="Green"/> This line of XML in the configuration file indicates that all pages within the application will default to the Green theme. Each page can individually override the theme choice in one of two ways. The second way involves using the @Page directive at the top of the page, as shown in the following example: <%@ Page Language="C#" MasterPageFile="~/Site.master" AutoEventWireup="true" CodeFile="Default.aspx.cs" Inherits="_Default" Title="Home Page" Theme="Red" %> This code is used by a page to override the Web.config setting and force the page to use the "Red" theme. You can also programmatically set the page's current theme. Because the page's theme selection has such a drastic impact on how the page is rendered, that selection needs to be done early in the page's life cycle. The following code shows a page's OnPreInit method overridden to programmatically set the page theme: protected override void OnPreInit(EventArgs e) { base.OnPreInit(e); Theme = "Green"; } If you attempt to set the page's theme at any other stage in the page life cycle, you will get a runtime error. To see the theme system in action, add some content to the master page and the default.aspx page and set the background color in each of the themes' css file to the appropriate color (for example, set the background-color style attribute in Blue.css to blue). When you run the application the first time, you should see the default behavior (no theme). Experiment with changing the Web.config theme setting and the page's setting and programmatic setting to see how that affects the display. The programmatic change of the theme setting overrides all previous theme selections for that page. Next, let's add some skins to dynamically control the appearance and behavior of specific controls. To do this, open up the Controls.skin file in the Green theme and add the following code: <%-- default button --%> <asp:Button runat="server" ForeColor="Green" BackColor="White" /> <%-- button appears when flat skinid is selected --%> <asp:Button runat="server" ForeColor="Green" BackColor="White" BorderStyle="None" Skin /> <%-- button appears when 'inverse' skin is selected --%> <asp:Button runat="server" ForeColor="White" BackColor="Green" Skin /> The code in a skin file contains partial control definitions. You must include the runat="server" portion, but you cannot set the ID property of the control. In addition, you can only set UI and display properties. This means that you can set the regular and alternating styles on a grid, but you cannot set its data source within the skin file. Tip You can choose to include all of your control definitions for the theme in a single skin file (for example, Controls.skin), but that can get extremely difficult to maintain on a large project. If you have several skins, and each skin has unique control definitions, it can be more efficient to create a different skin file for each skin ID. For example, you might create a Normal.skin file for the default control definitions for the theme, and an Inverse.skin for inverted controls, and so on. Using this method can make skins easier to create for designers and easier for developers to maintain. Now, create a new page called skindemo.aspx and choose your Site.master master page. If you created a content placeholder in the master page, you can set the following code in the skindemo.aspx file: <%@ Page Language="C#" MasterPageFile="~/Site.master" AutoEventWireup="true" CodeFile="skindemo.aspx.cs" Inherits="skindemo" Title="Untitled Page" Theme="Green"%> <asp:Content ContentPlaceHolder Runat="Server"> <asp:Button runat="server" Text="This is the default button" /> <asp:Button runat="server" Text="This is a flat button" Skin /> <asp:Button runat="server" Text="This is inverse" Skin /> </asp:Content> When you run this page in the debugger, you will see your master page content and the child content merged onto a green background. The first button will display with a standard border, the second button has no border, and the third button has a regular border but the colors are inverted. The power of the new IntelliSense in Visual Studio 2005 never ceases to impress. If you were typing the code in by hand and following along, you probably noticed that as you typed SkinID= IntelliSense actually popped up and displayed a list of skins defined. The new IntelliSense is shown in Figure 25.2. Figure 25.2. IntelliSense displaying a list of defined skins. You can also create a global theme. A global theme is one that is available to all applications on a given server. This can be particularly useful if you have multiple applications running on the same server that you want to share a set of common themes as well as have their own private themes. To create a global theme, you follow the same rules as for creating a page theme, except that the global theme is stored in the following directory: [IIS root]\aspnet_client\system_web\[version\Themes\[Theme] So on my system, a global theme called Christmas might be in the following directory: C:\inetpub\wwwroot\aspnet_client\system_web\2_0_50727\Themes\Christmas By default, the global Themes directory hasn't been created, so you will have to create it when you create your first global theme. As you can see, the mechanics of creating and using skins has been made extremely simple by the new ASP.NET theme support. The hard part is, as it should be, in the design of the style sheets and skin files. Because skins are file-based and extremely modular, the web and graphic designers can create these files on their own and insert them into the website as they become available without hindering the rest of the development process. Tip When building themes, you can have images that are specific to an individual theme. When you refer to that image from a control in a skin file, the URL is relative to the theme directory. This means that an image stored in App_Themes\Blue\images\logo.jpg would be referred to as <asp:Image ImageUrl=""images\logo.jpg""/>. |

EAN: 2147483647
Pages: 298