| Although some of Photoshop Elements' patterns can be a little gimmicky, others, like many of the fabric and rock textures, can be useful when you're trying to repair or retouch a damaged or aged photograph. For example, you might use one of the abstract stone patterns to camouflage a particularly damaged background in an old photo that would be difficult to salvage by any other method. Photoshop Elements provides a default set of patterns plus seven additional sets containing objects as varied as flowers, stone faces, and textured artist's surfaces. Patterns can be applied using two methods. If you have a large area of the same tonal value or color, you can use the Paint Bucket tool. On the other hand, if you have a smaller area made up of varying colors or textures, use the Pattern Stamp tool. To apply a pattern to a selected area with the Paint Bucket tool 1. | Select the Paint Bucket tool from the toolbox, or press K (Figure 6.33).
Figure 6.33. The Paint Bucket tool. 
| 2. | On the options bar, select Pattern from the Fill drop-down menu (Figure 6.34).
Figure 6.34. Once you've selected the Paint Bucket tool, select Pattern from the options bar. 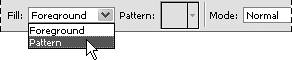
| 3. | Still on the options bar, click to open the pattern picker (Figure 6.35).
Figure 6.35. You can choose from a variety of patterns in the pattern picker on the options bar. 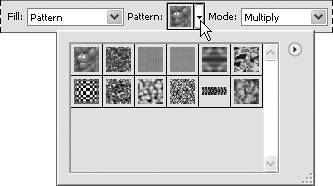
| 4. | Click to choose from the list of default patterns, or click the arrow button to the right of the thumbnail image to open the Pattern palette menu (Figure 6.36).
Figure 6.36. You can pick from a default sample list of patterns or load any one of seven additional pattern sets. 
| 5. | Select from the list of pattern sets in the bottom section of the menu.
The pattern picker displays the new pattern library.
| 6. | Return to the image window and click in the area where you want to apply the pattern.
The pattern is painted in the image (Figure 6.37).
Figure 6.37. Click the Paint Bucket tool in any large area where you want to apply a pattern. Here, a floral pattern was selected to create brand-new living room wallpaper. 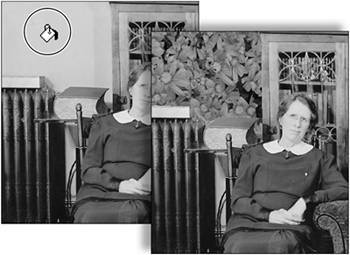
|
To apply a pattern with the Pattern Stamp tool 1. | In the toolbox, select the Pattern Stamp tool from beneath the Clone Stamp tool (Figure 6.38).
Figure 6.38. The Pattern Stamp tool is hidden underneath the Clone tool. Just right-click to access it. 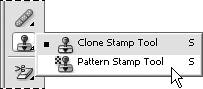
If you hold the Alt key while clicking the Clone Stamp tool in the toolbox, you can toggle between the Clone Stamp and Pattern Stamp tools. Or, if the Clone Stamp tool is already selected, you can select the Pattern Stamp tool from the options bar.
| 2. | On the options bar, select a brush size using the brush Size slider (Figure 6.39).
Figure 6.39. Choose a brush size appropriate for your image size and pattern. 
If you like, you can also make opacity and blending changes, just as you did for the Clone Stamp tool.
| 3. | Pick a pattern by following steps 3 through 5 in the previous procedure.
| 4. | Once you've chosen a pattern, return to the image window, hold down the mouse button, and then drag to paint the pattern in your image (Figure 6.40).
Figure 6.40. Position the pattern brush anywhere in your image to paint a pattern. 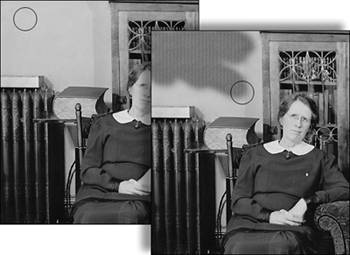
|
 Tips Tips
The Paint Bucket tool fills areas based on tonal value and color, so you'll have the most success filling areas composed of similar values, such as blank walls or clear, cloudless skies. You can adjust the behavior of the Paint Bucket tool by entering different values in the Tolerance text box on the options bar, but the results are a little unpredictable, and the process involves some trial and error. As with Photoshop Elements' Brushes palette, the Pattern palette offers several viewing options that you can access from the palette menu (Figure 6.41). In addition to the default mode of Small Thumbnail, you can view patterns as Text Only (a simple text list of the pattern names); Large Thumbnail (a larger version of the small thumbnails); Small List (tiny thumbnail views accompanied by their pattern names); or my personal favorite, Large List (similar to the Small List, but with nice, large thumbnail views). As a further aid, if Show Tool Tips (the default setting) is selected in the General Preferences dialog box, simply hover over any pattern thumbnail for a second or two to reveal a small pop-up descriptive name of that pattern. Figure 6.41. You can customize the views of the Pattern palette for easier browsing. The Large List view (shown here) combines easy-to-see thumbnails with descriptive pattern names. 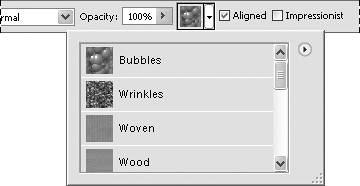
Mount a Photo on an Artist's Canvas You can create an interesting textured effect for almost any photo by using patterns from the Artist Surfaces set. 1. | In the Layers palette, create a new layer above your original photo layer.
| 2. | From the Pattern palette menu, choose the Artists Surfaces pattern set, and then choose from one of the artist surfaces.
| 3. | With the pattern layer selected, apply a blend mode (try Multiply) to combine the photo and pattern layers.
| 4. | If you like, adjust the pattern layer's opacity setting.
|
Your photo will appear to be printed on the textured artist surface (Figure 6.42). Figure 6.42. Using one of the textured Artist Surfaces patterns, any photo can be made to appear printed or rendered on watercolor paper, canvas, or a variety of other fine art surfaces. 
|
|