| To begin working with layers, you need to master just a few fundamental tasks. You can start by creating and naming a new layer, and then adding an image (or portion of an image) to it. Once you've constructed an image file of multiple layers, you need to select the individual layer before you can work on that layer's image. Keep in mind that any changes you make will affect only the selected, or active layer, and that only one layer can be active at a time. To create a new layer 1. | From the Layer menu or from the Layers palette menu, select New > Layer, or press Shift+Ctrl+N.
| 2. | In the New Layer dialog box, choose from the following options:
- Rename the layer with a more meaningful and intuitive name related to its contents. The default names are Layer 1, Layer 2, Layer 3, and so on (Figure 5.6).
Figure 5.6. Default layer names are Layer 1 for the first layer you create, Layer 2, Layer 3, and so on. You can enter a new name when creating a layer, or you can rename it later. 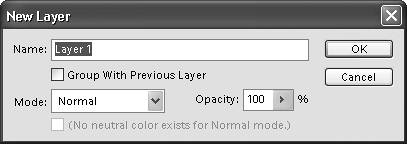
- Choose a blending mode for the layer.
The default blending mode is Normal, meaning that no change will be applied to the layer. You can experiment with other blending modes directly from the Layers palette.
- Choose the level of opacity for the layer.
Opacity can also be adjusted at any time from the Layers palette.
- Group the new layer with the Previous (or lower) layer.
The Group feature in the Layers palette produces an effect like masking where the lower layer in the group acts as a window for the upper layer's image to show through. For a detailed description of layer grouping, see "Creating Masking Effects with Layer Groups" later in this chapter.
|
 Tips Tips
You can also quickly create a new layer by clicking the New Layer icon near the top of the Layers palette (Figure 5.7). The new layer appears as the top layer in the palette with the default blending and opacity modes applied. To rename the new layer, double-click its name in the Layers palette and enter a new name. Figure 5.7. Click the New Layer icon to quickly create a new, blank layer. 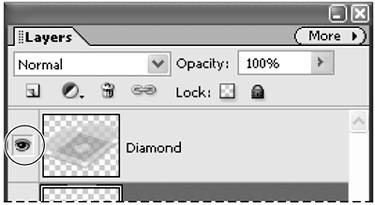
To work more easily on your image, you can choose to show or hide any of its layers from the Layers palette menu.
To select a layer Do one of the following: - On the Layers palette, click the Layer thumbnail or name to make that layer active (Figure 5.8).
Figure 5.8. Click the layer name or thumbnail to make it the active (editable) layer. 
If you've just imported an image from a digital camera or scanner, by default it will have only one layerthe background layer, which is selected by default.
- Select the Move tool and click directly on a layer image in the image window
A border with selection handles will appear around the layer image to indicate that it's selected (Figure 5.9).
Figure 5.9. When you click a layer image in the image window, a bounding box appears to show you that it is the selected, active layer. 
Tip When you try to select or make changes to an area in your image, you sometimes may keep getting weird and unexpected results. For example, your selection can't be copied, or you apply a filter but nothing happens. More often than not, this is because you don't have the correct layer selected. Just refer to the Layers palette to see if this is the case. Remember that the active layer is always highlighted in the Layers palette.
To show or hide a layer - On the Layers palette, click the eye icon to hide the layer (the eye disappears). Click again and the eye reappears, making the layer visible again in the image window (Figure 5.10).
Figure 5.10. Click the eye icon to hide a layer; click again to make the layer visible. 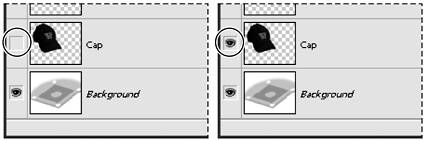
Tips You can quickly show or hide multiple layers by simply dragging through the eye column. To quickly display just one layer, Alt-click the eye icon for the desired layer. All of the other layers will become hidden. Alt-click again to show all of the layers.
To delete a layer 1. | Select a layer on the Layers palette.
| 2. | Do one of the following:
- From the Layer menu or from the Layers palette menu, choose Delete Layer (Figure 5.11).
Figure 5.11. Choose Layer Delete Layer > from the Layer menu (or Layers palette menu) to delete a selected layer. 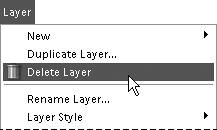
- Click the Trash icon on the Layers palette (Figure 5.12) and then click Yes.
Figure 5.12. Clicking the trash icon also removes the selected layer. 
- Drag the layer to the Trash icon on the Layers palette.
|
Background Layers When you import a photo from a digital camera or scanner, the photo appears on the background (or base) layer in Photoshop Elements. In fact when you open an image file from just about any source, it's very likely that it has been flattened and contains just a background layer. This layer cannot be reordered (that is, its relative position or level cannot be moved), and it cannot be given a blending mode, or assigned a different opacity. When you create a new image and choose Transparent for its background, the bottom layer is called Layer 1. This layer can be reordered, and you can change its blending mode or opacity just as with any other layer. A simple background layer can never be transparent, but that's okay if you're not concerned with changing opacity or applying blending modes. However, if you want to take advantage of the benefits that transparency offers, start by creating an image with transparent background contents, or convert an existing background layer to a regular layer. |
|