| You can probably tell by now that creating selections usually involves a little fine-tuning to get things just right. For example, imagine you're using the Magnetic Lasso tool to trace the outline of a face, but then realize you didn't include the ear in your selection. Rather than start all over again from scratch, you can simply add to or subtract from your selection until you've included every part of the image you want. Photoshop Elements even lets you select the intersection (or overlapping area) of two independent selections. This feature offers a creative solution for constructing interesting selection areas that would be difficult to create with a single selection tool. To add to a selection 1. | Make a selection in your image with any of the selection tools.
| 2. | With the selection still active, do one of the following:
- If desired, select a different selection tool, then click the Add to Selection icon (Figure 4.55) on the options bar.
Figure 4.55. To add to the current selection, either click the Add to Selection icon on the options bar, or hold down the Shift key while making another selection. 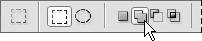
If the Add to Selection icon is already highlighted, skip to step 3.
- Hold down the Shift key, and, if desired, select a different selection tool.
A plus sign appears, indicating that you are adding to the current selection.
| 3. | Make a new selection in your image. If you want to add to your existing selection, make sure your new selection overlaps the original. If you want to create an additional selection, make sure you click outside of your original selection.
The new selection area is added to your first selection (Figure 4.56).
Figure 4.56. In this example, two selections are combined to form a single selection. 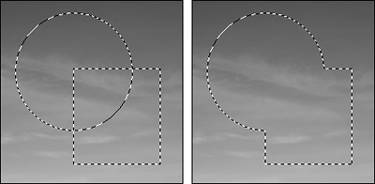
|
To subtract from a selection 1. | Make a selection with any of the selection tools.
| 2. | With the selection still active, do one of the following:
- Select the Subtract from Selection icon on the options bar and, if desired, choose any of the selection tools (Figure 4.57).
Figure 4.57. To subtract from the current selection, either click the Subtract from Selection icon on the options bar, or hold down the Alt key while selecting the area you want to subtract. 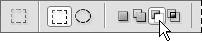
- Hold down the Alt key.
A minus sign appears, indicating that you are subtracting from the current selection.
| 3. | Drag the pointer through the area you want to subtract.
The area you defined is removed from the selection (Figure 4.58).
Figure 4.58. In this example, a pie-shaped cutout is left where the rectangle selection has been subtracted. 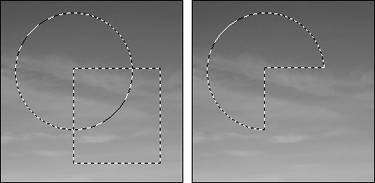
|
To select the intersection of two selections 1. | Make a selection with any of the Marquee or Lasso selection tools.
| 2. | With the selection still active, do one of the following:
- Select the Intersect with Selection icon on the options bar and create a new selection that overlaps the current selection (Figure 4.59).
Figure 4.59. To create an intersection of two selections, click the Intersect with Selection button on the options bar. 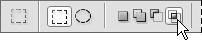
- Hold down Alt+Shift and create a new selection that overlaps the current selection. An X appears, indicating that you are selecting an area of intersection.
| 3. | A new selection area is formed based on the intersection of the two selections (Figure 4.60).
Figure 4.60. In this example, only the area of intersection remains. 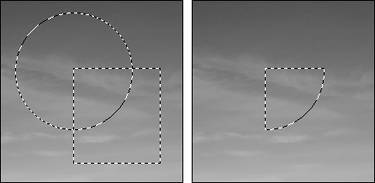
|
To deselect the current selection - From the Select menu, choose Deselect, or press Ctrl+D.
 Tip Tip
To reselect the last selection - Choose Select > Reselect, or press Shift+Ctrl+D.
To delete a selection Do one of the following: - From the menu bar, choose Edit > Cut, or press Ctrl+X.
- Press Backspace/Delete.
When you delete a selection, the portion of the image within your selection disappears entirely, leaving a hole in your image (Figure 4.61). If you accidentally delete a selection, click the Undo icon on the shortcuts bar or press Ctrl+Z.
Figure 4.61. When you delete a selection, the selected area disappears, and your current background color shows through. 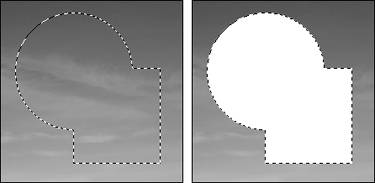
To hide a selection border - From the View menu, uncheck Selection, or press Ctrl+H.
Sometimes, after you've made a selection, you will want to temporarily turn off the selection marquee to edit the image without the selection border obscuring your view. Be sure to press the same keyboard shortcut to display the selection once moreotherwise, you might lose track of where your selection is.
|