| The Magic Wand and Magic Selection Brush tools allow you to make selections based on a selected color or tonal value. These tools can seem truly magicalor wildly unpredictableat first. When you select an area of an image with either tool, it selects all of the pixels within a color or tonal range close to the pixel you've initially selected. The Magic Wand tool provides options for setting tolerance (the number of color or tonal values included in the selection), anti-aliasing (smoothing), contiguousness (whether the pixels need to be connected to that first selected pixel), and whether to include all layers in the selection. The Grow and Similar commands, found in the Select menu, can be used with the Magic Wand to expand the selection area. The Grow command expands the range of adjacent pixels, and the Similar command expands the selection based on the pixel colors. Although the Magic Selection Brush doesn't offer the options available with the Magic Wand, it will often make an accurate selection based solely on the areas you mark with the brush. To use the Magic Wand 1. | From the toolbar, choose the Magic Wand (W) (Figure 4.28).
Figure 4.28. The Magic Wand icon is located just below the Lasso tool on the toolbar. 
| 2. | On the options bar, choose whether to create a new selection, add to or subtract from an existing selection, or select an area where two selections intersect (Figure 4.29).
Figure 4.29. The Magic Wand options bar. 
The default setting on the options bar creates a new selection.
| 3. | Select the tolerance (a range of pixels from 0 to 255) to establish how wide a tonal range you want to include in your selection.
The default tolerance level is 32 pixels. To pick colors or tonal values very close to the selected pixel, choose lower numbers. Entering higher numbers results in a wider selection of colors (Figure 4.30).
Figure 4.30. The Tolerance setting determines how wide a range of colors is included in the selection. 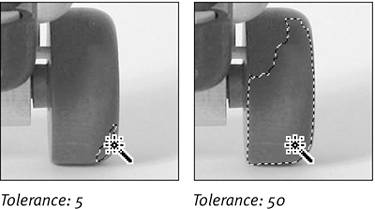
| 4. | If you want your selection to have a smooth edge, select Anti-alias.
| 5. | If you want only pixels adjacent to the original pixel to be included in the selection, select Contiguous (Figure 4.31).
Figure 4.31. Choose Contiguous if you want the selection to include only adjacent pixels. Uncheck the box if you want to select all colors throughout the image. 
| 6. | If you want the selection to include pixels on all the layers, select Sample All Layers.
| 7. | Click a color or tone in the image. Based on your settings, a group or range of pixels will be selected.
|
 Tip Tip
When you make your original selection with the Magic Wand, it takes a color "sample" from your image. You can adjust the sample size with the Eyedropper tool. The Eyedropper options bar lets you sample 1 pixel, or the average of a 3-by-3-pixel area (9 pixels total), or a 5-by-5-pixel area (25 pixels total). Whichever option is active determines how the Magic Wand establishes the sample color.
To expand the selection area 1. | From the toolbar, choose the Magic Wand tool.
| 2. | Click a color or tonal value in the image.
| 3. | From the Select menu, choose Grow to expand the selection of adjacent pixels.
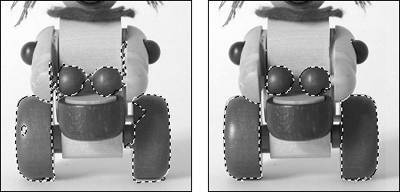
Each time you select Grow, the selection is expanded by the tolerance amount displayed on the Magic Wand options bar (Figure 4.32).
Figure 4.32. In this example, the tolerance is set to 50 pixels, with Contiguous unchecked for the first two Grow commands. To fine-tune the selection, the Contiguous box is checked, and the tolerance is reduced to 20 pixels. 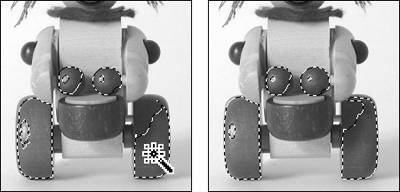
|
Tip
To include similar colors 1. | From the toolbar, choose the Magic Wand.
| 2. | Click a color or tonal value in the image.
| 3. | From the Select menu, choose Similar to expand the selection of nonadjacent pixels.
The selection is expanded by the tolerance amount set on the Magic Wand options bar (Figure 4.34).
Figure 4.34. Choose Select > Similar to add pixels to your selection. 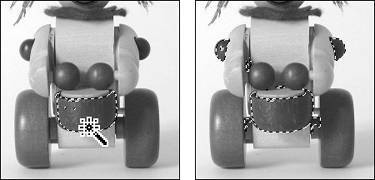
|
To use the Magic Selection Brush 1. | From the toolbar, choose the Magic Selection Brush (F) (Figure 4.35).
Figure 4.35. The Magic Selection Brush tool. 
| 2. | On the options bar, check that New Selection is chosen (Figure 4.36).
Figure 4.36. Buttons in the options bar supply different functions for the Magic Selection Brush. 
| 3. | Again in the options bar, choose a brush size. The default brush size is 13 pixels.
| 4. | In the image window, click, or click and drag in the area where you want to make your selection.
When you release the mouse button, the selection area will appear (Figure 4.37).
Figure 4.37. Painting through an area with the Magic Selection Brush creates a new selection. 
| 5. | To add to the selection, choose the Indicate Foreground button in the options bar, and then click (or click and drag) in an area outside the current selection (Figure 4.38).
Figure 4.38. To add to a selection, paint in additional brushstrokes. 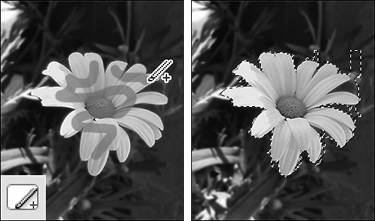
The Indicate Foreground button is selected automatically once you've made your first selection.
| 6. | To subtract from a selection, choose the Indicate Background button, and then click (or drag) inside the selection area (Figure 4.39).
Figure 4.39. Use the Indicate Background button in the options bar to delete a portion of a selection. 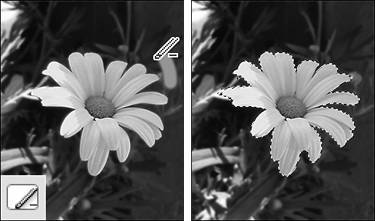
|
|