| In just a few simple steps, you can preserve the transparency of any image using options available in the GIF formatting settings. Once transparency has been set, an image of any shape (even one with a transparent cutout) can be placed on a Web page and made to blend seamlessly with its background (Figure 10.25). Figure 10.25. The image at left was saved with no transparency and displays with a solid, white background. The center image was saved with transparency, but since its matte color was set to the default of white, it appears to have a ghosted halo around its edge. The image at right was saved both with transparency and with its matte color matching that of the Web page background. 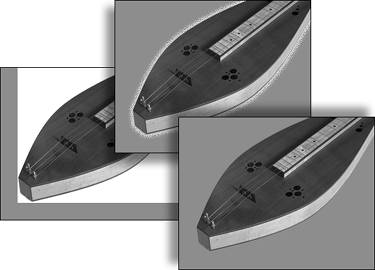
To apply transparency to an image 1. | Open the image you want to make transparent, then choose File > Save for Web to open the Save for Web dialog box.
| 2. | Select any one of the GIF formats from the Preset drop-down menu.
| 3. | If it's not already selected, click to select the Transparency check box (Figure 10.26).
Figure 10.26. GIF optimization offers the added bonus of preserving transparency in your Web-bound images. 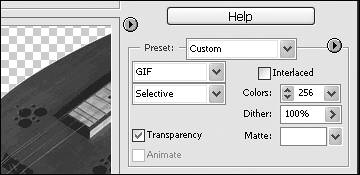
The image in the optimized preview area will be displayed against a transparency grid pattern (Figure 10.27).
Figure 10.27. If the Transparency box is unchecked, the image is displayed on a solid, colored background (left). If the Transparency box is checked, the image is displayed on a transparent background (right). 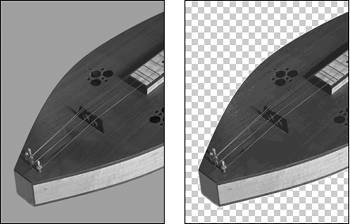
| 4. | To select the color that will be used to blend your image with the Web page background color, do one of the following:
- Click the Matte color box to open the Color Picker; then select a color from the main color window or enter color values in either the HSB, RGB, or Web color space text boxes (Figure 10.28).
Figure 10.28. Choose a matte color from the Color Picker to match your intended Web page background. 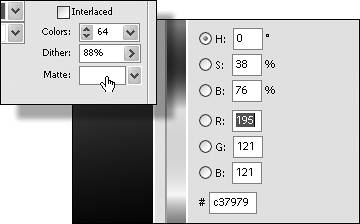
- From the Matte drop-down menu, choose a color option (Figure 10.29).
Figure 10.29. The Matte drop-down menu offers a limited number of color options. 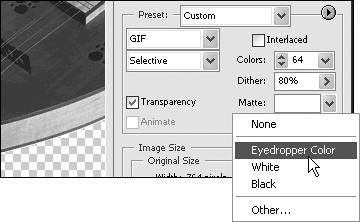
Only the semitransparent pixels around the edges of the image are filled with the matte color. If the matte color matches the color of the Web page background, the transition between the transparent image and its background will be seamless (Figure 10.30).
Figure 10.30. The color you select from the Matte drop-down menu or color box fills in the semitransparent pixels around your image, helping to maintain a smooth edge and creating a seamless transition when the image is placed on a Web page of the same color. 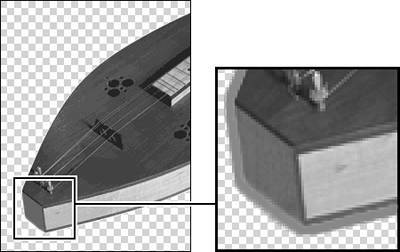
|
 Tips Tips
The JPEG format doesn't support true transparency, but as long as your image is placed on a Web page with a solid, colored background, you can simulate transparency by filling the original transparent spaces with a background color. Follow the steps in the earlier task "To apply custom JPEG optimization settings to an image," then click the Matte color box to open the Color Picker. Select a color, then click OK. When you close the Color Picker, any areas that were transparent in the original image will be filled with the matte color. Since the Eyedropper tool can sample color only from the two preview boxes in the Save for Web dialog box, the Eyedropper Color option is helpful only if the color of your Web page background also happens to be present in your image. The Other option simply opens the Color Picker. You're better off using the Matte drop-down menu only when selecting the White, Black, and None options.
Identifying Web Page Background Colors You'll need to do a little homework to identify the color of your Web page background before you can precisely assign a matte color to your transparent GIF images in Photoshop Elements. The most accurate method of determining the color of the Web page is to identify the color values in the Web page's source code. This isn't nearly as intimidating as it sounds. Open any Web page, then from the browser's main menu, find the command to view the source code. (In Internet Explorer, you simply choose View > Source.) A window will open, with code describing everything from the location of graphics and text to the background color. Once you have the source code window open, scan down the entries for the one that begins with <body>. (You'll typically find it within the first dozen entries or so.) On the same line, directly to the right, it will say, bgcolor= followed by either a 6-digit Web color code (something like #E2A6A6) or RGB color values (Figure 10.31). The "bg" stands for background, and the color code describes the color for that background. Simply jot down the color values from the Web page source code, then return to Photoshop Elements and enter those same values in the bottom field of the Color Picker to assign the matte color. Figure 10.31. In this example, I've opened the source code for a page from Peachpit's Web site. On the <body> line is the color code for the Web page backgroundbgcolor="#ffffff"which translates to white. So in this case, the background color code could also have read as either bgcolor=white or bgcolor=255,255,255 (the RGB values for white). 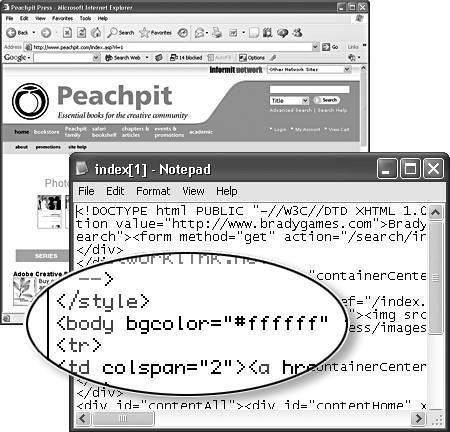
|
Placing Transparent Images on Patterned Backgrounds You may want to place your transparent GIF image on a patterned background rather than a background with a solid, colored fill. If you try to assign any matte color at all, even one similar to a color in the patterned background, you're likely to be disappointed by a halo that appears around the edges of the image (Figure 10.32). Instead, set the Matte option to None (Figure 10.33). The transparent edges will become hard and jagged, particularly on curved and angled edges (Figure 10.34), but when placed on the patterned background, the edges should be barely noticeable and will blend much more naturally than if you use the halo-edged alternative. Figure 10.32. When a transparent GIF with a matte color is placed on a patterned background, a colored "halo" may appear around its edges (left). When the matte is set to None, the halo effect disappears and the image appears to blend with the patterned background (right). 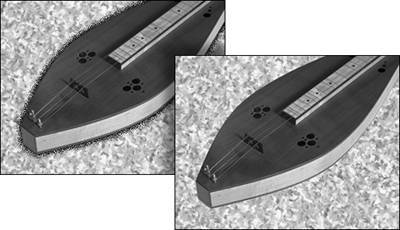
Figure 10.33. Select None from the Matte drop-down menu to create a hard-edged transparent image ideal for placing on a patterned background. 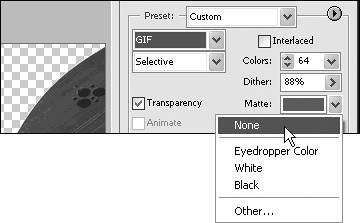
Figure 10.34. When None is selected from the Matte drop-down menu, a hard, aliased edge is created around a transparent image. 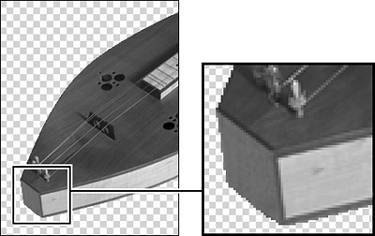
|
|