Section 5.1. Importing Pixels
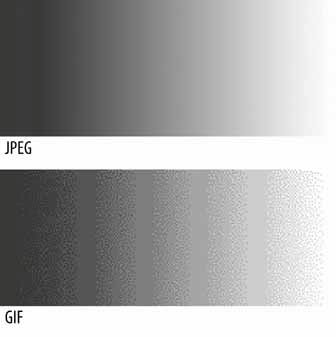
5.1. Importing PixelsAlthough importing graphic assets is a basic task, there are a few subtleties when dealing with specific file formats and specific applications. To help you take advantage of the full range of features Flash has to offer, and to give you a complete design palette to work with, this section will briefly explain some of the ins and outs of importing pixel-based graphics. Note: The graphics discussed herein are generically referred to as pixel-based or raster graphics, both as a means of categorizing topics and because that is the most common format for these types of graphics. However, you will soon see (especially when discussing Fireworks files) that some formats can contain both pixels and vectors. 5.1.1. A Few Words About File FormatsMany applications can create and edit pixel-based graphics. Adobe Photoshop will occasionally be referenced in this book, as it's the most common example. However, many (if not all) of the points discussed in this segment will apply to most pixel-editing programs. While Flash supports several bitmap file formats, including platform-specific formats such as Windows BMP and Macintosh PICT, here you will learn how to use the three most commonly used formats: JPEG, GIF, and PNG. It is outside the scope of this book to go into detail about these specific formats, but here is a very brief summary of the high points for each: Note: The term bitmap is often used to refer to a variety of similar, but not identical, items. The generic use of the term refers to pixel-based graphics, and a more specific usage can refer to the Windows file format BMP. Henceforth, the latter will be specified by the acronym, and "bitmap" will refer to a pixelbased graphic.
Figure 5-2. The PNG file format is optimal for varying levels of transparency. Note the halo in the GIF at right, caused by semitransparent pixels.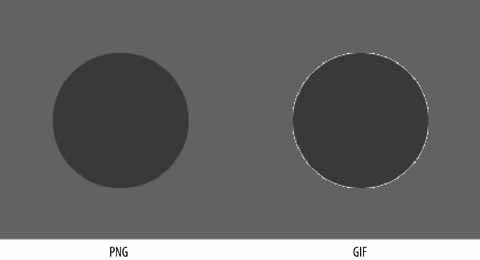 5.1.2. Importing Standard FormatsWhen importing the standard versions of these file formats, as you are likely to do most often, Flash will automatically handle the file for you and import a single bitmap image. At the outset of the process, you can decide to import directly to the Stage, or to the Library. The latter is handy when you want to import many images at the same time. Using the File Note: When you import or drag a bitmap into Flash, the filename, path, and certain properties of the external file are maintained, allowing you to update the file from within the Flash Library. This is convenient when you need to make changes to the external file. However, when you paste in a bitmap from the clipboard, Flash has no such information to maintain. A generic name of "Bitmap," followed by a sequential integer to avoid overwriting, will be applied. When you import a bitmap, whether to the Stage or the Library, a Library item is automatically created. This is because bitmaps are typically large, and Flash wants to make working with them as efficient as possible. The item it creates acts like a symbol, in that you can drag multiple instances of the bitmap to the Stage, and any permanent edits made to that image will be reflected in the instances. It will not be a symbol in every sense of the term, however, in that you cannot apply color effects and you cannot take advantage of some of the features built into graphic, button, and movie clip symbols. To gain these benefits, simply convert the bitmap to a symbol, the way you would any other relevant asset type. Warning: It's important to remember that if you create a symbol from a bitmap, the bitmap must remain in the Library. Do not delete the bitmap, thinking that it has been transformed into the symbol. Instead, think of a bitmap inside a symbol the way you'd think of a movie clip inside another movie clip. In both cases, if you delete the nested item, it will disappear from its related container. Take a few moments to import the cheesecake.jpg, black_circle_1.gif, and black_circle_2.png sample files provided in the 05 folder of your working directory. (You'll find these files in a subdirectory called Importing Pixels.) Experiment with how they do and do not behave like symbols. Compare the transparency levels of the PNG and GIF files on a dark Stage color or background shape. In general, get a feel for working with bitmaps, and then save your file as bitmaps.fla in your 05 folder. You won't be using this file again for future exercises, but it will give you something to look at when learning about compression settings later. 5.1.3. Importing from FireworksWhile Photoshop has earned the lion's share of the pixel-based graphics editing market, Macromedia has done a lot to ensure that Flash integrates tightly with its own products, such as Fireworks. This will be particularly pleasing to those who have purchased Studio 8, as Fireworks is part of the Studio suite. Note: If you don't have it, you can install a trial version of Fireworks from this book's CD-ROM. If you don't want to install Fireworks, assets created in the program have been provided for you. If you use Fireworks, or are interested in trying it, you will likely find that its mixture of pixel-based and vector-based objects can be very useful. It likely won't serve as a substitute for Photoshop, but you may be willing to part company with ImageReady and use Fireworks in its place. Take a moment to open the navigation.png and walk_cycle.png files in the /05/ Importing Pixels folder. Poke around and see how pixels and vectors are used in the files. Once you're ready to move on, import a Fireworks file into Flash to see how some of its unique features can be beneficial to Flash users:
When you create a file in Fireworks, whenever possible, symbols you create there will be converted into Flash symbols upon import. Depending on how carefully you maintain your Fireworks files, these and other assets will be added to the Library, and the appropriately named folder you just saw will be created. This is a step toward organizing your Library, which you'll read more about later. You will have a similar experience when importing Fireworks animations. Open your next Fireworks file to see the result:
|
 Import
EAN: 2147483647
Pages: 117