3.1. Layers and the Timeline You may have noticed in the previous exercises that you placed everything on the Stage within a single layer of the timeline. Layers are used to determine which elements appear in the foreground and which appear in the background, creating a visual stacking order for objects on the Stage. This is in addition to the visual stacking order of graphics within each layer, discussed in Chapter 1. While a single layer is sufficient for static graphics, computer-assisted animations require their own layers. To create multiple animations, you need multiple layers. Layers appear above the Stage in the main Flash document window, in a timeline. The timeline actually resides in its own panel (Figure 3-2), which is anchored at the top of the main document window by default. Figure 3-2. Layers in the timeline 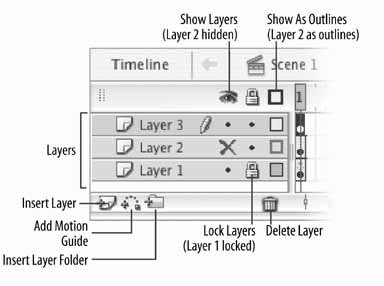
If you don't like the default position of the Timeline panel, you can move it. To do so, grab and drag the panel using the small textured grab handle to the left of the expandable arrow in the panel's title bar. If you want to see more layers but minimize the number of panels you must juggle, you can anchor the Timeline panel to the left of the Stage by dragging it to the lower-left side of the window. This is especially handy when you have many layers that you would like to see all at once, without scrolling. If you need to switch back to seeing fewer layers so that you can see many frames at once, simply drag the timeline loose again, or re-anchor it to the top of the Stage window. 3.1.1. Establishing Layer Order It's time to get started working with layers: Pick up where you left off in the last chapter by opening the animation.fla file. If you didn't create this file, you can find it in the 02 folder in your working directory. To get ready to animate the boxes, move each box to its own layer. Select all five boxes and choose Modify  Timeline Timeline  Distribute to Layers. This command automatically adds five layers to the timeline and places each box instance on its own layer. Each layer will be named with the name of the instance that appears on that layer, or the symbol name if the instances are unnamed. In this case, all five layers are named Distribute to Layers. This command automatically adds five layers to the timeline and places each box instance on its own layer. Each layer will be named with the name of the instance that appears on that layer, or the symbol name if the instances are unnamed. In this case, all five layers are named Layer 1 is now empty, and you don't need it anymore. To get rid of it, select Layer 1 by clicking on its name in the timeline, and click the Delete Layer button (the trash can icon indicated in Figure 3-2). Select the bottom layer in the timeline. Doing so also selects the box instance on the Stage that resides on the bottom layer. Select the other layers, from bottom to top, to see which layer each instance is on.
Note: Content on the top layer is displayed in the foreground. Content on the bottom layer is displayed the background. You can drag and drop the layers to rearrange their stacking order.
Having five layers with the same name makes it difficult to identify which box is on which layer, so rename and rearrange the layers to correspond to the positions of the boxes: Determine which layer contains the leftmost box instance, and double-click on the layer's name in the timeline. Change the layer name to box 1. Rename the remaining layers box 2, box 3, box 4, and box 5, according to which box the layer contains, from left to right, respectively. Click on the box 1 layer name, drag it to the top of the layer stack, and drop it above the other layers, thereby moving it to the foreground. Drag the box 2 layer and position it below the box 1 layer. Repeat for the remaining layers, in numerical order, so box 5 is at the bottom.
| The Timeline at a Glance | The Timeline panel contains information about your Flash file, as represented over time. If you think about a simple linear animation, the timeline is akin to a film in which each frame (i.e., column) represents a moment in time, just like a frame in a film. The playhead indicates the current frame, the content of which is rendered on the Stage, much like the light of a projector depicting a single frame on a screen. Each layer (row) in the timeline represents a plane in which graphics are rendered. Imagine each character in the film residing in his or her own layer. Content in the bottommost layer is rendered in the background, like a set. Characters make up a scene in various layers in front of (or on top of) the background, allowing them to walk behind and in front of each other. Finally, foreground elements, such as opening titles and closing credits, are placed in the top layer. Quick-access buttons throughout the timeline make it very easy to work with layers. Using the button bar below all the layers, you can delete or add new layers and create folders for additional organization. Once you've created a layer folder, you can drag and drop layers into that folder. You can also reorder layers by dragging and dropping. To make it easy to identify its contents, you can name a layer (either upon creation, or later by double-clicking the layer name). You can also show or hide a layer by clicking in the column marked with an eye and lock or unlock a layer's edit capability by clicking in the column marked with a lock icon. The last in the column of quick buttons will convert anything in the clicked layer to outlines in the shown color. This can sometimes make it easier to see obscured layer contents. You can also see all of these settings in one convenient place by double-clicking on a layer, which will display the Layer Properties dialog. This allows you to specify other types of layers, such as guide layers, which you'll discover later in this chapter, and masks, which you'll learn about in Chapter 7. |
If you've followed the preceding steps, the layers in your timeline should match Figure 3-3. Figure 3-3. Each layer, from top to bottom, corresponds to a box on the Stage, from left to right 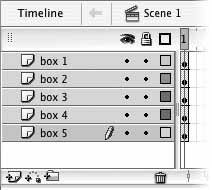
You've created a more intuitive way to view the assets by arranging the layers on which they reside. For convenience, "the box_mc movie clip symbol instance on layer box 1" will hereafter be called box 1, even though you haven't given it an instance name yet. This is just a shortcut, since you don't have to name each box individually yet; it will be true of the other boxes as well. 3.1.2. Organizing Layers into Groups You'll be adding more layers later for the text in the animation, and the timeline will be full of layers, making it harder to locate the ones you want. To avoid potential confusion, you can organize the box layers into groups in the timeline: Select the box 1 layer and then click the Insert Layer Folder button, indicated in Figure 3-2. (In the contextual menu, this command is called Insert Folder to distinguish it from the Insert Layer command.) A layer folder named Folder 1 appears above the box 1 layer. Layer folders are used to organize layers into groups. Shift-select the box layers, drag them onto Folder 1, and then release the mouse button. This moves the layers into the Folder 1 layer folder and indents the layer names. Compare your layers to Figure 3-4. Click the expand/collapse arrow next to Folder 1 to collapse the layer folder. This hides the layers, giving you room to view new layers without resizing or zooming the Timeline panel. Figure 3-4. The boxes layer folder 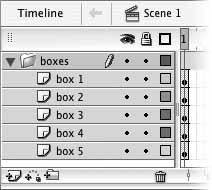 Rename the Folder 1 layer folder to boxes. Using a custom name makes the layer folder easier to identify.
Now that your boxes are on their own layers in the timeline and are stored neatly within a layer folder, you're almost ready to animate thembut first you'll jazz them up a bit. 3.1.3. Changing the color of the boxes In this animation, you'll start each box very small and increase its size over time so it appears to be growing or coming toward the viewer. Instead of using five gray boxes, you'll make the animation more colorful by changing the color of each box instance. Later, you'll change the colors to create a color-fade effect over time: Open the boxes layer folder to see the box layers. Select the box 1 instance and choose Tint from the Color drop-down list in the Properties panel, as shown in Figure 3-5. This changes the color of the movie clip instance on the Stage without affecting the original symbol in the Library. Editing the symbol directly changes every instance, but here you want each instance to be a different color. This symbol color effect lets you use boxes of different colors without adding to your file size. (If your Properties panel doesn't contain the Color drop-down list, click on the box symbol on the Stage to make sure you've selected the graphic instance and not just the layer containing it.) Click on the Tint Color swatch and choose any color, or enter specific values for red, green, and blue. The instance's tint value changes to the new color. (Later, you'll be adding black type on top of these colored boxes, so light colors are preferable.)
Note: When manipulating an instance, be sure to click on the instance rather than the frame. Clicking on a frame in the timeline will select everything on that layer that is in that frame. This makes it hard to change properties for one instance.
Figure 3-5. Setting the tint color in the Properties panel 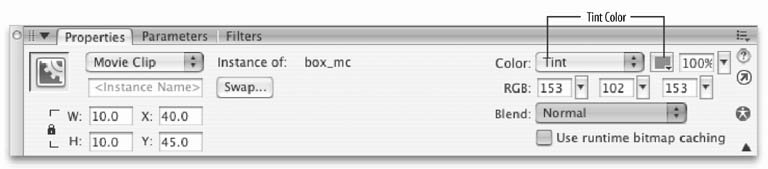 Select each of the remaining box instances and give them new tint colors. Save your work. If you want to check your progress, your file should now look like animation_01.fla in the 03 folder of your working directory.
|