Laying out your Stage elements well can improve the user experience of most projects and ensure that you're communicating effectively. However, planning and organizing a complex layout can quickly become cumbersome. Fortunately, the Flash designers planned for this possibility and built in several utilities to help you manage your designs.
2.3.1. Rulers and Guides
Create and position the first box in your layout using rulers and guides. In this exercise, you'll also practice some of the drawing principles you've already learned:
Select the Rectangle tool and enable Object Drawing mode. Shift-constrain your drawing, and draw a square on the Stage.
With the square still selected, use the Properties panel to enter a width of 90 and a height of 90.
Use Modify Convert to Symbol (F8) and choose Movie Clip as the symbol type. Call the movie clip box_mc. Youll learn more about the "_mc" extension later.
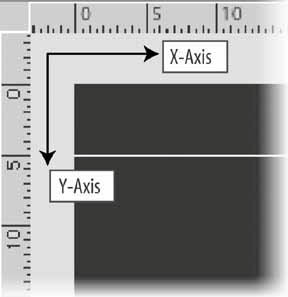
Choose the View Rulers menu option. Rulers appear, using pixels for measurement, along the top and left sides of the Stage, as shown in Figure 2-6. Notice that the upper-left corner of the Stage is aligned to (0, 0).
Figure 2-6. Rules and guides help you align objects
Zoom in pretty closely on the upper-left corner of your Stage. This can improve accuracy when working with small measurements.
Click on the horizontal ruler, which is parallel to the top edge of the Stage, and drag downward. This creates a guide (a green line). Drag the guide down past the top edge of the Stage, and watch the vertical ruler (which runs parallel to the left edge of the Stage) as you do it. Release the guide when it is aligned to 5 pixels below the top edge of the Stage (when the ruler measurement mark for 5 turns white).
Note:If the green guide color is ever difficult to see because of a Stage color or background graphic, you can change the color used for guides with the View Guides Edit Guides menu command.
Click on the vertical ruler and drag a guide to the left edge of the Stage, or until it is aligned to the 0 mark on the top ruler. Note that this is not just for extra practiceguides are also helpful when you have a background image or other graphic covering up the edges of the Stage.
Drag the box_mc instance so that its upper-left corner is aligned with the intersection of the guides you just drew. When the bounding box for the box_mc instance is directly over a guide, the color of the bounding box line will change. If you have a hard time positioning it perfectly, use the arrow keys on your keyboard to nudge the object one pixel at a time.
You've just used guides to align the first box for your layout to the point (0, 5), or the x- and y-coordinates of 0 and 5, respectively.
2.3.2. Snap It in Place
You need to align several more boxes to create a complete layout. However, dragging guides onto the Stage is time-consuming and can clutter your view. Instead, get Flash to help you align graphic elements using one of its automatic alignment features to speed things up:
Alt-click (Win) or Option-click (Mac) on the box_mc instance and drag it down and to the right approximately 50 pixels to copy a second instance of the box_mc symbol. (The 50-pixel distance is arbitrary but will give you some room to work with in the following steps.)
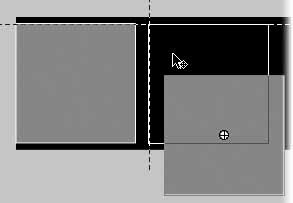
Drag the new instance back up and to the left, aiming to align the top edges of both boxes, with approximately a 10-pixel horizontal gap between the two instances. As you drag, you will see vertical and horizontal dashed lines appear on the Stage. These are called snap align guides. You may see a few lines appear as you drag your box, which will be explained in just a second. When a horizontal dashed line appears across the top of both boxes and a vertical dashed line appears approximately 10 pixels or so to the right of the first box, release the mouse button to stop dragging. Figure 2-7 shows the snap align guides in action.
Figure 2-7. Snap align guides in action
The snap align guides tell Flash to "snap" objects along invisible, intersecting gridlines. Positioning an object creates a virtual grid based on that object's position and objects in close proximity, including the edges of the Stage. The Snap Align feature is enabled by default, but you can toggle it on and off by choosing View Snapping Snap Align.
You may have seen more than one snap align guide appear, because the default settings include options such as snapping 18 pixels from every Stage edge. You can edit these settings using the View Snapping Edit Snapping dialog. For example, you can opt to change the virtual grid from 10 x 10 to another measurement of your liking, or to enable snapping to object horizontal and vertical centers. See Appendix A for more tips on customizing your workspace.
2.3.3. Precision Alignment with the Properties Panel
Using guides isn't always an accurate method of aligning objects, but you've already seen that the Properties panel can position objects at precise x- and y-coordinates. Review this approach by adding another box:
Alt-drag (Win) or Option-drag (Mac) a new box_mc instance to the right of the previous instance.
With the new box_mc instance selected, use the Properties panel to set the X and Y values for the box_mc instance to 200 and 5, respectively. This aligns the new instance perfectly to the same y-coordinate as the other boxes and positions it approximately 10 pixels to the right of the previous instance (depending on where you dropped box two when using the snap align guides).
Save your work.
As you can see, using the Properties panel to align objects eliminates the guesswork.
2.3.4. Auto Alignment with the Align Panel
You'll often need to align one object with another, and the Align panel can really make this painless. Create a fourth box and see how the Align panel works:
Alt-drag (Win) or Option-drag (Mac) another new box_mc instance, a bit down and to the right of the previous instance.
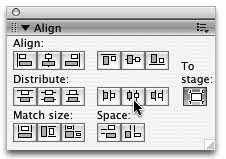
If it isn't already visible, choose Window Align (or press Ctrl/Cmd-K) to open the Align panel, shown in Figure 2-8.
Figure 2-8. The Align panel
Using the Shift key, or dragging a mouse selection that surrounds all of the boxes, select all the instances currently on the Stage. Click the Align Top Edge button, which is locatedat the left of the second group of three buttons in the first line of the panel. This will vertically align all of the boxes along their top edges.
You'll align the boxes horizontally in the next step, so save your work and move on.
2.3.5. Distributing Objects
Often, a layout of repeating patterns is helpful for displaying a series of objects. You'll be building just such a pattern for your first animation in the next chapter. When using the Align panel, you are usually just aligning objects relative to each other. However, in some cases, it helps to add the Stage itself into the calculation. For example, it is possible to evenly distribute objects across the entire Stage in one step using the Align/Distribute to Stage feature:
Alt-drag (Win) or Option-drag (Mac) one final box_mc instance to the right of the previous instance.
Repeat steps 3 and 4 from the previous section to align the box vertically. All five boxes should now have a y-coordinate of 5. Feel free to adjust them, if necessary.
In the Align panel, enable the Align/Distribute to Stage option. Clicking the To Stage button in the right of the panel toggles this feature on and off.
Select all five boxes again and click the Distribute Horizontal Center button, found in the middle of the second group of three buttons in the second row of the Align panel.
Save your work and close your file.
With the Align/Distribute to Stage feature enabled, the first box is aligned to the left of the Stage, the last box is aligned to the right of the Stage, and the gaps are calculated based on these outer boundaries. If this feature were not active, the positions of the left- and rightmost boxes would have been used to calculate the gaps between all the boxes.
2.3.6. Timeline Effects: Assistants
Flash also contains two "assistant" utilities that can be used for alignment and distribution. The Timeline Effects, introduced in Flash MX 2004, provide a way of adding effects, transitions, and other features through guided wizards.
While the effects are less likely to be used in Flash 8 due to new runtime bitmap effects that you'll examine in Chapter 10, some users may still find some of the Timeline Effects helpful. The two assistants, for example, can be useful for repeated copy and transform, or "step and repeat," actionsduring authoring. The Copy to Grid assistant will create an evenly spaced grid of copies from a selected object. The more feature-rich Distributed Duplicate assistant can offset, scale, rotate, color, and fade a number of copies of a selected object, resulting in a single graphic symbol that can easily be reused.
Next, you'll look at how the Copy to Grid assistant can automatically accomplish what it took you several steps to do in the previous sections:
Create a new Flash document and use Modify Document to configure its document properties like the animation.fla canvas you just created. Give it a width of 500, a height of 100, and a black background. This is just an experiment, so there's no need to save it.
Select the Rectangle tool, hold down the Shift key, and draw a square on the Stage. Timeline Effects can work with most any object, so it doesn't matter if you use Object Drawing mode or not.
Select the entire square, use the Properties panel to give it a width and height of 90, and position it at x- and y-coordinates (0, 5).
With the square still selected, use the Insert Timeline Effects Assistants Copy to Grid menu command. Just like when creating a grid or table, enter 1 row and 5 columns. As in your earlier examples, use a row spacing of 0 pixels and a column spacing of 10 pixels.
 Convert to Symbol (F8) and choose Movie Clip as the symbol type. Call the movie clip box_mc. Youll learn more about the "_mc" extension later.
 Rulers menu option. Rulers appear, using pixels for measurement, along the top and left sides of the Stage, as shown in Figure 2-6. Notice that the upper-left corner of the Stage is aligned to (0, 0).