VCL Drag and Drop
Although drag and drop is a simple user interface interaction technique, the implementation of drag and drop in an application is not that simple.
To properly implement drag and drop in an application, we have to do the following:
-
Start the drag operation.
-
Check what is being dragged and either accept or decline the dragged item.
-
End the drag operation.
Dragging can be initiated automatically if we set the DragMode property of a control to dmAutomatic. Usually, automatically initiating the drag operation doesn't cause problems, but sometimes it can be a bit more difficult to use the control because it automatically changes the mouse cursor. We can also start and stop the drag and drop operation manually by calling the BeginDrag and EndDrag methods.
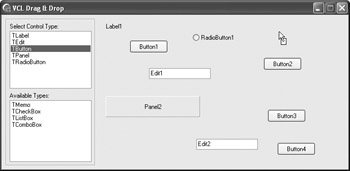
Now we'll create an application that enables the user to dynamically create controls by dragging the control's class name from a list box to the form (see Figure 20-1).

Figure 20-1: Simulating the Delphi Tool Palette
The list box in the upper-left corner contains the list of classes that can be instantiated, and the list box in the bottom-left corner contains additional classes that have to be dragged to the upper list box in order to be instantiated.
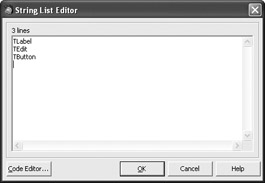
Rename the upper list box TypeList and set its DragMode property to dmAutomatic to enable it to initiate the drag operation automatically. Also add a TLabel, TEdit, and TButton to the list box using the String List Editor.

Figure 20-2: Add class names to the list box
After we've set the DragMode property to dmAutomatic, we have to write code that accepts or declines the dragged item. You can do this in the OnDrag- Over event handler. Since, we're dragging the items from the TypeList list box to the form, we have to write this in the form's OnDragOver event handler.
Listing 20-1: The OnDragOver event handler
procedure TMainForm.FormDragOver(Sender, Source: TObject; X, Y: Integer; State: TDragState; var Accept: Boolean); begin end;
In the OnDragOver event handler, we can use the Source parameter to see which control started the drag operation. The Accept parameter enables us to control the drag and drop operation. If we want to accept items from the Source control, we simply have to assign True to the Accept parameter. If an unsupported control started the drag and drop operation, we can set the Accept parameter to False to disable the form from accepting the dragged item. In this case, we also have to see if the user selected anything in the TypeList list box.
Listing 20-2: Accepting items from the TypeList list box
procedure TMainForm.FormDragOver(Sender, Source: TObject; X, Y: Integer; State: TDragState; var Accept: Boolean); begin Accept := (Source = TypeList) and (TypeList.ItemIndex <> -1); end;
Instantiating Controls
To finish the drag and drop operation (to accept the dragged item), we have to write a handler for the OnDragDrop event. The OnDragDrop event is fired only if the dragged item has been accepted in the OnDragOver event handler. The OnDragDrop event handler should contain code that instantiates the class selected in the TypeList list box.
The easiest way to write this code is to write an if-then test to see which class is selected and then create an instance of that specific class. This is actually not the way to do it, because each time you add a new class to the list, you have to write more code that instantiates the new class, as shown in Listing 20-3.
Listing 20-3: Not the best way to instantiate controls
procedure TMainForm.FormDragDrop(Sender, Source: TObject; X, Y: Integer); var newLabel: TLabel; newButton: TButton; newEdit: TEdit; sel: string; begin sel := TypeList.Items[TypeList.ItemIndex]; if sel = 'TLabel' then newLabel := TLabel.Create(Self) else if sel = 'TEdit' then newEdit := TEdit.Create(Self) else newButton := TButton.Create(Self); end;
Utilizing Polymorphism
The second (much better but not the best) way to dynamically create different controls is to use polymorphism. The code in Listing 20-4 utilizes the Control- Count property of the main form to create unique control names.
Listing 20-4: Using polymorphism to create controls
procedure TMainForm.FormDragDrop(Sender, Source: TObject; X, Y: Integer); var newControl: TControl; sel: string; begin sel := TypeList.Items[TypeList.ItemIndex]; if sel = 'TLabel' then newControl := TLabel.Create(Self) else if sel = 'TEdit' then newControl := TEdit.Create(Self) else newControl := TButton.Create(Self); Inc(FControlCount); newControl.Name := newControl.ClassName + IntToStr(FControlCount); newControl.Parent := Self; newControl.Top := Y; newControl.Left := X; end;
Class References (Metaclasses)
The best way to implement this functionality is to use class references (metaclasses). Class references enable us to work directly with classes, not with class instances. Class references are used extensively in all VCL Forms applications. For instance, the CreateForm method of the TApplication class uses class references to instantiate forms built at design time.
procedure CreateForm(FormClass: TFormClass; var Reference);
In order to reference a specific class in an application, that class has to be registered. Classes are registered automatically when an instance of a class is created at design time, but they can also be registered manually with the RegisterClasses procedure. In this case, we have to call the RegisterClasses procedure because we have to use classes that aren't instantiated on the Designer Surface. Place the RegisterClasses call in the OnCreate event handler.
Listing 20-5: Registering classes
procedure TMainForm.FormCreate(Sender: TObject); begin RegisterClasses([TLabel, TEdit, TButton, TMemo, TCheckBox, TRadioButton, TListBox, TComboBox, TPanel]); end;
Now that all necessary classes are registered, we have to obtain the class from the class name. We can obtain a registered class from its name by calling the GetClass function declared in the Classes unit. Since the GetClass function returns a TPersistentClass, we have to typecast its result to TControlClass. The TControlClass enables us to reference any component that descends from TControl.
var selClass: TControlClass; selItem: string; begin selItem := TypeList.Items[TypeList.ItemIndex]; selClass := TControlClass(GetClass(selItem)); end;
After we've obtained the class, we have to instantiate it and define the properties of the new control. The property that requires the most work is the Name property because the name of the control has to be unique. To get a unique name like the Designer Surface generates, we have to count how many instances of a specific class already exist on the form. It is best to place this code in a separate function:
function TMainForm.GetControlCount(AClass: TControlClass): Integer; var i: Integer; begin Result := 0; for i := 0 to Pred(ControlCount) do if Controls[i] is AClass then Inc(Result); end;
Listing 20-6 gives the entire OnDragDrop event handler.
Listing 20-6: Using class references to create controls
type TMainForm = class(TForm) private { Private declarations } function GetControlCount(AClass: TControlClass): Integer; public { Public declarations } end; var MainForm: TMainForm; implementation {$R *.dfm} function TMainForm.GetControlCount(AClass: TControlClass): Integer; var i: Integer; begin Result := 0; for i := 0 to Pred(ControlCount) do if Controls[i] is AClass then Inc(Result); end; procedure TMainForm.FormDragDrop(Sender, Source: TObject; X, Y: Integer); var newControl: TControl; selClass: TControlClass; ctlName: string; selItem: string; begin selItem := TypeList.Items[TypeList.ItemIndex]; selClass := TControlClass(GetClass(selItem)); newControl := selClass.Create(Self); newControl.Parent := Self; ctlName := newControl.ClassName + IntToStr(GetControlCount(selClass)); Delete(ctlName, 1, 1); { remove "T" } newControl.Name := ctlName; newControl.Left := X; newControl.Top := Y; end;
Drag and Drop between TListBox Components
Now it's time to enable the user to drag items from the Available Types list to the TypeList list box. The AvailableList list box should only be used as a container for classes that can be added to the TypeList list box.
Since we have to enable the user to drag and drop items from the AvailableList list box to the TypeList list box, we have to set the DragMode property of the AvailableList list box to dmAutomatic. Then we have to write the event handler for the OnDragOver event of the TypeList list box that will accept items dragged from the AvailableList list.
Listing 20-7: Accepting items from the AvailableList list box
procedure TMainForm.TypeListDragOver(Sender, Source: TObject; X, Y: Integer; State: TDragState; var Accept: Boolean); begin Accept := (Source = AvailableList); end;
When dragging an item to a list box, you can add the dragged item to the end of the list by calling the Add method of the Items property or you can be more professional and insert the dragged item at the position indicated by the mouse cursor. To do that, you have to call the ItemAtPos method of the list box to find out the index beneath the mouse cursor and then pass that index to the Insert method of the Items property, as shown in Listing 20-8.
Listing 20-8: Dragging an item from one list to another
procedure TMainForm.TypeListDragDrop(Sender, Source: TObject; X, Y: Integer); var itemPos: Integer; begin if AvailableList.ItemIndex = -1 then Exit; itemPos := TypeList.ItemAtPos(Point(X, Y), False); with AvailableList do begin TypeList.Items.Insert(itemPos, Items[ItemIndex]); Items.Delete(ItemIndex); end; end;
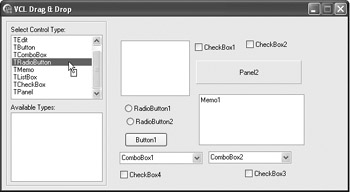
Now that we have implemented drag and drop between two list boxes, the user can instantiate all available classes by first dragging them to the TypeList list box and then to the form (see Figure 20-3).

Figure 20-3: Drag and drop between components
BeginDrag and EndDrag Methods
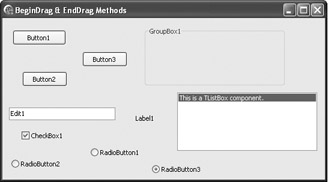
The BeginDrag and EndDrag methods can be used to start and stop the dragging of a control when the DragMode property of the control is set to dmManual. We'll use the BeginDrag and EndDrag methods to enable the user to move controls on the form. First, create a new VCL Forms application project and then drop several controls to the form.

Figure 20-4: Moving controls on the form using drag and drop
The best place to put the BeginDrag call is in the OnMouseDown event handler. When calling the BeginDrag method, you have to pass a Boolean value to the Immediate parameter that defines whether the drag operation starts immediately or after the mouse cursor has been moved a short distance. To start the drag operation immediately, pass True; otherwise, pass False (see Listing 20-9). The Sender parameter is typecast to TWinControl so that we can assign the event handler to multiple controls.
Listing 20-9: Calling the BeginDrag method
procedure TForm1.ControlMouseDown(Sender: TObject; Button: TMouseButton; Shift: TShiftState; X, Y: Integer); begin TWinControl(Sender).BeginDrag(True); end;
Now, all that we have to do is accept the dragged control in the OnDragOver event of the form and finalize the drag and drop operation in the OnDragDrop event by calling the EndDrag method (see Listing 20-10). The EndDrag method also accepts a Boolean parameter. If you want to drop the control, pass True. If you pass False, the drag and drop operation is cancelled.
Listing 20-10: Ending drag and drop with the EndDrag method
procedure TForm1.FormDragDrop(Sender, Source: TObject; X, Y: Integer); begin with TWinControl(Source) do begin Left := X; Top := Y; EndDrag(True); { drop the control } end; end; procedure TForm1.FormDragOver(Sender, Source: TObject; X, Y: Integer; State: TDragState; var Accept: Boolean); begin Accept := True; { accept everything } end; EAN: 2147483647
Pages: 212