Database Recovery
The first step in recovering any database is determining precisely what has been damaged. In the event of a hardware failure, it is likely the database is marked as suspect. In the event of human errors (such as dropping a table), the database might still be accessible. What do you do? Your first step should be to access the disaster recovery plan and follow it meticulously, but for this section, only the actual process is addressed. You have all of the background and you know the technology, but to really create the best strategy, you must start thinking in terms of recovery time. To create a recovery-oriented strategy for a highly available system, you must remember speed is of the utmost importance. To make the recovery process as fast as possible you must be able to execute your recovery strategy with precision. This recovery strategy should be well documented and well tested ; in fact, it should be scripted or automated in some other way if at all possible.
Recovery strategies will differ for user error versus hardware- related disasters. However, there are similarities in the strategies. Whenever a disaster occurs, your first question should be whether you can access the tail of the transaction log. In the event of any failure, the tail of the transaction log should be your primary concern. Before you start verifying backups and before you start recovery, always check to see if the tail of the transaction log is accessible. If the tail of the transaction log is accessible, then up-to-the-minute recovery is possible. Up-to-the-minute recovery ensures that all committed transactions up to the time of the failure can be recovered (if desired). This backup might not be used (or desired) because of the type of error. If the disaster is based on some form of human error, then you might end up returning to an earlier version of the database altogether, disregarding the tail of the transaction log.
Accessing the tail of the transaction log depends on two factors: physical access to the files and the recovery model state. The tail of the transaction log will be accessible if the physical devices on which the transaction log resides are accessible and the files are not corrupt. Additionally, the transaction log will only be accessible if you are in Full recovery model or in Bulk-Logged recovery model if you have not performed a Bulk-Logged operation since the last transaction log backup. Once it is determined that the tail of the log is accessible, then you should back up the transaction log and add it to your complete set of backups. Once you have backed up the tail of the transaction log, you need to recover your database.
| Tip | Are you sure hardware failure is responsible for your problem? Whenever a database is marked suspect and signs of damaged disks are visible (such as Event Viewer s System Log messages pointing to a disk failure), try resetting the status of the database. This simple trick is worth the few minutes it takes ” especially if it works. It requires that you stop and restart SQL Server. However, if it succeeds, this might be all you have to do to recover. Sometimes, the database gets improperly marked suspect and only a status change is necessary. In this case, resetting the database status (using sp_resetstatus ) and then restarting SQL Server might be the only recovery step you need. If the database is still marked suspect after restarting SQL Server, maybe only a file is corrupt. This will mark the beginning of your restore. |
The next step is to back up the tail of the log. To back up the tail of the log, SQL Server requires special syntax. Everything about the transaction log backup is the same ”the devices to which you plan to back up, the options you want to specify, and so on ”with one notable exception. To back up the tail of the transaction log, you must specify the NO_TRUNCATE clause. This can just be added to the end of the BACKUP LOG command. For example, to back up the tail of the transaction log for the Inventory database using the same devices, media set password, and options presented earlier in Executing the Full Database “ Based Backup Strategy Using Transact -SQL, the syntax only changes slightly:
BACKUP LOG [Inventory] TO [InventoryBackup1], [InventoryBackup2], [InventoryBackup3] WITH NOINIT, MEDIAPASSWORD = N'InventoryStripeSetPassword', NAME = N'InventoryTLogBackup', DESCRIPTION = N'Transaction Log Backup of Inventory', PASSWORD = N'InventoryBackupTAILPassword', NOREWIND, STATS = 10, NO_TRUNCATE
Once you have backed up the tail of the log, you can start to investigate further what type of damage has occurred and what the logical course of action is. If the damage is user error, the next step is to determine whether or not users should still be allowed within the database. If not, then restrict the database access to database owners only. Next, you need to investigate the extent of the damage: rows, tables, files, filegroups, entire databases, and so on. Each one will potentially have a different recovery path . Next, regardless of type of failure, you need to determine where you are going to perform the restore ”in place, on the same server, or to a different server. Each option has different requirements that should be well thought out. Begin to verify your backups, ensuring that you have a complete set based on the strategy you have chosen . Additionally, you should be thinking about (and have documented already) contingencies. Finally, start your restore.
What is the actual process of recovery? How does a database recover? What are some of the critical options to understand when recovering a database? What are the phases of restore and recovery? Can they be altered , sped up, or skipped ? After answers to all of these questions are understood , numerous recovery scenarios are covered to help you create the best recovery plan for your environment.
Phases of Recovery
When a database backup is used to recover a database, there are actually four phases each backup can go through: the file creation or initialization phase, the copy media phase, the redo phase, and finally the undo phase.
File Creation
The file creation phase is only performed when the file or files of the database being restored do not already exist in the appropriate size or location. The location can be changed during restore (RESTORE WITH MOVE) but the size cannot. If the database was defined at a total size for data of 10 GB, yet the backup yielded only a 300 MB full database backup because the database does not currently have a lot of data, it does not matter. The database created during the restore must completely resemble the database structure as it was backed up . The structure for all files and filegroups cannot be changed during restore. If you are restoring in place or if a subset of files is damaged, be sure not to drop the database. If the files are already there, you can save time during the restore. Because speed is the key to recovery in high availability, this is the first step to improving the restore performance. Even if the database is suspect and one or more of the files are damaged, you can still restore that database in place, replacing the files that are damaged (specifying their new location using RESTORE WITH MOVE).
Media Copy
The second phase that a restore goes through is the media copy phase. During this phase, only faster hardware can help. SQL Server reads the pages from the backup, determines their page location (from the page header), and writes the pages to their appropriate location on disk. Even if the pages are logically inconsistent (see How Full Database Backups Work in Chapter 9), this phase is uninterested. The sole purpose of this phase is to copy from the backup medium as fast as possible.
Again, focusing on speed, there are a few options. If you performed your backup to a parallel striped media set then your restore is also performed in parallel. If your database files being recovered are on faster RAID arrays, this can improve the copy phase (that is, striped mirror or mirrored stripes are faster than RAID 5; however, you will need to know how your hardware behaves, including things like the write cache, and so on).
Finally, maybe you can restore less. In the case of isolated corruption for a database that uses multiple files or filegroups, you can restore just the files or filegroups that are damaged.
| Tip | When a database has isolated failures, you can restore the files or filegroups by restoring from a full database backup or a file or filegroup backup. However, when restoring files from a file or filegroup backup, the restore can take substantially less time as the backup is smaller and only contains the necessary data. |
Redo and Undo
The two final phases a backup goes through during restore relate to the transactions that must be applied. This occurs in almost every type of backup with the exception of file/filegroup restores (the transaction log is not backed up during these backups). Because all other backups include some portion of the transaction log or are solely transaction log backups, the restore must use the transaction log to recover what is not already in the database. To do this there are two phases of log analysis: redo and undo.
During the redo phase, SQL Server reviews the log to apply any transactions not already in the database. Because some of the transactions might not have committed by the time the backup completed the final phase, undo must be performed. However, the undo phase is actually determined by the RESTORE command s recovery completion state. If more backups are to be restored, then there is no reason to undo. Undo is only performed for the final restore, which is the restore that is meant to bring the database online for users. Determining when to recover the database is based on the recovery completion state specified during the restore.
Recovery Completion States
When each backup is restored, a recovery completion state must be defined. The recovery completion state defines the state in which the database will be when that particular backup is restored. More specifically , because each backup is an image of the database as it looked when the backup completed, SQL Server must determine the fate of the transactions that were pending when the backup completed. With each option you accomplish something different ” for different purposes. The recovery completion states are RECOVERY, NORECOVERY, and STANDBY.
RECOVERY
The RECOVERY completion state indicates that all four phases of the restore should be performed, including undo. When the undo phase is performed with the RECOVERY completion state, no additional backups can be applied. The RECOVERY option should not be specified on any backup except the very last one. However, RECOVERY is the default when no recovery completion state is specified. If a database is recovered too early (meaning that you still have backups to apply) then you will need to restart the restore sequence with the first backup. The opposite is not true. If you accidentally use NORECOVERY on the very last backup, you can still recover the database easily and quickly. To recover the database without restoring any backups use this syntax:
RESTORE DATABASE DatabaseName WITH RECOVERY
| Important | Never use the RECOVERY option unless you are absolutely certain that you have no other backups to restore. Recovering a database too early will cause a significant delay while you go through your restore process again. |
NORECOVERY
The NORECOVERY completion state is not the default for SQL Server, but in reality, you should be using it all the time. When a series of backups must be restored, each backup should be restored with NORECOVERY. This option tells SQL Server that the undo phase can be skipped because the next step will be to perform another restore. However, this phase does not allow anyone , including system administrators, to access the database. This option leaves the database nonoperational but able to restore additional backups. NORECOVERY is not the default, but it is always safer to err on the side of NORECOVERY. Perform every restore with NORECOVERY and when you are absolutely certain that you just applied the very last transaction log (usually the tail of the transaction log), recover the database using the RECOVERY option.
STANDBY
The STANDBY recovery completion state is a special combination of the two. With this recovery completion state specified, SQL Server performs undo yet keeps the transactional information that was undone in a file that can be used when the next log is applied. If another transaction log is to be applied you might wonder how this differs from NORECOVERY. In fact, it even sounds as though it has more overhead in saving the information so that you can just re-apply it when the next backup is restored. If all you are planning to do is immediately apply another restore, then you are right; this is more overhead. However, the STANDBY recovery completion state offers the ability to use the database for read activity in between the restores. This allows you to verify the state of the data between restores. This is extremely useful if you are trying to determine when data became damaged. Additionally, this allows you to create a secondary copy of the database that can be used for read activity until the next restore must be performed. Log shipping allows this option for recovery; however, when backups are restored, users cannot be using the database.
| More Info | For more information on log shipping and the use of NORECOVERY and STANDBY, see Chapter 7, Log Shipping. |
Useful RESTORE Options
In learning about parallel striped backup and multifile backup, we covered numerous options. Now that these backups have been performed, how do you read from them appropriately so that you optimally restore the correct backups? Additionally, what happens if you performed a parallel striped backup to six tape devices and one of the tape devices stopped working? Can you restore the six tapes from five devices?
-
Accessing a media set If a media set password was specified, all backups accessing this media set must supply the correct password. Without the password, the media set is useless. This precaution secures your backups, but remember, someone needs to know the password in a disaster recovery scenario.
[[,] MEDIAPASSWORD = {mediapassword} -
Accessing an individual backup As with the media set password, any backup that has a password defined needs to have the password specified to access the individual backup. Even if you know the backup password you will not be able to access it without the media set password.
[[,] PASSWORD = {password @password_variable}] -
Reading the media or backup device When backups are performed, the default SQL Server 2000 behavior is to append backups to the existing media set or to a device. If you want, you can specify WITH INIT to overwrite the backup device. However, if you choose multifile backup, multiple backups will reside on the same backup device. When restoring from multifile backups, you must always be sure to restore the correct backup based on its position on the backup device. If you do not specify the exact backup to restore by position, you will restore the first backup performed to the media set or device. This backup will always be the oldest one and possibly not the backup you want. To examine the list of all backups on a device (even when part of a media set), use the RESTORE HEADERONLY command. To restore a specific backup, you must specify FILE = # on the restore command. The pound sign (#) corresponds to the Position column shown in the header information of the multifile backup set.
[[,] FILE [= FileByPosition]]
Important Always verify the backups that exist on your media set before you restore. Look specifically at the header information and each backup s position number before restoring. Make sure you are familiar with the backup type, date, version, and so on. For more information, see the section Verifying Backups earlier in this chapter.
-
Restore statistics The STATS option defines when progress messages will be returned from a restore. Using WITH STATS when performing restores helps you determine the status of the restore. More important, though, you should have a rough estimate of how long the restore usually takes.
[[,] STATS [= percentage]]
-
Tape-only options NOREWIND is important if you have multiple backups to restore from the same tape. You can use RESTART if a power failure occurs during the restore. Instead of restarting from the beginning, you can execute the RESTORE with RESTART, and SQL Server resumes the restore where it left off. Finally, with tape devices, unlike disk devices, SQL Server allows you to restore from fewer than you backed up to. However, all backups must be restored before the database will become accessible. With tape devices solely, specify the devices you have and continue to restore the database until all tapes have been restored.
[[,] NOREWIND REWIND] [[,] NOUNLOAD UNLOAD] [[,] RESTART]
Disaster Recovery with Backup and Restore
Database recovery can occur in one of many ways and often depends on the type of damage sustained. When a database has become corrupt due to hardware failure, the problem is ironically easier to handle because there are fewer options. This is not to say that the problem is less severe at all. When a database is suspect or corrupt, then either no users can get into the database and all activity has ceased, or users are receiving data errors and the database is rendered corrupt. Because the damage is localized, it is most likely you will recover in place after the damaged devices have been replaced . Optionally , you might recover almost immediately if you have other devices to which the damaged files can be moved during the restore. Regardless, the recovery options are well defined.
Conversely, if the damage has occurred due to human error, the database is likely still accessible. Should it be? How soon after the damage occurred did you find out about it? How are you going to begin your recovery? Are you going to recover the whole database to an earlier point in time, or are you going to recover the database to an alternate location and manually merge the data back into the production database? Managing a disaster after human error is the more difficult problem from which to recover.
Recovering from Hardware Failure: In Place and Up to the Minute
To perform database recovery in place (that is, replacing the existing ”and damaged ”database), you will need to make sure that there is a place for all files required for this database. To see the list of files for a database, you can use RESTORE FILELISTONLY. This tells you the number of and location for all files in the database. If drives are damaged and no space exists on other drives (which are large enough for the file), then the database cannot be restored until damaged devices are replaced. If devices are damaged, yet other drives have plenty of space, the restore can move the files from their damaged location to a new location during the restore.
Recovering In Place and Up to the Minute with Full Database “Based Backup Strategy
If you are running with the full database “based backup strategy the recovery process is straightforward. The process consists of these steps:
-
Back up the tail of the transaction log.
-
Repair the damaged devices or locate another acceptable device to which the files can be restored.
-
Verify your backups.
-
Restore the most recent full database backup.
-
Restore the last differential database backup (if you are using differentials).
-
Restore the transaction log backups ”including the tail.
-
Recover the database (optionally you could recover the database on the last transaction log backup restored).
The following example describes a database corruption situation, and then explains how to recover. In this example, multifile backups are performed to a single device.
First the background:
-
Your database is using the Full recovery model.
-
The DBA makes:
-
A full backup every Sunday night at 10 P.M.
-
Differential backups Monday through Saturday at 10 P.M.
-
Transaction log backups every 15 minutes during the day. They are multifile to one log backup device on disk.
-
-
You get a page from operations saying that an error of severity 24 has occurred and users are unable to access certain data. Reviewing the error log, you see the following:
2003-01-24 23:00:26.54 spid618 Error: 823, Severity: 24, State: 2 2003-01-24 23:00:26.54 spid618 I/O error (bad page ID) detected during read at offset 0x000009f407c000 in file 'F:\mssql\DATA\DATA3.NDF'..
-
You run a DBCC CHECKDB that shows that there are allocation errors. Further investigation shows that the SAN firmware is not the latest revision.
-
You decide you need to restore the database to the last clean state at about 11 P.M.
Now for the recovery plan:
-
You update your firmware to the current revision levels supported if it is necessary.
Warning Make sure that this revision, especially if on a cluster, is supported for your solution. Applying firmware for the sake of updating it can lead to more problems than it can solve. Only perform this if necessary.
-
Reformat the disk and ensure no errors.
-
The Sunday night full database backup needs to be restored with the NORECOVERY option . The syntax for this command is:
RESTORE DATABASE Payroll FROM PayrollFullBackupDevice WITH NORECOVERY
-
The Friday night differential backup from 10 P.M. needs to be restored with the NORECOVERY option.
RESTORE DATABASE Payroll FROM PayrollDifferentialBackupDevice WITH FILE=5, NORECOVERY
-
All transaction logs from 10 P.M. to 11 P.M. need to be restored with the NORECOVERY option .
RESTORE LOG Payroll FROM PayrollLogBackupDevice WITH FILE=88, NORECOVERY RESTORE LOG Payroll FROM PayrollLogBackupDevice WITH FILE=89, NORECOVERY RESTORE LOG Payroll FROM PayrollLogBackupDevice WITH FILE=90, NORECOVERY RESTORE LOG Payroll FROM PayrollLogBackupDevice WITH FILE=91, NORECOVERY
-
For the last transaction log, recover the database using the RECOVERY syntax.
RESTORE LOG Payroll FROM PayrollLogBackupDevice WITH FILE=92, RECOVERY
Note The DBA only has to restore the transaction logs after the last differential because the differential is the cumulative of all changes since the last full backup. Thus, the DBA does not have to apply the transaction logs prior to the differential.
Although this scenario provides a simple mechanism for restoring a database up to the time of the failure, it requires the entire database to be restored. If your database was designed using multiple files and filegroups, you can restore the damaged files or filegroups more efficiently from a full database backup using the same syntax shown in the file-based recovery scenario.
Recovering In Place and Up to the Minute with the File-Based Backup Strategy
If you are running with the file-based backup strategy, the recovery process is more complex but is likely to be faster in the case of isolated hardware failure. With the full database “based backup strategy the easiest option is to recover the entire database and roll forward using other backups. The restore of the full database backup could take a significant amount of time. If you have a database designed using multiple files and filegroups, then you can restore only the damaged files. Better yet, if you have chosen to backup the individual files and filegroups then the recovery process is more granular as well. In place, you can restore only the damaged files and filegroups, restore the differentials for the files and filegroups restored, and then (and only then) apply the correct sequence of transaction log backups to get up to the minute. Of this entire process, finding the correct sequence of transaction log backups to apply is the most challenging stage. Above all, it requires an understanding of how to read backup history information from backup devices or preferably from msdb backup history tables.
Using the database backups showing the file-based backup case study earlier in this chapter in the section Executing the File-Based Backup Strategy Using Transact-SQL, what happens if there is a disk failure on the file c:\Program Files\Microsoft SQL Server\MSSQL\Data\FileBasedBackupDBRWFile2.NDF? If this file is not accessible, SQL Server marks the database as suspect, as shown in Figure 10-10.
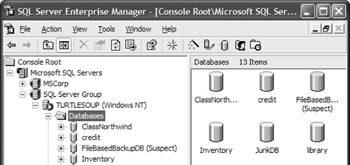
Figure 10-10: FileBasedBackupDB: A suspect database.
The entire database is inaccessible, so how can you determine the exact cause of error? Review the SQL Server error log, which can be found as a text file in the LOG directory. Additionally, you can find these messages in the Application Log of Event Viewer. Or, if SQL Server Enterprise Manager is accessible, you can obtain the graphical version of the error log. In the error log, you should be able to find a data file error for the damaged file, as shown in Figure 10-11.
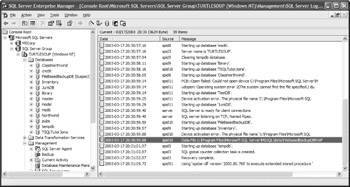
Figure 10-11: FileBasedBackupDB: Data file error.
By double-clicking on the error you can see even more details, as shown in Figure 10-12.
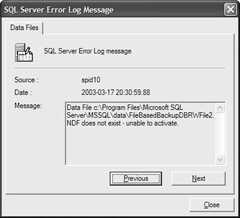
Figure 10-12: FileBasedBackupDB: Specific file error.
At this point, you know exactly what is damaged. You have file- and filegroup-based backups, so the recovery process can be performed with just the damaged files. The recovery process always begins with a backup of the tail of the transaction log. In this case, you execute:
BACKUP LOG [FileBasedBackupDB] TO [FileBasedBackupDev] WITH NAME = 'FileBasedBackupDB Backup', DESCRIPTION = 'FINAL Transaction Log (Tail up-to-minute)', NOINIT, NO_TRUNCATE
| On the CD | To perform the recovery as described, first create the File_Based_Backup_DB sample database and all the backups shown in the earlier case study diagram. All of this setup can be found in the File_Based_Backup_Strategy.sql script on the companion CD. The recovery process beginning with the backup of the tail of the transaction log can be found in the File_Based_Backup_Strategy-Restore_ InPlace_UpToTheMinute_Isolated_Corruption.sql script. Review the syntax descriptions from this section prior to execution for best understanding. |
Once the tail of the transaction log is backed up you have the set of backups shown in Figure 10-13.
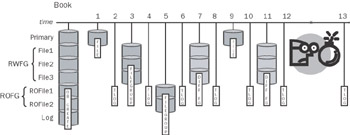
Figure 10-13: File corruption of RWFile2 between points in time 12 and 13.
Because only RWFile2 is damaged, only that file needs to be recovered. To recover this file you need to first find the last full version of this file backed up. At point in time 3, the entire filegroup was backed up. This is your starting point for this restore. Beginning with the filegroup backup at position 3, you can restore just this damaged file using:
RESTORE DATABASE FileBasedBackupDB FILE = 'FileBasedBackupDBRWFile2' FROM [FileBasedBackupDev] WITH FILE = 3, NORECOVERY
To move this file to a forward point in time, use the last differential for this file, which was performed at point in time 11. To recover just this file from this differential, the syntax is exactly the same with the exception of pointing SQL Server to the correct differential backup. To recover the differential at position 11 use:
RESTORE DATABASE FileBasedBackupDB FILE = 'FileBasedBackupDBRWFile2' FROM [FileBasedBackupDev] WITH FILE = 11, NORECOVERY
Finally, transaction logs need to be applied. This is the most challenging part about recovering from file and filegroup backups. Because transaction log backups can occur concurrently, multiple transaction log backups could overlap with a file- or filegroup-based backup. To restore the correct transaction logs you must determine the minimum effective log sequence number (LSN). In other words, you must review the earliest point that needs to be restored. In this case, because it was isolated failure, there is only one file affected. The last restore was for point in time 11. Review the backup history with the following query:
SELECT Backup_Start_Date, [Name], [Description], First_LSN, Last_LSN, Backup_Finish_Date FROM msdb.dbo.backupset AS s JOIN msdb.dbo.backupmediafamily AS m ON s.media_set_id = m.media_set_id WHERE database_name = 'FileBasedBackupDB' ORDER BY 1 ASC
The output returned for all of the backups (the backup number refers to the backup as shown by the case study) for just the First_LSN and Last_LSN columns is shown in Table 10-2.
| Backup | First_LSN | Last_LSN |
|---|---|---|
| 1 | 13000000163000001 | 13000000163300001 |
| 2 | 13000000163000001 | 14000000057900001 |
| 3 | 14000000267300001 | 14000000268200001 |
| 4 | 14000000057900001 | 15000000159400001 |
| 5 | 16000000049400001 | 16000000050100001 |
| 6 | 15000000159400001 | 19000000112100001 |
| 7 | 19000000319000002 | 19000000319200001 |
| 8 | 19000000112100001 | 20000000210000001 |
| 9 | 21000000098500001 | 21000000098700001 |
| 10 | 20000000210000001 | 21000000304900001 |
| 11 | 22000000192900002 | 22000000193100001 |
| 12 | 21000000304900001 | 24000000030800001 |
| 13 | 24000000030800001 | 26000000141800001 |
Reviewing the First_LSN column for backup set number 11, you can see that the minimum LSN is 22000000192900002. To determine the appropriate transaction log to restore, you must find the first transaction log that includes this LSN. Review only transaction log backups by adding AND type = 'L' , as well as adding the appropriate value for the First_LSN. The value of Last_LSN should be less than or equal to the First_LSN of the next backup set, which is greater than the value for Last_LSN of the existing backup set. If you follow this rule and add these to a WHERE clause in the SELECT statement shown earlier, you can determine the proper transaction log to restore. Below is an example:
WHERE database_name = 'FileBasedBackupDB' AND type = 'L' AND First_LSN < = 22000000192900002 AND Last_LSN > = 22000000192900002
Once executed, it becomes clear that the backup you will restore is the backup at position 12 (in this case the backup is after the last differential; although this is likely, it is not guaranteed ). The good news is that if you accidentally restore a transaction log that is too early (for example, the transaction log backup at position 10), SQL Server generates this error message:
Server: Msg 4326, Level 16, State 1, Line 16 The log in this backup set terminates at LSN 21000000305600001, which is too early to apply to the database. A more recent log backup that includes LSN 22000000193600002 can be restored. Server: Msg 3013, Level 16, State 1, Line 16 RESTORE LOG is terminating abnormally.
Along the same lines, if you restore a transaction log that is too late then SQL Server also gives a comparable message:
Server: Msg 4305, Level 16, State 1, Line 1 The log in this backup set begins at LSN 24000000031500001, which is too late to apply to the database. An earlier log backup that includes LSN 22000000193600002 can be restored. Server: Msg 3013, Level 16, State 1, Line 1 RESTORE LOG is terminating abnormally.
Executing NORECOVERY only with file 12 leaves the transaction log at position 12. To restore the last set of transaction logs and recover the database, you complete the restore with the last two transaction log restores:
RESTORE LOG FileBasedBackupDB FROM [FileBasedBackupDev] WITH FILE = 12, NORECOVERY RESTORE LOG FileBasedBackupDB FROM [FileBasedBackupDev] WITH FILE = 13, RECOVERY
Once the database is restored with RECOVERY then no additional restores can be performed. Additionally, users are allowed back into the database.
Additional Recovery Examples
The following examples assume that you are restoring to the same database you backed up from, or you have also restored the master database prior to starting the restore. The reason for this is that the user IDs will not be in sync if you restore to a different server than the one users were created on.
For more information on synchronizing users, see the topic Transferring Logins, Users, and Other Objects Between Instances in Chapter 14, Administrative Tasks to Increase Availability.
Point-In-Time Recovery
There are times when it is not necessary to recover a complete log. In fact, you might not want to because the complete transaction log has information in it that you do not want applied to the database. A good example of this is that someone accidentally forgot to provide a WHERE clause on a DELETE statement and wiped out a critical table.
If you know what time the person deleted the rows from the table, you can recover all the way up to the moment before it happened . SQL Server provides this functionality using the STOPAT syntax. In the following situation, this part of RESTORE is explored:
-
Your database is using the Full recovery model.
-
The DBA makes a full backup every day of his development database at 11 A.M.
-
The DBA makes transaction log backups every 15 minutes during the day. They are multifile to one log backup device on disk.
-
A developer was testing some code before lunch at 11:50 A.M., but forgot to fully qualify the DELETE statement with a WHERE clause to restrict the rows deleted. When the code is run, the production payroll table is affected.
-
You were paged at 12:15 P.M. when the development team realized the error and let the contact know that the table needed to be recovered and about what time it occurred.
Recovery Plan
Follow the steps in this order:
-
The full database backup needs to be restored with the NORECOVERY option .
-
All transaction logs up to 11:45 A.M. need to be restored with the NORECOVERY option .
-
For the last transaction log, you need to use the STOPAT and RECOVERY syntax. This tells SQL Server to stop at the moment before the table was deleted and recover the database so users can log in.
-
The database can now be opened for users.
The following is the script for this scenario:
-- restore the full backup made at 11AM restore database dev_db from full_backup with norecovery go -- restore the 11:15AM log backup restore database dev_db from log_backup with file=1, norecovery go -- restore the 11:30AM log backup restore log dev_db from log_backup with file=2, norecovery go -- restore the 11:45AM log backup restore log dev_db from log_backup with file=3, norecovery go -- restore the noon backup, but STOP recovery at 11:49AM, just before -- the table was deleted at 11:50AM restore log dev_db from log_backup with file=4, recovery, STOPAT = 'Jan 28, 2003 11:49:00.000 AM' go
Moving Data on a RESTORE
There are times when you are restoring a database that you need to move the data to a new location. Common examples of this include the following:
-
Someone gives you a database from a different system that has different disk drive mappings or directory paths. An example of this is that you need to refresh a test database from a copy of production.
-
For performance reasons you need to move the data files among the disk drives. For example, you built a new SAN and want to take advantage of the new LUN slicing the hardware engineers configured for you.
-
If you rebuild disk drives or want to move data files around for better performance, you can restore the database to the new disks.
SQL Server provides the MOVE syntax for this purpose. You need to know the logical names of the files you are going to move. To get this information, run the command RESTORE FILELISTONLY against the backup. This lists the logical names . After that, you only need to do a restore and provide the new target locations.
In the following example, a production database is to be restored to a test server from an LTO array. The database has 12 data files and one log file. Due to the size of the database, you want to monitor the progress, so you have added the STATS syntax to show the percentage complete.
-- Examine the logical and physical locations on the backup restore filelistonly from LTO1, LTO2, LTO3, LTO4 go -- First, create the new directories on the file system so we can -- RESTORE to them. -- Now, restore the database as you normally would, except -- specify to SQL Server the new locations for the data devices restore database test_db from LTO1, LTO2, LTO3, LTO4 with move 'data1' to 'H:\mssql\DATA\DATA1.MDF', move 'data2' to 'I:\mssql\DATA\DATA2.NDF', move 'data3' to 'J:\mssql\DATA\DATA3.NDF', move 'log1' to 'U:\mssql\LOG\LOG1.LDF', recovery, stats=1
EAN: 2147483647
Pages: 137
- The Effects of an Enterprise Resource Planning System (ERP) Implementation on Job Characteristics – A Study using the Hackman and Oldham Job Characteristics Model
- Context Management of ERP Processes in Virtual Communities
- Intrinsic and Contextual Data Quality: The Effect of Media and Personal Involvement
- A Hybrid Clustering Technique to Improve Patient Data Quality
- Relevance and Micro-Relevance for the Professional as Determinants of IT-Diffusion and IT-Use in Healthcare