Cube
-
Select the Rectangle Tool (R) with a black stroke color and whatever fill color you prefer. Now hold down the SHIFT key and draw a perfect square about 100x100 pixels in size ”we will refer to this as square A. Don't worry if it's not exactly the right size ; you can easily adjust these dimensions through the Property Inspector after drawing the square:
-
Select square A and its stroke by double-clicking its fill. Copy it (CTRL/CMD+C), unselect it, and then paste it in place (CTRL/CMD+SHIFT+V). We will call this square B.
-
With square B still selected, hold down your SHIFT key and press the DOWN arrow twice, and then the left arrow twice. If you are in 100% view, this should move square B 20 pixels down and 20 pixels left.
-
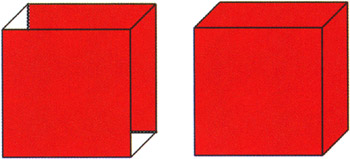
Now, using the Line Tool (N), connect the top-left corner of square B with the top-left corner of square A ”this should be pretty easy if you've got Snap to Objects selected. Do the same thing with the top-right corner of both squares. Next, delete the extra lines that will not be seen (selected in the image below):
-
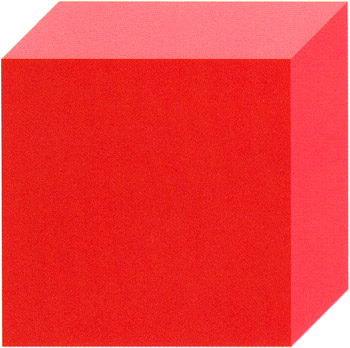
Fill the blank areas left by the deleted lines with the same color as used in the square's fill. For this, you can use the Eyedropper Tool (I) to sample the appropriate color and then the Paint Bucket Tool (K) to fill. You now have a complete cube.
-
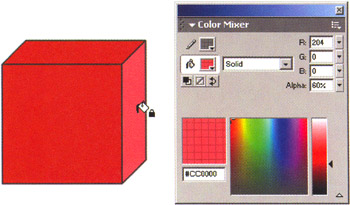
You will now fill the right and top sides of your cube with a different shade to create a better lighting effect. Select the right side of the cube and, using the Color Mixer panel ( Window > Color Mixer or SHIFT+F9), set the Alpha of this fill to 60%.
-
Next, select the top fill of the cube, and set the alpha to 40%. Now, this does look OK, but because of the way that alpha works ( alpha refers to the opacity of an object), if you ever put anything behind it on a lower layer (like a shadow you will put in later), you'll see straight through to it, and it will make this effect pointless.
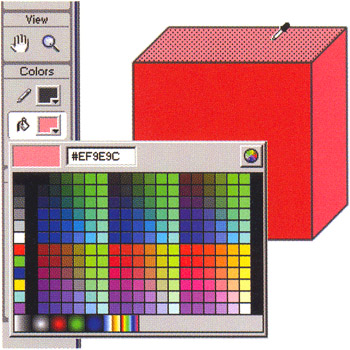
So, to get the actual color values of these alpha-valued fills, you need to click on the Fill Color option on the toolbar. When you mouse over any fills in the Flash MX authoring environment, it will tell you the exact color values (in hexadecimal form), which you can suck up with the Eyedropper and plug back in to your fills with the Paint Bucket Tool.
-
Finally, delete all the lines and you're left with a beautiful cube.