Creating a 3D Navigation Movie
In this example, you'll see just how easy it is to import Swift 3D files into Flash. In fact, even the Swift files that you'll use are pretty straightforward to construct in Swift 3D. All you need is version 2 or higher, and, of course, Flash MX.
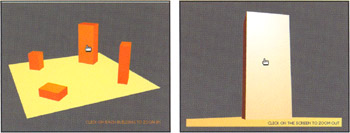
As we mentioned earlier, we'll avoid the finer details of how this was created, as it's a little beyond the scope of this book. That said, something worth keeping in mind when creating your animation in Swift 3D is to always go back to the same point you zoomed into. This is critical so that you can get a fluid animation throughout. That probably doesn't make much sense right now, but hopefully it will very soon. In this case, you'll click on a 3D building graphic to zoom in and then click the main screen again to zoom back out to the exact same spot, no matter what building you are on (you'll see this in action very shortly).
So, assuming your Swift 3D files have already been created (and you can find ready-made sample Swift files in this chapter's example files, available for download from www.friendsofed.com , as ever), let's get started. Note that the finished version of the example is swift3D_FlashExample.fla .
-
First things first, if you don't already have it, you'll need to download the Smart Layer Importer (for PC or Mac ”whichever you are using) to import the external Swift 3D file. It couldn't be easier to do ”just go to www.erain.com/technology/smartlayer.asp , follow the short and snappy instructions from the good folks at Electric Rain, and you'll be up and running with the Smart Layer Importer in no time at all.
-
Now, open a new Flash MX document and import the file swift3DExample_export.swft from this chapter's examples ( File > Import... and then browse for the file through the Import window). After import, it will create a new layer in your Flash file called Colors .
-
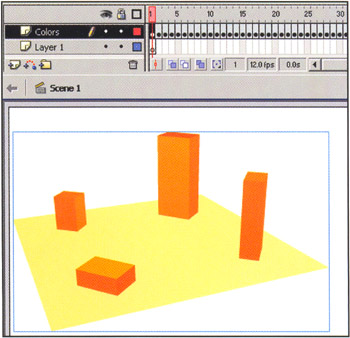
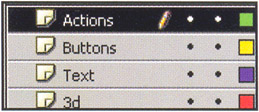
At this point, you'll notice that Flash has imported this file as a series of keyframes, each being a different view/zoom. Press ENTER and Flash will take you on a quick tour of the animation. Every frame is different except for frames 1, 20, 40, 60, and 80. This is because these will be the zoomed-out starting points. What you will need to do next is create three more layers (from top to bottom): Actions , Buttons , and Text ( Colors is already created, and we've renamed this layer 3d ).
-
In your Actions layer, create blank keyframes (F7) at frames 1, 10, 20, 30, 40, 50, 60, 70, and 80, and write stop(); actions on each one of these frames.
-
Next, on the Buttons layer, draw a rectangle with no stroke. Select it and press F8 to convert it to a button with the name Blank Button. Now double-click this button and move the Up frame (first frame) to the Hit frame (fourth frame). Your button is now invisible, and it will function the same as a normal button without showing itself.
-
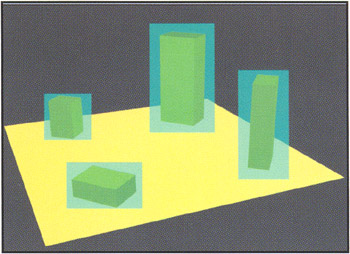
Place this button over the back left "building" and scale it to be a little larger than the entire building itself. Duplicate the button and do the same thing with the rest of the buildings . When you've finished, you should have four buttons overall, and the stage will look something like this:
-
Select the back-left building button and put the following actions in the Actions panel (F9) (note that we're using the attached scripting technique in this example for ease of understanding ”you could, of course, give each button an instance name and control all the actions remotely from a single script):
on (release) { gotoAndPlay(2); } -
Attach the following actions to the back-right building button:
on (release) { gotoAndPlay(21); } -
Put the following actions on the front-right building button:
on (release) { gotoAndPlay(41); } -
Finally, place this script on the front-left building button:
on (release) { gotoAndPlay(61); } -
Next, you will need to insert a blank keyframe (F7) on frame 2 of the Buttons layer. Select both frames 1 and 2, and while holding the ALT (OPTION) key, drag the frames to frame 20, 40, 60, and 80. Delete frame 81, as it will never be used. When you've finished, your timeline should look like this:

-
Next, select frames 1 and 2 again, and while holding the ALT (OPTION) key, drag it to frame 10. Select frame 10 and delete all buttons on the stage except one (it doesn't matter which one, as long as you have one). Take this button and scale it to be the size of the stage. Select the button and put the following actions in the Actions panel:
on (release) { gotoAndPlay(11); } -
Next, select frames 10, and 11, and while holding the ALT (OPTION) key, drag these frames to frames 30, 50, and 70. Now select frame 30, edit the ActionScript on the button to gotoAndPlay(31) , do the same for frames 50, and 70, but make them go to 51 and 71 (see also swift3D_FlashExample.fla ).
-
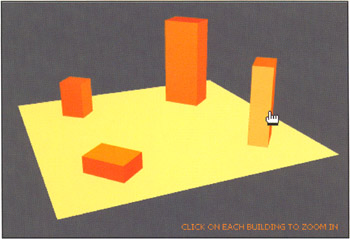
To finish, add some simple textual navigational instructions to each frame. Select frame 1 of the Text layer, and create a dynamic text box. Type " Click on each building to zoom in " in the text box. Position it in the lower-right corner of the stage.
-
Insert a blank keyframe in frame 2 of the Text layer. Select frames 1 and 2, and while holding the ALT (OPTION) key, drag these frames to frames 20, 40, 60, and 80. Next, create a keyframe on frame 10 of the Text layer and add another dynamic text box. Type " Click on the screen to zoom out " and then position this text box on the stage somewhere. Insert a blank keyframe on frame 11. Select frames 10 and 11, and drag them to frames 30, 50, and 70. You now have text on each frame instructing the user how to navigate through the buildings.
-
If you now test your movie (CTRL/CMD+ENTER), you can click on each building and the camera will zoom into it. When you click anywhere on the screen, the camera zooms back out ready to zoom into another building. By creating the blank keyframes after each button, you disable the user from clicking that button again before it is zoomed in/out:
Your finished Flash design is pretty flexible and could be used in many different ways: a navigation interface for a website, an attention- grabbing presentation, or whatever else you can dream up!
You've seen how easy it is to import graphics from an external 3D program, but it's important to remember that once the objects have been imported into Flash, changing or editing the 3D images becomes very complicated. The crucial point is that when you change one frame, you must change the rest. This might not be that bad on a 10-frame animation, but in our example we were working with an 80 frame animation.
However, a couple of properties that are fairly easy to edit are alpha and color values and the scaling. Changing the opacity or color is particularly easy for mouseovers, as they are not included in the animation. Take a look at the bonus example in this chapter's source file. Open swift3D_FlashExample_mouse.fla and notice the subtle yet effective mouseover animation that we've added: