3D Slice Engine in Action
In the remaining half of this chapter you'll study several implementations of your slice engine. Though the engine has an expansive scope with the potential to produce pseudo-3D effects in many different areas, we have attempted to isolate several main possibilities. The key to achieving optimum results from this 3D engine is first to understand how it works and realize what it is doing, and second to experiment with both layer and tween techniques, as well as the core engine functions.
Sample 1: Building Primitive and Organic Objects
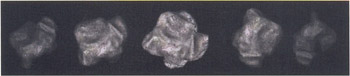
Although we've discussed building a 3D landmass, the engine is not confined to just these object types. As the engine represents objects by slices, you need to manipulate the slices to take advantage of that fact. For instance, if you replace your original landmass tween with a simple square and run the engine, you will notice that there is nothing defining the separate faces of the resulting 3D box. In order to do this, you need to shade the square so that each edge is a slightly different color .
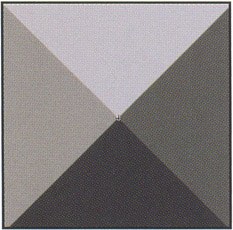
The resulting object looks like this:
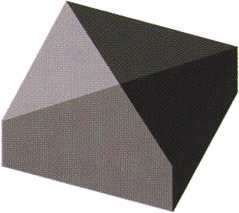
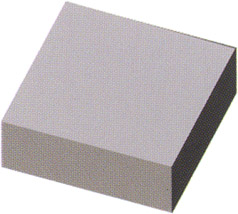
You can now see that each face of the object is beginning to show its own definition. Only the top face of the object still shows the shading of the layers beneath . In order to remove this visible shading, you need to cap the top of your object. To do this, you simply place a keyframe on the final frame of the movie clip, where the last frame is equal to the total number of slices as determined by the sliceNum variable. In this frame, just fill the shape with a solid color. Now that all the slices have shaded edges and the last slice (or top slice) has a solid color, the final object renders as a box.
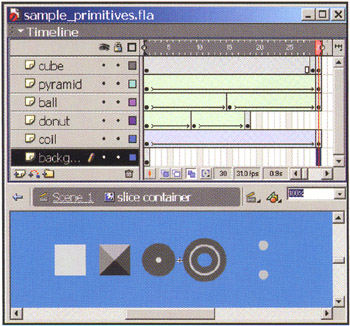
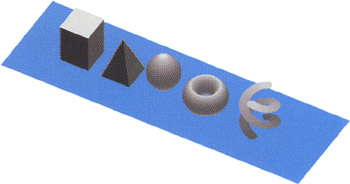
Experiment with different shapes and shading to get different results. For example, take a look at the file sample1_primitives.fla . This file illustrates the way in which motion and shape tweens combined with multiple layers allow you to achieve all sorts of primitive objects. Open the slice container movie clip from the Library (F11) and spend some time examining the structure of its timeline.
It is important to experiment with shapes, tweens, and slices to get a feel for how they all work with each other. You may also find that you can achieve certain effects by making simple changes to the slice container movie clip instead of adjusting the engine code. Make sure to experiment with lines, text, and transparency, but pay attention to how they affect the overall performance.
Note, however, that using shaded shapes and shape tweens can result in undesirable frames . You may have to use shape hints in order to gain better control of the tweened shapes. To execute more organic shapes, it is best to use a combination of shapes, graphics, movie clips, and multiple layers.
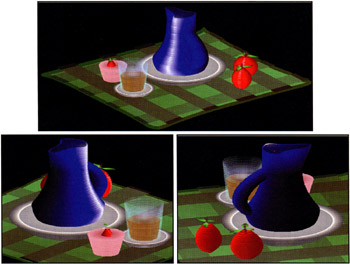
In the more advanced example shown below ( sample1_vase.fla ), you will see that we've used the same core engine to represent a still life of a vase, plate, fruit, and glasses . Using this engine allows you to create pretty much any real-world object you could imagine.
Sample 2: Layer Interactivity
One of the easiest ways of introducing layer interactivity into your objects is to define event handlers that would normally be used for buttons . sample2_layer_interactivity.fla is a good example of how layers can be made interactive. To demonstrate this, let's take the core engine code and add some functions that change the _alpha (opacity) of each slice:
function hideMe() { this._alpha = 0; } function showMe() { this._alpha = 100; } You then add these event handlers to each instance of slice:
for (i=0;i<sliceNum;i++) { base.createEmptyMovieclip("slice"+i,i) ; base["slice"+i].attachMovie("inner","inner"+i,i); base["slice"+i]["inner"+i].gotoAndStop(i+1); base["slice"+i]["inner"+i].onEnterFrame = rotateMe; base["slice"+i].myNum = i; base["slice"+i].onEnterFrame = scaleMe; base["slice"+i].onRollOver = hideMe; base["slice"+i].onDragOver = hideMe; base["slice"+i].onRollOut = showMe; base["slice"+i].onDragOut = showMe; } Whenever the mouse is moved over a slice, whether the mouse is down or not, the event handlers onRollOver and onDragOver trigger the hideMe function. Whenever the mouse is moved out of the slice, the event handlers onRollOut and onDragOut trigger the showMe function. These small additions to the core engine allow for a high level of layer interactivity. As you roll in and out of each slice, the _alpha switches from to 100 , respectively.
Event handlers can be added to the individual slices to facilitate layer and section interactivity and animation. Refer to the file interactive_combo.swf in the SWF_samples directory as an example of how layer interactivity could be integrated into a menu system.
Sample 3: Organic Masks
The true power of this 3D engine is best illustrated through the use of textures. Most Flash 3D techniques that use bitmaps for textures are based around the use of squares and/or triangles as masks for bitmaps. In the following example, you will discover how organic 3D-looking objects can be built through the use of progressive organically shaped masks.
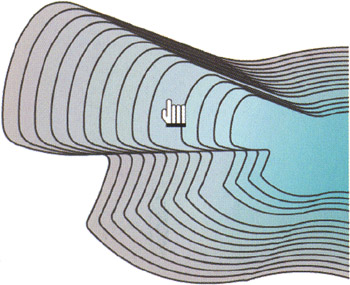
Open sample3_organic_masks.fla and take a look at the slice container movie clip in the Library. Here you'll see that instead of using a series of shapes to define our final object, we are using a series of masks and a single bitmap image. Much like the topographical map metaphor, we are taking elevation contours and, instead of filling them with a color, we are filling them with the raster image that would be visible at each specific elevation.
The following image illustrates the series of contours that are being used as masks and the image that is to be masked by these contours:
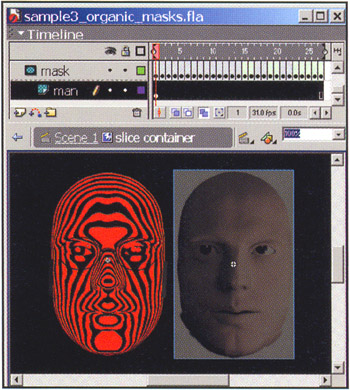
These contours were created by building a model in 3D Studio Max and then animating a plane passing through the object. By making the model solid black in color and the plane self-illuminating white, it is easy to render a series of images that represent the masks. These images were then imported into Flash MX, bitmap traced ( Modify > Trace Bitmap... ), and then cleaned up for use. As ever, it's best to experiment with what tools you have knowledge of and access to, as well as ways of processing the image series once imported into Flash.
An effective way of converting bitmaps to shapes without creating excessive shapes is to use a large color threshold. Bitmap tracing often results in small extraneous shapes around the edges of your main shape. To remove these, simply select and copy the main shape, then select and delete all the shapes and paste the main shape back in place. The main shape can then be optimized' though you must be careful not to alter it too much.
When you view the main engine script in frame 1 of the root timeline sample3_organic_masks.fla , you'll notice that there are some minor changes to the original core code (note that these changes have been made to suit this particular example and are not always required when building organic models):
_quality = "low"; sliceNum = 27; step = 3; scaleFactor = 0.5; rotSpeed = 0.5; offsetX = 200; offsetY = 200; createEmptyMovieClip("base", 0); base._x = offsetX; base._y = offsetY; for (i=0;i<sliceNum;i++) { base.createEmptyMovieClip("slice"+i,i); base["slice" +i].attachMovie("inner","inner"+ i , i); base["slice"+i]["inner"+i].onEnterFrame = function() { this._rotation =_root.rot; } base["slice"+i].myNum = i; base["slice"+i].onEnterFrame = function() { this._y = - this.myNum*_root.step*Math.cos  *(_root.angle*Math.PI/180); this._yscale = Math.sin (_root.angle*Math.PI/180)*100; } } onEnterFrame = function() { rot = (this._xmouse - offsetX)*rotSpeed; angle = (this._ymouse) *scaleFactor; base._rotation = -rot; };
 The variables sliceNum and step are changed to reflect the length of the slice container movie clip and the desired distance between the individual slices. This line from the original code:
this._rotation +=_root.rot;
has now been changed to the following:
this._rotation =_root.rot;
and this line has been added to the onEnterFrame function:
base._rotation = -rot;
These subtle code changes affect the way in which the object rotates. Previously, mouse movement on the x-axis would change the speed in which the object rotated . In this case, it is not the speed of rotation that changes with _ xmouse but simply the amount of rotation. The additional line of code rotates the base object to counteract the, rotation of the base object's content, making the final object remain in a vertical position. Getting a smooth result is dependent on the alignment of your slices relative to the center of the slice container movie clip.
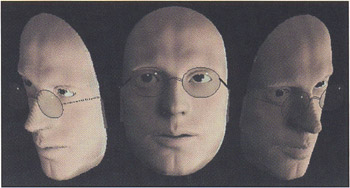
For a bit of fun, try replacing the image used in slice container with a photo of a friend or yourself. Try and make the facial features (eyes, nose, lips, and outline) line up with those of the original image to get a cleaner effect.
Sample 4: Global to Local Object Space
Previously, we discussed building and manipulating objects in global space ”that is, the object sits in a set position and changes according to mouse movement relative to the object and the stage. In this example, we'll discuss how to use the base object and its properties to define the way in which we render its layers.
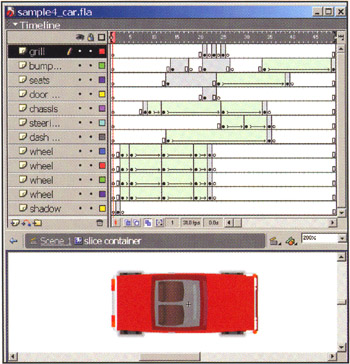
The sample we will be using to illustrate this is a pseudo-3D representation of a car (refer to sample4_car.fla ). This image is practical in the sense that it is fairly small, and therefore relatively CPU-efficient ”it does not require the use of the full 3D space. It could easily be adapted to game engines, and it also facilitates 3D collision detection as well as component animation (tires, indicators, lights, and so on).
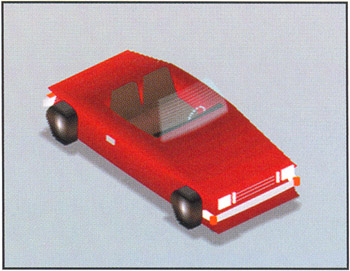
Earlier in this chapter, when you created the original landmass, you first created the base object and attached the slices to it. Previously, you used global mouse positions to control the angle and rotation of the object. In this example, you are going to use the object's position to define its angle and rotation. Though this example allows you to drag the object around the screen and watch it change angle and rotation, the engine is not confined to using just a mouse drag. You can experiment with adding key controls to make the vehicle turn and move forward and backward.
The changes to the original engine code for this example ( sample4_car.fla ) are as follows :
_quality = "low"; sliceNum = 49; step = 1; scaleFactor = 0.2; rotSpeed = 0.5; offsetX = 200; offsetY = 200; createEmptyMovieClip("base", 0); base._x = offsetX; base._y = offsetY; base.onPress = function() { startDrag(this); } base.onRelease = function() { stopDrag(); } onEnterFrame = function() { rot = (base._x)*rotSpeed; angle = (base._y)*scalePactor; }; for (i=0;i<sliceNum;i++) { base.createEmptyMovieClip("slice"+i,i); base["slice"+i].attachMovie("inner","inner"+i,i); base["slice"+i].onEnterFrame = scaleMe; } function rotateMe() { this._rotation =_root.rot; } function scaleMe() { this._y = - this.myNum*_root.step*Math.cos (_root.angle*Math.PI/180); this._yscale = Math.sin (_root.angle*Math.PI/180 ) *100; } The first few changes are pretty self-explanatory and are specific to each different object you build:
sliceNum = 49; step = 1; rotSpeed = 0.5;
More important, the changes to the onEnterFrame function greatly affect the way in which your object reacts to its position on the stage:
onEnterFrame = function() { rot = (base._x)*rotSpeed; angle = (base._y)*scaleFactor; }; Previously, you were using mouse positions to control your angle and rotation. By changing the control mechanism from mouse positions on the stage ( global ) to your object's position ( local ), you can see how the object's rotation and angle relate to its screen position. As the object approaches the bottom of the stage ( base._y ), the viewing angle increases , and as the object approaches the right of the stage ( base._x ), the rotation increases.
Though this is, of course, a simplified example, it outlines the foundation of a car- related game engine. Although it is possible to use the car as a local object and have the race track (or environment) as a global object, it would require an entire chapter to explain the processes required to complete it.
As an exercise, examine the slice container movie clip in sample4_car.fla and pay attention to the way in which movie clips, layers, and tweens are used to build up the object. Try adding features to the vehicle and try taking away features, layers, and slices to optimize the processor requirements.
Sample 5: Dynamic Shading and Blurring
Following on from the global to local example, you are going to look at using local object properties to create dynamic shading. Accordingly, open sample5_meteor.fla . In this example, the object has each slice layer shaded respective to its position on the screen and its order in the stack of layers. The _alpha property is used to shade and blur each layer:
The code is basically the same as the previous vehicle sample, with the addition of some distance calculations and the setting of _alpha for each slice:
_quality = "low"; sliceNum = 19; step = 5; scaleFactor = 0.25; rotSpeed = 0.5; offsetX = 200; offsetY = 200; createEmptyMovieClip("base", 0); base._x = offsetX; base._y = offsetY; base.onPress = function() { startDrag(this); } base.onRelease = function() { stopDrag(); } onEnterFrame = function() { rot = (base._x-offsetX)*rotSpeed; angle = (base._y-offsetY)*scaleFactor + 90; dist = Math.sqrt((base._x - offsetX) * (base._x - offsetX) + (base._y  offsetY) * (base._y - offsetY)); }; for (i=0;i<sliceNum;i++) { base.createEmptyMovieClip("slice"+i, i); base["slice"+i].attachMovie("inner","inner"+i, i); base["slice"+i]["inner"+i].gotoAndStop(i+1); base["slice"+i]["inner"+i].onEnterFrame = rotateMe; base["slice"+i].myNum = i; base["slice"+i].onEnterFrame = scaleMe; } function rotateMe() { this._rotation =_root.rot; } function scaleMe() { this._y = - this.myNum*_root.step*Math.cos X(_root.angle*Math.PI/180); this._yscale = Math.sin (_root.angle*Math.PI/180)*100; this._alpha = 200 - _root.dist - this.myNum * 10; }
 Open the file sample5_meteor .fla and test the movie (CTRL/CMD+ENTER). As with the vehicle example, you are able to move the object about the stage with the mouse. The fundamental difference in this case is that the object progressively fades and blurs as it approaches the edges of the stage. To do this, you must first calculate the distance that the object is from its original positions. At the start of the chapter, you defined the variables offsetX and offsetY as the initial starting coordinates for your object. It is these coordinates that you will use to measure the distance that the object has moved (though you could use any arbitrary point):
dist = Math.sqrt((base._x - offsetX) * (base. _x - offsetX) + (base._y  offsetY) * (base._y - offsetY));
 This is the standard measure of distance (using a little bit of trigonometry again) between the two points ( base._x , base._y ) and ( offsetX , offsetY ).
You then change the _alpha of each layer. It is initially set to 100 , from which you subtract the distance that the object is from its initial coordinate:
this._alpha = 100 - _root.dist * (this.myNum+10)/20;
Note that you want the layers to fade out individually, so you need to make the _alpha of each slice a factor of its unique identifier. The use of the +10 simply increases the range of slices from 1-19 to 11-29 to give a more even distribution of the fade effect. You divide by 20 to reduce the effect of dist combined with the unique identifier. Increasing the number that you divide by will increase the distance at which the object fades.
In this example, you have used _alpha to achieve a fade and slight blur effect. It's also possible to create a fade-only effect by using the color object or to create just a blur effect by using _alpha and placing a solid noneffected layer at the bottom of the slice stack.
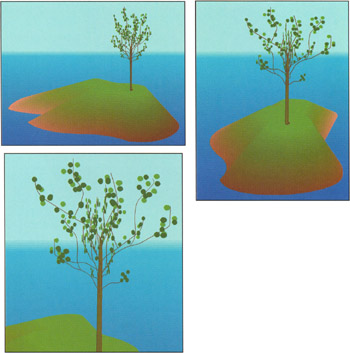
Sample 6: Including Nonlayer Elements
Now that you understand some of the more advanced iterations of the engine, you're ready to examine a way in which you can include additional elements to your object. Nonlayer elements are objects that render as part of the model but do not act like the slices that are used to make the model.
The fact is, we're still exploring the use of nonlayer elements and the different ways to introduce them into the 3D object, so there are currently some restrictions and complications to keep in mind. One of the biggest issues is that your element is best restricted to a point-style object ”that is, the element joins to the 3D object at a single point. Another consideration is that z-order and rotational scale have to be factored into the element and, in doing so, can fundamentally affect the code structure of the core engine.
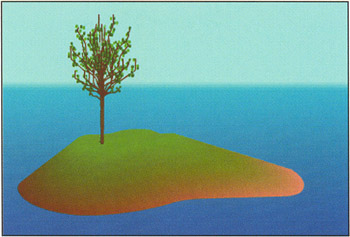
To alleviate some of these complications and to ease your use of nonlayer elements, we are going to discuss the addition of a tree into a landmass object environment. As the landmass is a very organic shape, z-ordering issues (as discussed earlier in this chapter) can be prohibitively complex. So for this example, you are going to add the tree to the top layer of the landmass. (If you choose to explore z-ordering further, we suggest you begin by implementing a z-order fix similar to that required for the rotational z-order mentioned earlier in this chapter.)
Open the file sample6_final.swf and notice the way the tree acts in relation to the landmass and mouse movement:
Now that you've seen what we're talking about, you'll learn how to do it:
-
Open the file sample6_start.fla and go to the Library to edit the slice container movie clip.
-
Create a new layer above the current one and an empty keyframe at frame 30 (to correspond to your uppermost object slice).
-
Into this keyframe, place an instance of the node movie clip (just drag it from the Library) and align it to the desired point above the landmass slice. The node clip is used purely as a point of reference and does not require a name or contents (though in this case it contains a small circle so that you can see it at runtime).
-
With this instance of node still selected, open the Actions panel (F9) and add the following ActionScript:
onClipEvent(enterFrame) { point = new object(); point.x = 0; point.y = 0; localToGlobal(point); _root.myX = point.x; _root.myY = point.y; updateAfterEvent(); }This code is a good example of using localToGlobal(). For those unfamiliar with this useful method, we are creating an object at 0,0 (relative to node ), and then converting it from node coordinates (local) to the stage coordinates (global).
If you test the movie and trace or debug the point object, you will see that node moves relative to the slice object and that point.x and point.y show coordinates relative to the top right of the stage.
-
Now that you have globalized your point coordinates, you can concentrate on adding the element. Drag an instance of the tree movie clip onto the stage. You need to make this movie clip sit in front of the landmass, so you attach the following code to it to force the clip to a depth of 100 (an arbitrary number that is higher than the number of slices in your slice object):
onClipEvent(load) { this.swapDepths(100); } -
Next , you need to make the object conform to the (global) coordinates of node . Extend the code as follows:
onClipEvent(load) { this.swapDepths(100); } onC1ipEvent(enterFrame) { this._x = _root.myX; this._y = _root.myY; } -
At this point, test the movie with (CTRL/CMD+ENTER) and you'll see that the tree does not rotate in relation to the rotation of the landmass slices. In some cases this may be desirable, but in this case it is not. You can solve this problem with a little bit of trigonometry again, but before you do so, you need to work out the rotation of the landmass. In the core engine code, you calculate the rotation increment for each frame as the variable rot . Thus, you need to use rot to calculate the accumulative rotation like so:
onClipEvent(load) { this.swapDepths(100); } onClipEvent(enterFrame) { this._x = _root.myX; this._y = _root.myY; tempRot +=_root.rot; } -
Additionally, you need to add a little bit of trig to scale the tree clip depending on the landmass rotation:
onClipEvent(load) { this.swapDepths(100); } onClipEvent(enterFrame) { this._x = _root.myX; this._y = _root.myY; tempRot +=_root.rot; this._xscale = Math.sin(tempRot*Math.PI/180) *100; }This calculation is fundamentally the same as the trig required for the landmass slice scaling, as discussed in the start of the chapter, only in this case it is applied to the _xscale of the object.
-
So you have successfully created an object that follows a point and scales relative to the landmass rotation. The only problem now is that the object gets thin when it reaches the x-coordinate extremities of the landmass.
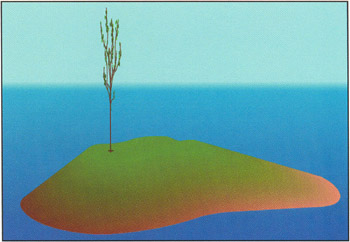
A simple yet effective solution is to place another movie clip at the same location as the original object one, but to make it appear perpendicular to the original object. Drag a copy of the tree2 movie clip onto the stage and place it next to the instance of tree . Copy the code from tree , place it on tree2 , and make the following changes:
onClipEvent(load) { this.swapDepths( 101 ); } onClipEvent(enterFrame) { this._x = _root.myX; this._y = _root.myY; tempRot +=_root.rot; this._xscale = Math. cos (tempRot*Math.PI/180)*100; }All you have done here is change the z-order to 101 so as to not conflict with the z-order of tree , and you've changed the trig equation from sin to cos in order for the two movie clips to appear at right angles to each other. Play around with the finished movie ( sample6_final.swf ) to see your 3D tree in all its glory !