Changing the Plane of Focus
In the examples of the previous section, you were essentially moving a single character toward the plane of focus. In this section, you will work with several characters and shift the plane of focus between them. You'll use bitmaps with prerendered blurs, but you could easily combine the techniques in this example with the blurring technique you used in the last example.
-
You'll find this example in the chapter's source files as focus5.fla . As usual, create a new movie by pressing CTRL/CMD+N. The first thing you must do here is import four source images. You can do this by selecting File > Import (CTRL/CMD+R) and then browsing to find your required images.
-
First, import the background images:
-
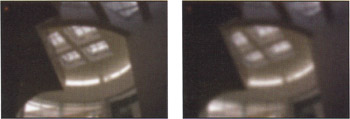
focus5_bg_clear.jpg - The sharper of the two background images (below left)
-
focus5_bg_blurred.jpg - The out-of-focus version of the background image (below right)
-
-
Next, import the foreground images:
-
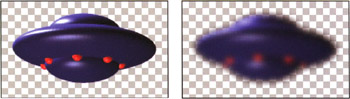
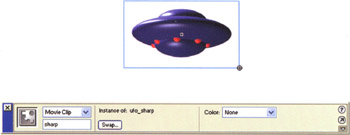
focus5_ufo_clear.png - The sharp version of the UFO (below left)
-
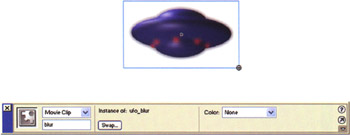
focus5_ufo_blurred.png - The blurry version of the UFO (below right)
-
It's worth noting at this point that the sharper background image isn't nearly as sharp as the sharper foreground image. In this example, you will only focus on the foreground objects. Thus, the background will never really be completely in focus.
-
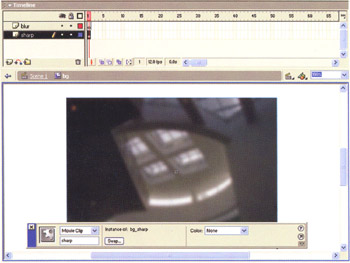
Convert each image to a movie clip (F8) and name them bg_sharp, bg_blurry, ufo_sharp , and ufo_blurry , respectively.
-
Select Insert > New Symbol... (CTRL/CMD+F8) and create a new movie clip named background .
-
In the background movie clip, create an additional layer and then select the bottom layer. Drag the bg_sharp image from the Library window (F11) onto the stage. Name this instance sharp in the Property Inspector.
-
Select the top layer and drag the bg_blur symbol from the Library (F11) onto the stage. Name this instance blur in the Property Inspector. Make sure that both the sharp and blur movie clips are centered on the stage. If they aren't in the exact same position, there will be an unnatural shift when the effect occurs.
-
Now go back to the main timeline, select Insert > New Symbol... , and name the symbol ufo .
-
In the ufo movie clip, create an additional layer and then select the bottom layer. Drag the ufo_sharp image from the Library onto the stage and give it an instance name of sharp .
-
Now drag the ufo_blur symbol from the Library onto the top layer and name it blur . Again, remember to center both the sharp and blur movie clips on the stage.
-
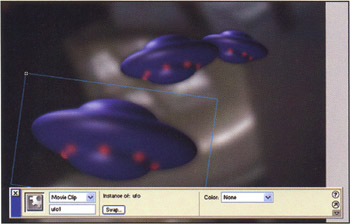
Return to the main timeline and drag one instance of the bg movie clip to the scene and three instances of the ufo movie clip to the scene from the Library window ( Window > Library ). Name the instances of these movies background, ufo1, ufo2 , and ufo3 .
-
The primary motivation in this effect is making the characters closer to the plane of focus sharp and those farther away from this plane less sharp. You will accomplish this with some ActionScript. On the main timeline, select frame 1 of the first layer. Then open the Actions panel ( Window > Actions or F9) and insert the following code:
function set_depth(movie, movie_depth, radius, current_depth) { // x is the distance between the current depth and this object's depth. x = current_depth-movie_depth; blur_amount = Math.min(100, Math.max(0, Math.abs((- 100/radius)* x ), 100)); if (x<=0) { sharp_amount = (100/(.5*radius))*x+150/.5; } else if (x>=0) { sharp_amount = (-100/(.5*radius))*x+150/.5; } sharp_amount = Math.min(Math.max(0, sharp_amount), 100); movie.blur._alpha = blur_amount; movie.sharp._alpha = sharp_amount; }
Here, blur_amount decreases as x (the distance between the current depth and the depth of the object) tends toward . When x is equal to radius , it achieves its maximum value of 100 . The sharp_amount has a value of 100 when x is less than radius and tends toward as you leave the radius. It is exactly when x=1.5*radius. In this way, the sharp and blur movie clips make their transitions in two phases: blur fades in as x changes from to radius , and sharp fades out as x changes from radius to 1.5*radius .
If you had simply faded blur in as you faded sharp out, the _alpha value of each movie would be 50% at the midpoint of the transition and you would be able to see through them. When two objects at 50% opacity overlap, you might think that together they will be completely opaque . Color is actually computed according to this formula:
color = background*(1-alpha) + foreground*alpha
So, if the background color is black ( ), the foreground color is white ( 1 ), and alpha is 50%, then 0+1*0.5 = 0.5, or 50% white, which is what you would expect. If you apply this operation again with another white layer at 50% opacity, you find 0.5*0.5+1*0.5=0.75 , or 75% white and not 100% white.
If the background had been a solid color, perhaps 75% opacity would be good enough, but it would look odd if you could see the background through the UFO in this particular example.
-
You'll continue your script with the evaluate_depth function:
function evaluate_depth() { current_depth = depth_scroll.getScrollPosition(); set_depth(ufo1, 0, 30, current_depth); set_depth(ufo2, 50, 30, current_depth); set_depth(ufo3, 100, 30, current_depth); set_depth(bg, 100, 50, current_depth); }
What you are doing here is making the blur instance of each character have less alpha value as you approach that character. The sharp instance of each character has more alpha value as you approach it. We have written the set_depth function in such a way that the sharp transition and the blur transition do not overlap. Instead, it happens in stages. First we change the sharp symbol and then we change the blur symbol. If we changed the alpha value of the sharp and blur symbols at the same time, you would be able to see through them as they changed.
If you weren't interested in making this example interactive, you could do this example manually on the timeline using a transition as described to get the same effect.
In the evaluate_depth() function, each character is assigned a different depth. An object at depth is closest to the observer, and an object at depth 100 is farthest. Each time set_depth() is called with a different current depth, the alpha values of the blur and sharp instances in the corresponding movie are adjusted.
-
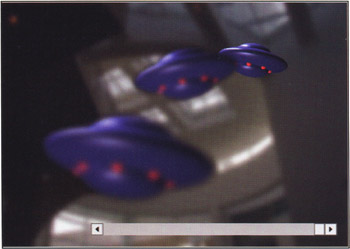
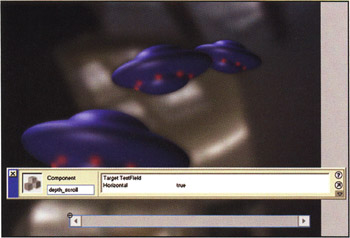
You've completed the core functionality of this piece, but nothing will happen if you run the movie at this point, because there is no way to change the current depth. You need to add some mechanism to play with the depth values. Let's add a ScrollBar component to the movie. When you drag the ScrollBar from the Components panel ( Window > Components or CTRL/CMD+F7) onto the stage, it will automatically try to snap to the nearest movie. In this particular case, such behavior is undesirable. To make working with the ScrollBar easier, create a new layer and lock the other layers before you drag the ScrollBar onto the stage. Once it's on the stage, set the instance name to depth_scroll and set the Horizontal attribute to true in the Property Inspector.
-
Now you need to add the final few lines of code to your chunk of ActionScript that sets the ChangeHandler of your depth_scroll ScrollBar to your evaluate_depth function defined earlier. This will give you complete control of the focus of your UFO movie:
depth_scroll.setScrollProperties(5, 0, 100); depth_scroll.setChangeHandler("evaluate_depth"); evaluate_depth(); -
Finally, test the movie (CTRL/CMD+ENTER) and use the ScrollBar to alter the plane of focus.