Part II: Creating the Home Page
In this part, you will create a home page for the catalog. Before you begin, however, you need to add some graphics files to your site.
Step 1
If you don't already have the Catalog web open in Visual InterDev, open it now. On the FileView tab, click the IMAGES directory and then choose Add To Project/Files from the Project menu. Add the project images from the \CODE\CHAP07\CATALOG\ IMAGES directory.
Step 2
Choose New from the File menu. When the New dialog box appears, click the Files tab and select HTML Page. In the File Name text box, type default.htm, and click OK. Visual InterDev will automatically add a new Web page to your site.
Step 3
Right-click the file DEFAULT.HTM in the project window. Choose Open With from the pop-up menu. In the Open With dialog box, open the file with Microsoft FrontPage Editor (Visual InterDev Edition).
In FrontPage, choose Background from the Format menu. In the Page Properties dialog box, specify white as the background color for the page and click OK.
To insert a page banner into the document, choose Image from the Insert menu. In the Image dialog box, add the new image by specifying its location. Use the following virtual directory:
/CATALOG/IMAGES/BANNER.JPG
Hit the return key once to start a new line, and insert a horizontal rule by choosing Horizontal Line from the Insert menu. Save your page in FrontPage, and return to Visual InterDev.
Step 4
In the following steps, you will use the Advanced Data Control (ADC) to build a list of product categories. The categories are kept in the database, so changes to the database will automatically update the Web page.
To begin, open DEFAULT.HTM in the text editor in Visual InterDev. In DEFAULT.HTM, locate the horizontal rule (<HR>) tag that you inserted in FrontPage. Make some space below this tag, and add the ADC to the page by inserting the following code:
<!-- The Advanced Data Control --> <OBJECT ID="datCategories" HEIGHT=10 WIDTH=10 CLASSID="clsid:BD96C556-65A3-11D0-983A-00C04FC29E33"> <PARAM NAME="SQL" VALUE="SELECT * FROM Categories"> <PARAM NAME="SERVER" VALUE=[your site name]> <PARAM NAME="CONNECT" VALUE="DSN=HomePage"> </OBJECT>
WARNING: The CLASSID attribute might be different for your version of the Advanced Data Control. Check it carefully.
Step 5
Once the ADC is added, you can use it to retrieve category names, which will be placed in a special division of the Web page reserved only for categories. Create this division with the <DIV> tag. Add the following code to the BODY section of DEFAULT.HTM, just below the <OBJECT> tag that you added for the ADC:
<!-- The category list is built in this division --> <SPAN ID="divCategories" STYLE="position:absolute;left:50;top:200;width:300;height:300;"> </SPAN>
Step 6
The category division will be populated in the Window_OnLoad event handler. In the code's HEAD section, create a SCRIPT section and add code for the Window_OnLoad event. Create a Range object that points to the <SPAN> tag where the categories should be inserted. Then use the PasteHTML method of the Range object to paste records from the database into the division. Here is the code:
<SCRIPT LANGUAGE="VBScript"> <!-- Sub Window_OnLoad ` ** Create the product categories ** ` Variables Dim rngCategories Dim objRecordset Dim strID Dim strCategory Dim strStyle ` Create the Range object for ` adding new categories Set rngCategories = Document.Body.CreateTextRange() rngCategories.MoveToElementText(divCategories) If rngCategories.Text <> "" Then Exit Sub ` Add the categories to the Range object Set objRecordset = datCategories.Recordset objRecordset.MoveFirst Do While Not objRecordset.EOF ` Get category name and ID strCategory = objRecordset("CategoryName") strID = objRecordset("CategoryID")MMM ` Paste in new HTML strStyle = "STYLE=font-style:normal; " & _ "background-color:transparent; font-size:20;>" rngCategories.PasteHTML _ "<P><FONT " & "ID='Category" & Trim(strID) & _ "` FACE=Verdana COLOR=Blue " & strStyle _ & strCategory & "</FONT></P>" ` Move to next record objRecordset.MoveNext Loop End Sub --> </SCRIPT> Step 7
Save the page, and preview it to verify that the categories are visible. Your page should look like the one shown in Figure 7-7.
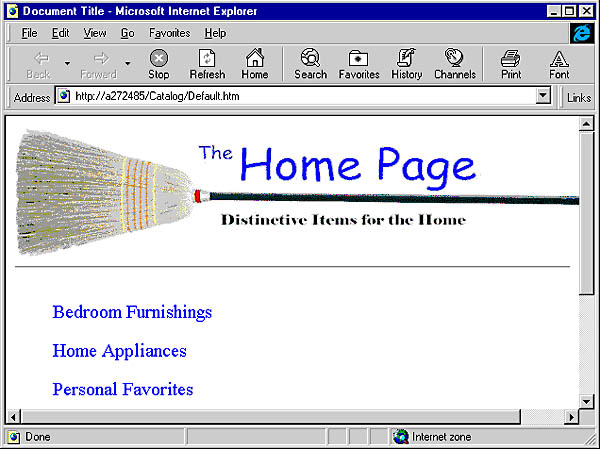
Figure 7-7. Displaying categories.
Step 8
Now that you have the categories listed, you will want to display a description of each category when the mouse passes over its name. In order to accomplish this, create a second division in the page and write the category descriptions as hidden HTML text in the new division. Use Dynamic HTML to display a description when the mouse passes over its category title.
Begin by adding the following division below the first division:
<!-- The category descriptions are shown here --> <SPAN ID="divDescriptions" STYLE="position:absolute;left:350;top:200;width:300;height:300;"> </SPAN>
Because the category descriptions are part of the database, you must add them to the new division dynamically at run time. The descriptions are added in the same manner as the category names—by using a Range object. Add the following code to the Window_OnLoad event, after the code that generates the category listings:
` ** Create the category descriptions ** ' Variables Dim rngDescriptions Dim strDescription ' Create the style strStyle = "STYLE=position:container; left:0; top:0; " & _ "visibility:hidden; font-size:16;" ' Create the Range object Set rngDescriptions = Document.Body.CreateTextRange() rngDescriptions.MoveToElementText(divDescriptions) If rngDescriptions.Text <> "" Then Exit Sub ' Add the descriptions to the division objRecordset.MoveFirst Do While Not objRecordset.EOF ` Get description and ID strDescription = objRecordset("CategoryDescription") strID = objRecordset("CategoryID") ` Paste in new HTML rngDescriptions.PasteHTML _ "<P><FONT FACE='Viner Hand ITC' COLOR=Purple ID='Text" _ & Trim(strID) & "` " & strStyle & ">" & strDescription _ & "</FONT></P>" `Move to next record objRecordset.MoveNext Loop Step 9
When the descriptions are added to the page, they are invisible. The Visibility argument of the STYLE attribute is set to hidden. You will use the OnMouseOver and OnMouseOut events to display each description at the appropriate time—that is, when the mouse passes over its catalog name. Place the event handlers in the same SCRIPT section you used for the Window_OnLoad event, and write them at the SPAN level, which will trap all events from the items in the division. When the OnMouseOver or OnMouseOut event of the division fires, the SrcElement property will determine exactly which category received the event and will fire the transition to show the text:
Sub divCategories_OnMouseOver() ` Mouse passes over a category Dim objEvent Dim strTarget On Error Resume Next ` Get the target element Set objEvent = Window.Event strTarget = objEvent.SrcElement.ID If strTarget <> "divCategories" Then ` Change the category attributes objEvent.SrcElement.Style.FontStyle = "italic" objEvent.SrcElement.Color = "Black" ` Show the category description Select Case strTarget Case "Category1" Text1.Style.Visibility = "visible" Case "Category2" Text2.Style.Visibility = "visible" Case "Category3" Text3.Style.Visibility = "visible" Case "Category4" Text4.Style.Visibility = "visible" End Select End If End Sub Sub divCategories_OnMouseOut() ` Mouse leaves a category Dim objEvent Dim strTarget On Error Resume Next ` Get the target element Set objEvent = Window.Event strTarget = objEvent.SrcElement.ID If strTarget <> "divCategories" Then ` Change the category to normal objEvent.SrcElement.Style.FontStyle = "normal" objEvent.SrcElement.Color = "Blue" ` Hide the description Select Case strTarget Case "Category1" Text1.Style.Visibility = "hidden" Case "Category2" Text2.Style.Visibility = "hidden" Case "Category3" Text3.Style.Visibility = "hidden" Case "Category4" Text4.Style.Visibility = "hidden" End Select End If End Sub
Step 10
Save your work, and view the page in Internet Explorer. You should now see the categories and descriptions. The result should look like the page shown in Figure 7-8.
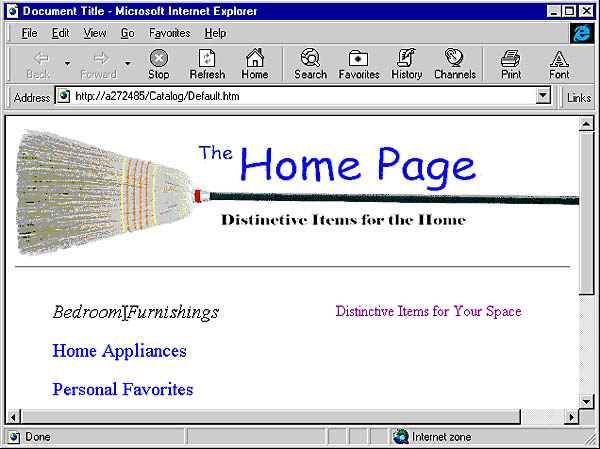
Figure 7-8. Displaying category descriptions.
EAN: 2147483647
Pages: 84