Cascading Style Sheets
Cascading style sheets are an important part of Web development and have expanded significance in the world of Dynamic HTML. Cascading style sheets specify the layout of a Web page in a format that is separate from the actual Web page content. Separating the style from the content makes a Web site easier to maintain. In Dynamic HTML, style sheets can also be changed dynamically, allowing for special effects such as dynamic styles and dynamic layouts.
Style sheets came into use with the release of Internet Explorer 3.0. Under IE 3.0, developers of Web content could specify additional formatting such as font size and color for various portions of a page and could factor out the styles for easier maintenance of the site. Style sheets are described as cascading because they can be implemented at different levels of the content and can override styles defined at higher levels. You can choose to implement styles in one of three ways: linked style sheets, embedded styles, and inline styles.
Linked Style Sheets
Linked style sheets are the most global of all style sheet implementations. In this scenario, you can define a style sheet as a separate document and link its style to one or more Web pages. This provides a way of setting up a thematic style for your site—one that is inherited by all pages.
Linked style sheets are constructed as plain text in a file with a CSS extension. In the CSS file, you must provide one or more style definitions, which are used to format the linked page. A style definition is an HTML tag accompanied by a list of tag attributes in curly braces. Each attribute is named and followed by a colon and the attribute's value. Multiple attributes can be specified by using a semicolon to separate the attribute/value pairs. The following code defines a style for the <H1> tag:
H1 {font-size: 20pt; color: red} You can specify as many tags as you want in one style sheet and then link them to a Web page. Linking to a Web page is accomplished by using the <LINK> tag, which is placed directly in the page where the styles are to be applied. The tag is placed in the HEAD section so that it's available before the page is rendered. As an example, suppose you have a style sheet named MYSTYLE.CSS and you want to link it to a Web page. In the HEAD section of the page, you use the following HTML:
<LINK REL=STYLESHEET HREF="MYSTYLE.CSS">
The HREF attribute of the <LINK> tag points to the URL where the style sheet can be found. The definitions provided in the style sheet are then applied universally throughout the Web page. If you want to change the styles in all of the linked Web pages, you have only to change the definitions in the style sheet. Listing 4-4 shows a typical style sheet.
Listing 4-4. A partial style sheet.
BODY { margin-left:50px; font:9pt/11pt "Arial"; color:black; text-align:left; background:transparent; } P { margin-left:0px; font:9pt/11pt "Arial"; color:black; } H1 { margin-left:0px; font:18pt/18pt "Times New Roman"; color:black; font-weight:bold; }
Embedded Styles
In addition to linking a Web page to a style sheet, you can choose to embed styles directly in the page's HTML. Embedded styles are created using the <STYLE> tag. In the tag, style definitions are coded in the same format as in the linked style sheet:
<STYLE> <!-- H1 {font-size:20pt; color:red} --> </STYLE> The styles applied in the embedded section will override any styles defined in a linked style sheet. Notice also that embedded styles use HTML comment marks (<!-- -->) to hide the style definitions from old browsers that do not recognize the <STYLE> tag. (Hiding code is a common practice when new tags are involved. The technique is used with the <SCRIPT> tag, for example, to hide script code from old browsers.) Listing 4-5 provides complete code for a Web page with embedded styles.
Listing 4-5. Embedded styles.
<HTML> <HEAD> <META NAME="GENERATOR" Content="Microsoft Developer Studio"> <META HTTP-EQUIV="Content-Type" content="text/html; charset=iso-8859-1"> <TITLE>Embedded Styles</TITLE> <STYLE TYPE="text/css"> <!-- BODY {font:10pt "Arial"} H1 {font:15pt/17pt "Stencil"} P {font:10pt "Arial"} --> </STYLE> </HEAD> <BODY> <H1>This is the H1 style</H1> <P>This is the P style</P> </BODY> </HTML>
Inline Styles
If you want to define styles for a particular tag or to override styles created by linked or embedded styles, you can use inline styles. Inline styles are created by using the STYLE attribute of a tag. This attribute and its values are placed directly in the tag:
<H1 STYLE="font-size:20pt; color:red">Welcome!</H1>
Inline styles allow changes to an individual tag, embedded styles affect a whole page, and linked style sheets can be applied to the site. But what if you need to change just one section of a Web page? The answer is to use the <DIV> tag to define a division in the page. A division in a Web page is similar to a section in any Microsoft Word document: it's used to specify that part of the document be treated as one unit. The <DIV> tag allows you to specify styles that apply to only a section of the page. Listing 4-6 contains sample code for styles in a division.
Listing 4-6. Styles in a division.
<HTML> <HEAD> <META NAME="GENERATOR" Content="Microsoft Developer Studio"> <META HTTP-EQUIV="Content-Type" content="text/html; charset=iso-8859-1"> <TITLE>A Division in a Web Page</TITLE> </HEAD> <BODY> This line is outside the division <DIV STYLE="font-size:18pt; color:red"> This line is inside the division </DIV> This line is outside the division </BODY> </HTML>
Style Definition Techniques
Style sheets can be implemented through several coding techniques that simplify the use of styles. One technique for declaring styles is to use a style class, a predefined style that can be applied at the tag level. A style class is defined in a manner similar to a regular style, but you can name the style. The following code creates three style classes—Normal, Military, and Fancy—for the <H1> tag:
<STYLE> <!-- H1.Normal {font-size:12pt; font-family:arial;} H1.Military {font-size:20pt; font-family:stencil} H1.Fancy {font-size:14pt; font-family:courier; font-style:italic} --> </STYLE> Using the style class becomes a matter of invoking the class name through the CLASS attribute of a tag. The style class works as if you had defined the complete style for the class in the STYLE attribute of the affected tag. The following code shows a style class applied to an individual tag as well as to a division in the page:
<H1 CLASS=Military>This is the Military class</H1>
Another technique available for style definition is to use a style group, a set of tags that share similar styles and are grouped together for easy definition. For example, suppose you want to share similar styles across all of your header tags. The following code simplifies the definitions:
H1 H2 H3 H4 H5 H6 H7 {font-family:arial} A complete style reference for Internet Explorer 4.0 is included on the CD-ROM that accompanies this book.
Dynamic Styles
Styles play a vital role not only in standard HTML but in Dynamic HTML as well. In Dynamic HTML, all styles in the Document object are available as Style objects. Style objects can be manipulated through VBScript code, resulting in comprehensive changes to a page while requiring less code. These manipulations are known as dynamic styles.
Dynamic styles can be coded at the same levels that styles are applied—through linking, embedding, and inline styles—and can be used for everything, from allowing users to customize Web pages to adding subtle effects when the mouse passes over key text. You can manipulate styles across an entire page by dynamically changing the style sheet that is linked to the page. As an example, let's customize a feedback form for using two different style sheets. Listing 4-7 shows the complete feedback form and customization script. The style sheets offer a choice between a red theme and a blue theme. The style can be set dynamically at run time, but initially the page is linked to the blue theme:
<LINK ID="LinkStyle" REL=STYLESHEET HREF="BLUE.CSS">
Notice that the <LINK> tag has an ID attribute so that it can be addressed in code later. On the page, two option buttons allow the selection of a red or blue theme. These are standard HTML option buttons in a form. When an option is checked, the selected theme is sent to a VBScript routine, which changes the linked style sheet by addressing the <LINK> tag through its ID attribute.
Listing 4-7. Changing a style sheet dynamically.
<HTML> <HEAD> <TITLE>Feedback Form</TITLE> <LINK ID="LinkStyle" REL=STYLESHEET HREF="BLUE.CSS"> <SCRIPT LANGUAGE="VBScript"> <!-- Sub ChangeStyle(strStyle) LinkStyle.HRef = strStyle & ".CSS" End Sub --> </SCRIPT> </HEAD> <BODY> <H1>Feedback Form</H1> <HR> <!-- This form changes the page style --> <H2>Pick a page style!</H2> <FORM NAME="frmStyle"> <INPUT TYPE="RADIO" NAME="optStyle" OnClick="ChangeStyle('BLUE')"CHECKED>Blue Style<P> <INPUT TYPE="RADIO" NAME="optStyle" OnClick="ChangeStyle('RED')">Red Style<P> </FORM> <!-- The rest of the HTML is just for the Web page content --> <P> Tell us what you think about our Web site, our products, our organization, or anything else that comes to mind. We welcome all of your comments and suggestions. </P> <FORM> <P><STRONG> What kind of comment would you like to send? </STRONG></P> <DL><DD> <INPUT TYPE="radio" NAME="MessageType" VALUE="Complaint">Complaint <INPUT TYPE="radio" NAME="MessageType" VALUE="Problem">Problem <INPUT TYPE="radio" CHECKED NAME="MessageType" VALUE="Suggestion">Suggestion <INPUT TYPE="radio" NAME="MessageType" VALUE="Praise">Praise </DD></DL> <P><STRONG> What about us do you want to comment on? </STRONG></P> <DL><DD> <SELECT NAME="Subject" SIZE="1"> <OPTION SELECTED>Web Site</OPTION> <OPTION>Company</OPTION> <OPTION>Products</OPTION> <OPTION>Store</OPTION> <OPTION>Employee</OPTION> <OPTION>(Other)</OPTION> </SELECT> Other: <INPUT TYPE="text" SIZE="26" MAXLENGTH="256" NAME="SubjectOther"> </DD></DL> <P><STRONG> Enter your comments in the space provided below: </STRONG></P> <DL><DD> <TEXTAREA NAME="Comments" ROWS="5" COLS="42"> </TEXTAREA> </DD></DL> <P><STRONG> Tell us how to get in touch with you: </STRONG></P> <DL><DD><PRE> Name <INPUT TYPE="text" SIZE="35" MAXLENGTH="256" NAME="UserName"> E-mail <INPUT TYPE="text" SIZE="35" MAXLENGTH="256" NAME="UserEmail"> Tel <INPUT TYPE="text" SIZE="35" MAXLENGTH="256" NAME="UserTel"> FAX <INPUT TYPE="text" SIZE="35" MAXLENGTH="256" NAME="UserFAX"> </PRE></DD></DL> <DL><DD> <INPUT TYPE="checkbox" NAME="ContactRequested" VALUE="ContactRequested">Please contact me as soon as possible regarding this matter. </DD></DL> <P> <INPUT TYPE="submit" VALUE="Submit Comments"> <INPUT TYPE="reset" VALUE="Clear Form"> </P> </FORM> <HR> <H5> New Technology Solutions, Incorporated<BR> Copyright © 1997. All rights reserved.<BR> </H5> </BODY> </HTML> Changing styles globally is useful for personalizing a site, but dynamic style changes on a smaller scale can be useful for achieving limited effects with very little code. Consider the code in Listing 4-8, which displays text that changes color when the mouse passes over it. This example uses style classes to simplify the coding. The classes are defined independently of any particular tag by using a dot before the class name in an embedded style block. Defining generic classes in this way allows easy reuse of common functionality such as color change.
Listing 4-8. Dynamic styles with classes.
<HTML> <HEAD> <META NAME="GENERATOR" Content="Microsoft Developer Studio"> <META HTTP-EQUIV="Content-Type" content="text/html; charset=iso-8859-1"> <TITLE>Embedded Styles</TITLE> <STYLE> <!-- .Red {color:red} .Blue {color:blue} --> </STYLE> </HEAD> <BODY> <SCRIPT LANGUAGE="VBScript"> <!-- Sub eleH2_OnMouseOver() Dim header Set header = Window.Event.SrcElement header.ClassName = "Red" End Sub Sub eleH2_OnMouseOut() Dim header Set header = Window.Event.SrcElement header.ClassName = "Blue" End Sub --> </SCRIPT> <H2 CLASS="Blue" ID="eleH2"> Visit the VB Bootcamp! </H2> </BODY> </HTML> Dynamic Layouts
Perhaps the most powerful use of style sheets in Internet Explorer 4.0 is the creation of dynamic layouts, a capability new in version 4.0. Style sheets implemented in IE 3.0 do not support layouts. In fact, in version 3.0, layouts are done without style sheets by using a special ActiveX control known as the HTML Layout control. The HTML Layout control is an invisible ActiveX control that sits on top of a Web page and acts as a container for other ActiveX controls. You actually position the other ActiveX controls inside the HTML Layout control. This technique is limiting, however, because it relies on the use of ActiveX controls for placement of elements and does not work directly with the HTML in the page. Consequently, the HTML Layout control does not blend well with the page's existing HTML. In order to create layouts, you often need to mimic regular HTML characteristics in ActiveX label controls, which requires more work to implement. Additionally, ActiveX controls must be downloaded to the client and can take significantly longer to render in the browser than does plain HTML.
Dynamic layouts with cascading style sheets eliminate the problems presented by the HTML Layout control. Dynamic layouts allow complete integration with existing HTML and do not require the download of any ActiveX controls. Therefore, dynamic layouts are faster and easier to maintain than equivalent Web pages created with the HTML Layout control.
Like dynamic styles, dynamic layouts are created through Style objects. The difference is that dynamic layouts take advantage of new additions to the cascading style sheet specification utilized by IE 4.0. These new style parameters—top, left, height, width, and z-index—allow complete control of the X, Y, Z placement of various elements on the page.
Elements on the Web page can be positioned in one of three modes: static, relative, and absolute. Static positions are unaffected by the top and left style parameters; these elements are simply positioned by the browser as if no position style were assigned. Relative positions reflect top and left alignment relative to the existing static content on the page. Absolute positions use the top and left parameters for positioning by pixel, regardless of the existing content on the page. As the author of the Web page, you can specify any of these positioning schemes. The code in Listing 4-9 positions three images on a Web page: one image is positioned statically, one relatively, and one absolutely. Note that in the code each image is assigned the same top parameter for the style, but the results are decidedly different, as you can see in Figure 4-1, also on the following page.
Listing 4-9. Static, relative, and absolute positions.
<HTML> <HEAD> <META NAME="GENERATOR" Content="Microsoft Developer Studio"> <META HTTP-EQUIV="Content-Type" content="text/html; charset=iso-8859-1"> <TITLE>Position Types</TITLE> </HEAD> <BODY> <!-- These images show how each position type affects the display of HTML elements --> <IMG SRC="STATIC.GIF" STYLE="position:static; top:100px"><P> <IMG SRC="ABSOLUTE.GIF" STYLE="position:absolute; top:100px"> <IMG SRC="RELATIVE.GIF" STYLE="position:relative; top:100px"> </BODY> </HTML>

Figure 4-1. Static, relative, and absolute positions.
Using absolute positioning, you can easily create dynamic pages that are not limited to rigidly defined rectangular sections of the page. For example, Listing 4-10 creates an animated page with dynamic styles—in this case, a simple home page for an online floral shop. The home page, shown in Figure 4-2 , displays a butterfly and a flower. The butterfly, which flaps its wings, is actually an animated GIF file. This is another appealing feature of styles with <IMG> tags: you don't have to manage the animation frames if you use animated GIFs. Animating the butterfly is a matter of changing the STYLE attribute of the <IMG> tag governing the animated GIF. This is done through periodic calls to the Fly function. Fly tracks the current top and left parameters for the style and adjusts them accordingly. The animation is controlled through the SetTimeout method, which eliminates the need to download an ActiveX Timer control.
As a background, the page uses a flower centered in the browser. Centering the image is accomplished by retrieving the browser's horizontal and vertical screen resolution, which is accessed through the Screen object. The following code repositions the flower image in the Window_OnLoad event handler:
Listing 4-10. An animated home page.
' Center the flower imgFlower.Style.Top = _ Int((Window.Screen.Height - 412) / 2) imgFlower.Style.Left = _ Int((Window.Screen.Width - 384) / 2) <HTML> <HEAD> <META NAME="GENERATOR" Content="Microsoft Developer Studio"> <META HTTP-EQUIV="Content-Type" content="text/html; charset=iso-8859-1"> <TITLE>Virtual Florist</TITLE> <SCRIPT LANGUAGE="VBScript"> <!-- Public intTimeout Public intX Public intY Sub Window_OnLoad() ' Center the flower imgFlower.Style.Top = _ Int((Window.Screen.Height - 412) / 2) imgFlower.Style.Left = _ Int((Window.Screen.Width - 384) / 2) ' Position the butterfly intY = Window.Screen.Height - 77 intX = 77 imgBFly.Style.Top = intY imgBFly.Style.Left = intX ' Begin the animation intTimeout = Window.SetTimeout("Fly", 750) End Sub Sub Fly() ' Get new coordinates intX = intX + 37 intY = intY - 37 If intX > Window.Screen.Width - 77 Then intX = 77 If intY < 0 Then intY = Window.Screen.Height - 77 ' Position the image imgBFly.Style.Left = intX imgBFly.Style.Top = intY ' Reset the timeout intTimeout = Window.SetTimeout("Fly", 750) End Sub --> </SCRIPT> </HEAD> <BODY> <CENTER><H1 STYLE="font:arial bold 20; color:blue"> Welcome to the Virtual Florist! </H1></CENTER> <IMG ID="imgFlower" SRC="FLOWER.GIF" STYLE="position:absolute; width:384px; height:412px"> <IMG ID="imgBFly" SRC="ANIMATED_BFLY.GIF" STYLE="position:absolute; width:77px; height:77px"> </BODY> </HTML> 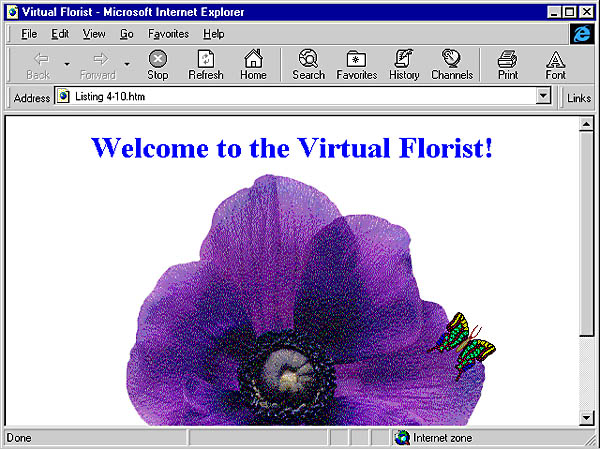
Figure 4-2. The Virtual Florist.
Dynamic layouts can be used to create not only animated pages but also sophisticated graphical user interfaces. Listing 4-11 produces a GUI with dynamic layout that simulates the Microsoft Outlook user interface. The result is pictured in Figure 4-3 on page 75.
This Web page provides a tabbed toolbar that allows the user to click a tab to reveal a new toolbar, an effect that depends primarily on causing the images of the various toolbars to appear and disappear when the appropriate tab is clicked. The code element that allows an <IMG> tag to become visible or invisible is the Display argument of the STYLE attribute. The following code causes an <IMG> tag named MyGIF to appear or disappear:
Listing 4-11. The Outlook toolbar page.
MyGIF.Style.Display = "none" ' Make GIF invisible MyGIF.Style.Display = "" ' Make GIF visible <HTML> <HEAD> <META NAME="GENERATOR" Content="Microsoft Developer Studio"> <META HTTP-EQUIV="Content-Type" content="text/html; charset=iso-8859-1"> <TITLE>Outlook Toolbar</TITLE> <SCRIPT LANGUAGE="VBScript"> <!-- Sub RollBar(intIndex) Call OutlookBarVisible("none") Call MailBarVisible("none") Call OtherBarVisible("none") Select Case intIndex Case 1 ' Outlook cmdOutlook.Style.Top = "0" cmdMail.Style.Top = "350" cmdOther.Style.Top = "375" Call OutlookBarVisible("") Case 2 ' Mail If cmdMail.Style.Top = "25px" Then cmdOutlook.Style.Top = "0" cmdMail.Style.Top = "350" cmdOther.Style.Top = "375" Call OutlookBarVisible("") Else cmdOutlook.Style.Top = "0" cmdMail.Style.Top = "25" cmdOther.Style.Top = "375" Call MailBarVisible("") End If Case 3 ' Other If cmdOther.Style.Top = "50px" Then cmdOutlook.Style.Top = "0" cmdMail.Style.Top = "25" cmdOther.Style.Top = "375" Call MailBarVisible("") Else cmdOutlook.Style.Top = "0" cmdMail.Style.Top = "25" cmdOther.Style.Top = "50" Call OtherBarVisible("") End If End Select End Sub Sub OutlookBarVisible(strDisplay) imgOutlook1.Style.Display = strDisplay imgOutlook2.Style.Display = strDisplay imgOutlook3.Style.Display = strDisplay imgOutlook4.Style.Display = strDisplay imgOutlook5.Style.Display = strDisplay End Sub Sub MailBarVisible(strDisplay) imgMail1.Style.Display = strDisplay imgMail2.Style.Display = strDisplay imgMail3.Style.Display = strDisplay imgMail4.Style.Display = strDisplay End Sub Sub OtherBarVisible(strDisplay) imgOther1.Style.Display = strDisplay imgOther2.Style.Display = strDisplay imgOther3.Style.Display = strDisplay End Sub --> </SCRIPT> </HEAD> <BODY> <DIV STYLE="position:absolute; width:100; height:400;"> <!-- Buttons --> <INPUT STYLE="position:absolute; top:0; width:100;" TYPE="BUTTON" NAME="cmdOutlook" VALUE="Outlook" OnClick="Call RollBar(1)"> <INPUT STYLE="position:absolute; top:350; width:100;" TYPE="BUTTON" NAME="cmdMail" VALUE="Mail" OnClick="Call RollBar(2)"> <INPUT STYLE="position:absolute; top:375; width:100;" TYPE="BUTTON" NAME="cmdOther" VALUE="Other" OnClick="Call RollBar(3)"> <!-- Outlook bar images --> <IMG SRC="INBOX.GIF" ID="imgOutlook1" STYLE="position:absolute; left:32; top:80"> <IMG SRC="CALENDAR.GIF" ID="imgOutlook2" STYLE="position:absolute; left:32; top:125"> <IMG SRC="CONTACTS.GIF" ID="imgOutlook3" STYLE="position:absolute; left:32; top:170"> <IMG SRC="TASKS.GIF" ID="imgOutlook4" STYLE="position:absolute; left:32; top:215"> <IMG SRC="JOURNAL.GIF" ID="imgOutlook5" STYLE="position:absolute; left:32; top:260"> <!-- Mail bar images --> <IMG SRC="INBOX.GIF" ID="imgMail1" STYLE="position:absolute; left:32; top:80; display:none"> <IMG SRC="SENTITEMS.GIF"ID="imgMail2" STYLE="position:absolute; left:32; top:125; display:none"> <IMG SRC="OUTBOX.GIF" ID="imgMail3" STYLE="position:absolute; left:32; top:170; display:none"> <IMG SRC="DELETED.GIF" ID="imgMail4" STYLE="position:absolute; left:32; top:215; display:none"> <!-- Other bar images --> <IMG SRC="MYCOMPUTER.GIF"ID="imgOther1" STYLE="position:absolute; left:32; top:80; display:none"> <IMG SRC="FOLDER.GIF" ID="imgOther2" STYLE="position:absolute; left:32; top:125; display:none"> <IMG SRC="NOTES.GIF" ID="imgOther3" STYLE="position:absolute; left:32; top:170; display:none"> </DIV> </BODY> </HTML> 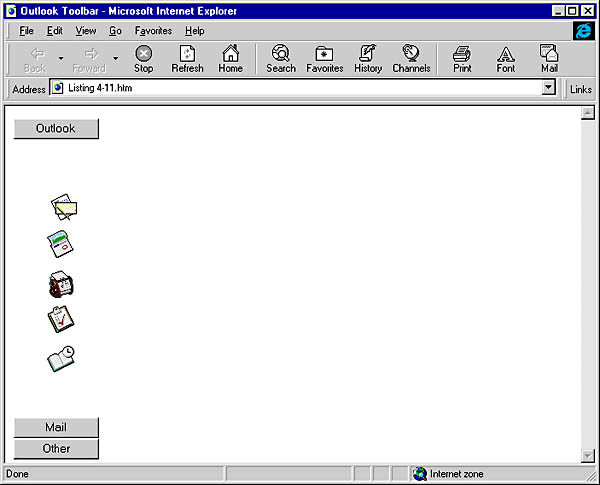
Figure 4-3. An Outlook-type interface.
EAN: 2147483647
Pages: 84