Exercise 9-2: Building a Site Collection Web Part
Exercise 9-2: Building a Site Collection Web Part
As your SPS installation grows, you may find that the number of site collections, team sites, and workspaces grows to the point where it is difficult to navigate the hierarchy. With that in mind, this project creates a site collection web part that shows all of the subsites underneath a top-level site. This is useful because it allows end users to discover sites they may not have known. Additionally, the web part has the ability to show users sites to which they do not belong so that they can request access, if appropriate. Figure 9-1 shows a view of the final project.
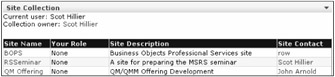
Figure 9-1: Listing sites in a collection
Prerequisites
Before beginning the project, you will need to define a new application for the Microsoft SSO service. The web part developed in this project will programmatically interact with several web sites, and it requires administrator permission to complete its function. Use the following steps to create the new application definition:
-
Log in to SPSPortal as a member of the MSSSOAdmins group .
-
Select Start All Programs SharePoint Portal Server SharePoint Portal Server Single Sign-On Administration.
-
On the Manage Settings page, select Enterprise Application Definition Settings Manage Settings for Enterprise Application Definitions.
-
On the Manage Enterprise Application Definitions page, click the New Item link.
-
On the Create Enterprise Application Definition page, enter SubSiteList in the Display Name box.
-
Enter SubSiteList in the Application Name box.
-
Enter administrator@sps.local in the Contact E-mail Address box.
-
Enter UserName in the Field 1: Display Name box.
-
Enter Domain in the Field 2: Display Name box.
-
Enter Password in the Field 3: Display Name box.
-
Select Yes for the Mask option associated with Field 3.
-
Click OK.
-
Return to the Manage Settings page and select Enterprise Application Definition Settings Manage Account Information for Enterprise Application Definitions.
-
In the Account Information section, choose SubSiteList from the drop-down list.
-
Type sps\Domain Users in the Group Account Name box.
-
Click OK.
-
On the "Provide workflow engine account information" page, type administrator in the UserName box.
-
Type sps in the Domain box.
-
Type the administrator password in the Password box.
-
Click OK.
Creating the Project
This web part project will be written in VB.NET. Therefore, you should open Visual Studio and create a new web part project in VB.NET named SPSSubSites . When the project is created, rename the class file and the web part description file as SPSSubSites.dwp and SPSSubSites.vb respectively. Then, open SPSSubSites.dwp from the Solution Explorer and change the file to appear as shown in Listing 9-14.
| |
<?xml version="1.0" encoding="utf-8"?> <WebPart xmlns="http://schemas.microsoft.com/WebPart/v2" > <Title>Site Collection</Title> <Description>A web part to list sub sites</Description> <Assembly>SPSSubSites</Assembly> <TypeName>SPSSubSites.Lister</TypeName> </WebPart>
| |
Before you begin to modify the web part code, you must add a couple of references to the project. This web part will change identity, just as you did when you created document workflow to get permission to list web sites. Therefore, you need access to the SSO system. You also have to set a reference to the SharePoint Services namespace.
To set the references, follow these steps:
-
Select Project Add Reference from the Visual Studio menu.
-
In the Add References dialog, double-click Microsoft.SharePoint.Portal.SingleSignon.dll and Windows SharePoint Services .
-
Click OK.
Once the references are added, open the SPSSubSites.vb file for editing. You will add several Imports statements to the file and modify the class name. Change your web part to appear as shown in Listing 9-15.
| |
Option Strict On Option Explicit On Option Compare Text Imports System Imports System.ComponentModel Imports System.Web.UI Imports System.Web.UI.WebControls Imports System.Xml.Serialization Imports Microsoft.SharePoint Imports Microsoft.SharePoint.Utilities Imports Microsoft.SharePoint.WebPartPages Imports Microsoft.SharePoint.WebControls Imports System.Security.Principal Imports System.Runtime.InteropServices Imports Microsoft.SharePoint.Portal.SingleSignon <DefaultProperty("ShowAllSites"), _ ToolboxData("<{0}:Lister runat=server></{0}:Lister>"), _ XmlRoot(Namespace:="SPSSubSites")> _ Public Class Lister Inherits Microsoft.SharePoint.WebPartPages.WebPart | |
Defining the Properties
Your web part has only a single property defined named ShowAllSites . ShowAllSites is a Boolean value that determines if the web part lists sites to which the current user does not belong. Listing such sites allows the end user to discover sites and request access. If you want to hide sites in the collection, however, set this property to False . The property is simple to define. Just add the code from Listing 9-16.
| |
Protected blnShowAllSites As Boolean = False <Browsable(True), Category("Behavior"), DefaultValue(False), _ WebPartStorage(Storage.Shared), FriendlyName("Show All Sites"), _ Description("Show sites to which the user does not belong.")> _ Property ShowAllSites() As Boolean Get Return blnShowAllSites End Get Set(ByVal Value As Boolean) blnShowAllSites = Value End Set End Property | |
Creating the Child Controls
The child sites discovered by the web part are listed in a grid. The grid creates a hyperlink to the site ”so a user can navigate directly ”as well as an e-mail link to the site collection owner. Therefore, you have to create the HyperLinkColumns and BoundColumns by hand for your grid. You have used similar techniques several times in other web parts throughout the book. Add the code from Listing 9-17 to create the grid for the web part.
| |
Protected WithEvents grdSites As DataGrid Protected WithEvents lblMessage As Label Protected Overrides Sub CreateChildControls() 'Grid to display results grdSites = New DataGrid With grdSites .AutoGenerateColumns = False .Width = Unit.Percentage(100) .HeaderStyle.Font.Name = "arial" .HeaderStyle.Font.Size = New FontUnit(FontSize.AsUnit).Point(10) .HeaderStyle.Font.Bold = True .HeaderStyle.ForeColor = System.Drawing.Color.Wheat .HeaderStyle.BackColor = System.Drawing.Color.DarkBlue .AlternatingItemStyle.BackColor = System.Drawing.Color.LightCyan End With Dim objBoundColumn As BoundColumn Dim objHyperColumn As HyperLinkColumn 'Name Column objHyperColumn = New HyperLinkColumn With objHyperColumn .HeaderText = "Site Name" .DataTextField = "Name" .DataNavigateUrlField = "URL" grdSites.Columns.Add(objHyperColumn) End With 'Membership Column objBoundColumn = New BoundColumn With objBoundColumn .HeaderText = "Your Role" .DataField = "Role" grdSites.Columns.Add(objBoundColumn) End With 'Description Column objBoundColumn = New BoundColumn With objBoundColumn .HeaderText = "Site Description" .DataField = "Description" grdSites.Columns.Add(objBoundColumn) End With 'Contact Column objHyperColumn = New HyperLinkColumn With objHyperColumn .HeaderText = "Site Contact" .DataTextField = "Author" .DataNavigateUrlField = "eMail" grdSites.Columns.Add(objHyperColumn) End With Controls.Add(grdSites) 'Label for error messages lblMessage = New Label With lblMessage .Width = Unit.Percentage(100) .Font.Name = "arial" .Font.Size = New FontUnit(FontSize.AsUnit).Point(10) .Text = "" End With Controls.Add(lblMessage) End Sub
| |
Creating the Helper Functions
As I mentioned earlier, this web part needs to change its identity to access all the necessary site information. Therefore, you need to provide the same help function to create a new identity as you did for document workflow. This function is useful in many web parts and you will use it often. Add the code from Listing 9-18 to create the new identity.
| |
Protected Shared Function CreateIdentity(ByVal User As String, _ ByVal Domain As String, ByVal Password As String) As WindowsIdentity Dim objToken As New IntPtr(0) Dim ID As WindowsIdentity Const LOGON32_PROVIDER_DEFAULT As Integer = 0 Const LOGON32_LOGON_NETWORK As Integer = 3 'Initialize token object objToken = IntPtr.Zero ' Attempt to log on Dim blnReturn As Boolean = LogonUser(User, Domain, Password, _ LOGON32_LOGON_NETWORK, LOGON32_PROVIDER_DEFAULT, objToken) 'Check for failure If blnReturn = False Then Dim intCode As Integer = Marshal.GetLastWin32Error() Throw New Exception("Logon failed: " & intCode.ToString) End If 'Return new token ID = New WindowsIdentity(objToken) CloseHandle(objToken) Return ID End Function <DllImport("advapi32.dll", SetLastError:=True)> _ Private Shared Function LogonUser(ByVal lpszUsername As String, _ ByVal lpszDomain As String, _ ByVal lpszPassword As String, ByVal dwLogonType As Integer, _ ByVal dwLogonProvider As Integer, _ ByRef phToken As IntPtr) As Boolean End Function <DllImport("kernel32.dll", CharSet:=CharSet.Auto)> _ Private Shared Function CloseHandle(ByVal handle As IntPtr) As Boolean End Function | |
Rendering the Web Part
Once the helper functions are defined, you can begin to code the main body of the web part. You will write this code directly in the RenderWebPart method. We will discuss each part of the code so that you can follow how it works. Essentially, your strategy will be to enumerate the sites in the collection, add them to a DataSet , and bind the DataSet to the grid for display. Begin by adding the code from Listing 9-19 to the RenderWebPart method.
| |
Protected Overrides Sub RenderWebPart( _ ByVal output As System.Web.UI.HtmlTextWriter) 'Get the site collection Dim objSite As SPSite = SPControl.GetContextSite(Context) Dim objMainSite As SPWeb = objSite.OpenWeb Dim objAllSites As SPWebCollection = objSite.AllWebs Dim objMemberSites As SPWebCollection = objMainSite.GetSubwebsForCurrentUser Dim objSubSite As SPWeb 'Get the user identity Dim strUsername As String = objMainSite.CurrentUser.LoginName 'Create a DataSet and DataTable for the site collection Dim objDataset As DataSet = New DataSet("root") Dim objTable As DataTable = objDataset.Tables.Add("Sites") 'Context for the new identity Dim objContext As WindowsImpersonationContext Dim arrCredentials() As String Dim strUID As String Dim strDomain As String Dim strPassword As String | |
Once you have retrieved the basic information for the site collection and the user, you are ready to change the identity of the web part so that it can enumerate the subsites in the collection. To accomplish this, you will retrieve credentials from the SSO system. Add the code from Listing 9-20 to the RenderWebPart method to change the identity.
| |
Try 'Try to get credentials Credentials.GetCredentials(_ Convert.ToUInt32("0"), "SubSiteList", arrCredentials) strUID = arrCredentials(0) strDomain = arrCredentials(1) strPassword = arrCredentials(2) 'Change the context Dim objIdentity As WindowsIdentity objIdentity = CreateIdentity(strUID, strDomain, strPassword) objContext = objIdentity.Impersonate Catch x As SingleSignonException lblMessage.Text += "No credentials available." + vbCrLf Catch x As Exception lblMessage.Text += x.Message + vbCrLf End Try | |
| Note | After you change the identity of the web part, the identity of the current user is no longer available; therefore, you should always retrieve the identity of the current user before changing the identity of the web part. |
After the new identity is created, the web part can enumerate the child sites and add them to the DataSet . Which sites are enumerated is determined by the value of the ShowAllSites property. Along the way, the web part builds the appropriate site and e-mail links for the end user. Add the code from Listing 9-21 to enumerate the child sites.
| |
Try 'Design Table With objTable.Columns .Add("Role", Type.GetType("System.String")) .Add("Name", Type.GetType("System.String")) .Add("Description", Type.GetType("System.String")) .Add("URL", Type.GetType("System.String")) .Add("Author", Type.GetType("System.String")) .Add("eMail", Type.GetType("System.String")) End With 'Fill the Table with Member Sites For Each objSubSite In objMemberSites Dim objRow As DataRow = objTable.NewRow() With objRow Try .Item("Role") = objSubSite.Users(strUsername).Roles(0).Name Catch .Item("Role") = "None" End Try .Item("Name") = objSubSite.Name .Item("Description") = objSubSite.Description .Item("URL") = objSubSite.Url .Item("Author") = objSubSite.Author.Name .Item("eMail") = "mailto:" + objSubSite.Author.Email End With objTable.Rows.Add(objRow) Next Catch x As Exception lblMessage.Text = x.Message End Try Try 'Fill the Table with non-member sites If ShowAllSites = True Then For Each objSubSite In objAllSites 'Get the user collection for each sub site Dim objUsers As SPUserCollection = objSubSite.Users Dim objUser As SPUser Dim blnMember As Boolean 'Skip the parent site If objMainSite.Name <> objSubSite.Name Then blnMember = False 'Look through user list For Each objUser In objUsers If objUser.LoginName.Trim = strUsername.Trim Then blnMember = True End If Next If blnMember = False Then 'If the current user is not a member add a record Dim objRow As DataRow = objTable.NewRow() With objRow .Item("Role") = "Not a Member!" .Item("Name") = objSubSite.Name .Item("Description") = objSubSite.Description .Item("URL") = objSubSite.Url .Item("Author") = objSubSite.Author.Name .Item("eMail") = "mailto:" + objSubSite.Author.Email End With objTable.Rows.Add(objRow) End If End If objSubSite.Close() Next End If 'Close sites objMainSite.Close() objSite.Close() 'Tear down context objContext.Undo() Catch x As Exception lblMessage.Text = x.Message End Try | |
Once all of the sites are enumerated, the DataSet can be bound to the grid. Add the code from Listing 9-22 to complete the RenderWebPart method.
| |
'Bind dataset to grid output.Write("<p>Current user: " + objMainSite.CurrentUser.Name + "<br>" _ + "Collection owner: <a href=""mailto:" + objSite.Owner.Email + """>" _ + objSite.Owner.Name + "</a></p>") With grdSites .DataSource = objDataset .DataMember = "Sites" .DataBind() End With 'Show grid grdSites.RenderControl(output) output.Write("<br>") lblMessage.RenderControl(output) | |
Using the Web Part
Before you can compile the web part, you must give it a strong name and modify the AssemblyInfo file with the name of the key pair file. Just as you have done with every web part, you must also modify the web.config file for SPS to mark the web part as safe. You have already accomplished these tasks several times, so I won't repeat the steps here. Once you have finished compiling the web part, import it onto the home page of a top-level site and verify that it enumerates the subsites below.
EAN: N/A
Pages: 92