Exercise 8-2: Building a Research Service
Exercise 8-2: Building a Research Service
Building a custom research service allows you to integrate information from line-of-business systems with the task pane of Office 2003 products. This integration has the potential to improve end- user productivity by placing key information about products, customers, and so on in close proximity with the documents that are being created. In this exercise, you will create a custom research service that displays publisher names and addresses from the pubs database.
Prerequisites
When SPS is installed, it prevents Visual Studio from accessing the site for development. Additionally, the security restrictions that SharePoint Services places on the site can prevent web applications and web services from running normally. Therefore, your best bet is to use a completely separate server running Internet Information Server (IIS) for all of your web services. For this exercise, however, you will create a new site on SPSPortal for the research service.
To create this new web site, you will need to perform these steps:
-
Log in to SPSPortal as the local administrator.
-
Select Start Administrative Tools Internet Information Services (IIS) Manager.
-
In the IIS Manager, expand the tree until the Web Sites folder is visible.
-
Right-click the Web Sites folder and select New Web Site. This will start the web site wizard.
-
In the Description text box, type Research and then click Next.
-
In the "TCP port this web site should use (Default 80)" text box, type 8888 and then click Next.
-
Click Browse to search for a new directory.
-
In the Browse for Folder dialog, select the root of the C: drive and click the Make New Folder button.
-
Name the new folder ResearchWeb and click OK.
-
Finish the rest of the wizard to create the new web site.
-
Close the IIS Manager.
Starting the Project
Custom research services are built on top of web services. The fundamental structure of a service requires a Registration and a Query web method. The bulk of the programming work is parsing the incoming request stream and providing an appropriate response stream.
Here is what you need to do to begin the project:
-
Select File New Project from the Visual Studio menu.
-
In the New Project dialog, click the Visual C# Projects folder.
-
In the Templates window, select ASP.NET Web Service.
-
Make sure the web service is designated to be built on the correct web site, name the new project ResearchPubs , and click OK.
-
When the project is created, open Service1.asmx .
-
The web service must reference the urn:Microsoft.Search namespace and needs several using statements so that it can access the database and parse XML. The code in Listing 8-20 shows how the beginning of your class file should appear.
Listing 8-20: Starting the Project

using System; using System.Collections; using System.ComponentModel; using System.Data; using System.Data.SqlClient; using System.Diagnostics; using System.Web; using System.Web.Services; using System.Configuration; using System.IO; using System.Xml; namespace ResearchPubs { [WebService(Namespace="urn:Microsoft.Search")] public class Service1 : System.Web.Services.WebService {
Creating the Registration Response
When the research service is registered, it must respond with an appropriate XML stream. Because much of the response is boilerplate , you use an XML document as a template for the response. Before you begin to code the Registration method, you need to create the template. Add a new XML file to your project named RegistrationResponse.xml . Modify the template to appear as shown in Listing 8-21.
| |
<?xml version="1.0" encoding="utf-8" ?> <ProviderUpdate xmlns="urn:Microsoft.Search.Registration.Response"> <Status>SUCCESS</Status> <Providers> <Provider> <Message>This is a research service for publisher information</Message> <Id>{DEA2797E-DEDC-4a7d-AEB5-DD8DF82F753F}</Id> <Name>Publishers</Name> <QueryPath/> <RegistrationPath/> <AboutPath/> <Type>SOAP</Type> <Services> <Service> <Id>{3C927E62-566D-4193-AF40-B0CA3E4F3E00}</Id> <Name>Publisher Lookup</Name> <Description>Returns address information for a publisher</Description> <Copyright></Copyright> <Display>On</Display> <Category>BUSINESS_BUSINESS</Category> </Service> </Services> </Provider> </Providers> </ProviderUpdate> | |
Once the template is written, you are ready to code the Registration method. This method loads the template and then modifies the <RegistrationPath/> , <QueryPath/> , and <AboutPath/> elements to reflect the true location of the service. When you create a research service for distribution, you will probably want to make this code more portable. In this exercise, you have hard-coded some path information. Add the code in Listing 8-22 to complete the Registration method.
| |
[WebMethod()]public string Registration(string registrationxml) { //Key path information string templatePath = HttpContext.Current.Server.MapPath(".").ToString() + "\RegistrationResponse.xml"; string servicePath = "http://spsportal:8888/ResearchPubs/Service1.asmx"; //Load template XmlDocument outXML = new XmlDocument(); outXML.Load(templatePath); //Prepare to modify template XmlNamespaceManager manager = new XmlNamespaceManager(outXML.NameTable); manager.AddNamespace("ns", "urn:Microsoft.Search.Registration.Response"); //Modify XML outXML.SelectSingleNode("//ns:QueryPath", manager).InnerText = servicePath; outXML.SelectSingleNode("//ns:RegistrationPath", manager).InnerText _ = servicePath; outXML.SelectSingleNode("//ns:AboutPath", manager).InnerText = servicePath; return outXML.InnerXml.ToString(); } | |
| Caution | The input argument of the Registration method must be named registrationxml or the XML data sent from Office will not reach the method. Office 2003 expects this exact name for the argument. |
Creating the Query Response
After the service is registered with the Research Library, new queries will be made by calls to the Query method. The response you formulate will be based on a search of the pubs database using the <QueryText> element passed in by the Research Library. The stream is contained in an XML envelope that you will create as a template. Although the envelope is fairly simple, you must ensure that the domain attribute of the <Response> element is identical to the <Id> element for the <Service> defined in the registration response template. Add a new XML file to your project named QueryResponse.xml and modify it to appear as shown in Listing 8-23.
| |
<?xml version="1.0" encoding="utf-8" ?> <ResponsePacket revision="1" xmlns="urn:Microsoft.Search.Response"> <Response domain="{3C927E62-566D-4193-AF40-B0CA3E4F3E00}"> <Range> </Range> <Status>SUCCESS</Status> </Response> </ResponsePacket> | |
Coding the Query Method
Your Query method will be responsible for parsing the <QueryText> element and packaging the results for return to the Research Library. The actual database query will be handled by a separate function. The basics of the Query method are similar to those in the Registration method. You parse the incoming XML and build the outgoing XML based on a template. Add the code from Listing 8-24 to create the Query method.
| |
[WebMethod()]public string Query(string queryXml) { //The query text from the Research Library string queryText=""; //Key path information string templatePath = HttpContext.Current.Server.MapPath(".").ToString() + "\QueryResponse.xml"; //Load incoming XML into a document XmlDocument inXMLDoc = new XmlDocument(); try { if (queryXml.Length > 0) { inXMLDoc.LoadXml(queryXml.ToString()); //Prepare to parse incoming XML XmlNamespaceManager inManager = new XmlNamespaceManager(inXMLDoc.NameTable); inManager.AddNamespace("ns", "urn:Microsoft.Search.Query"); inManager.AddNamespace _ ("oc", "urn:Microsoft.Search.Query.Office.Context"); //Parse out query text queryText = inXMLDoc.SelectSingleNode _ ("//ns:QueryText", inManager).InnerText; } } catch{queryText="";} //Load response template XmlDocument outXML = new XmlDocument(); outXML.Load(templatePath); //Prepare to modify template XmlNamespaceManager outManager = new XmlNamespaceManager(outXML.NameTable); outManager.AddNamespace("ns", "urn:Microsoft.Search.Response"); //Add results outXML.SelectSingleNode("//ns:Range",outManager). _ InnerXml = getResults(queryText); //Return XML stream return outXML.InnerXml.ToString(); } | |
| Caution | The input argument of the Query method must be named queryXml or the XML data sent from Office will not reach the method. Office 2003 expects this exact name for the argument. |
Packaging the Results
The actual result set that your service returns to the Research Library must be contained inside of an XML stream that complies with the expected schema. Therefore, you must loop through every record returned from the query and write out the XML elements to contain them. This is mostly a matter of carefully coding the XML construction. Add the code from Listing 8-25 to build the results.
| |
public string getResults(string queryText) { //Credentials string userName="sa"; string password=""; string database="pubs"; string sqlServer="(local)"; //Build connection string string strConn = "Password=" + password + ";Persist Security Info=True;User ID=" + userName + ";Initial Catalog=" + database + ";Data Source=" + sqlServer; //Build SQL statement string strSQL = "SELECT pub_name, city, state FROM Publishers " + "WHERE pub_name LIKE '" + queryText + "%'"; DataSet dataSet = new DataSet("publishers"); //Run the query SqlConnection conn = new SqlConnection(strConn); SqlDataAdapter adapter = new SqlDataAdapter(strSQL,conn); adapter.Fill(dataSet,"publishers"); //Build the results StringWriter stringWriter = new StringWriter(); XmlTextWriter textWriter = new XmlTextWriter(stringWriter); DataTable dataTable = dataSet.Tables["publishers"]; DataRowCollection dataRows = dataTable.Rows; textWriter.WriteElementString("StartAt", "1"); textWriter.WriteElementString("Count", dataRows.Count.ToString()); textWriter.WriteElementString("TotalAvailable", dataRows.Count.ToString()); textWriter.WriteStartElement("Results"); textWriter.WriteStartElement _ ("Content", "urn:Microsoft.Search.Response.Content"); foreach(DataRow dataRow in dataRows) { ///Heading textWriter.WriteStartElement("Heading"); textWriter.WriteAttributeString("collapsible", "true"); textWriter.WriteAttributeString("collapsed", "true"); textWriter.WriteElementString("Text", dataRow["pub_name"].ToString()); //City textWriter.WriteStartElement("P"); textWriter.WriteElementString("Char", dataRow["city"].ToString()); textWriter.WriteStartElement("Actions"); textWriter.WriteElementString("Insert", ""); textWriter.WriteElementString("Copy", ""); textWriter.WriteEndElement(); textWriter.WriteEndElement(); //State textWriter.WriteStartElement("P"); textWriter.WriteElementString("Char", dataRow["state"].ToString()); textWriter.WriteStartElement("Actions"); textWriter.WriteElementString("Insert", ""); textWriter.WriteElementString("Copy", ""); textWriter.WriteEndElement(); textWriter.WriteEndElement(); textWriter.WriteEndElement(); } textWriter.WriteEndElement(); textWriter.WriteEndElement(); textWriter.Close(); return stringWriter.ToString(); } | |
Using the Custom Service
Using the service is a matter of registering the service and sending a query. Registering always requires you to know the URL of the web service. Once registered, the service will be available in the research pane.
To use the new service, take these steps:
-
Open the Research Library in Microsoft Word by selecting Tools Research from the menu.
-
At the bottom of the research pane, click the Research Options link.
-
In the Research options dialog, click Add Services.
-
In the Address box, type the URL http://spsportal:8888/ResearchPubs/Service1.asmx .
-
Click Add and accept any additional prompts.
-
Close the Research Options dialog.
-
In the research pane, select the service source from under the All Business and Financial Sites section.
-
Type a search string into the Search For box and click the green arrow. Figure 8-12 shows the final project.
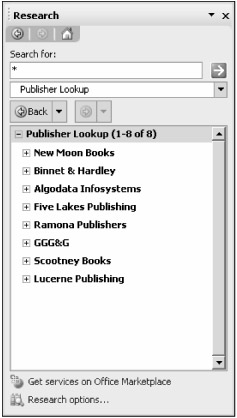
Figure 8-12: The final project
EAN: N/A
Pages: 92
- Enterprise Application Integration: New Solutions for a Solved Problem or a Challenging Research Field?
- Data Mining for Business Process Reengineering
- Intrinsic and Contextual Data Quality: The Effect of Media and Personal Involvement
- Relevance and Micro-Relevance for the Professional as Determinants of IT-Diffusion and IT-Use in Healthcare
- Development of Interactive Web Sites to Enhance Police/Community Relations