Libraries
Once you have defined your site structure and added users to site groups, you will want to begin to make content available. Although SPS can present several different types of content, the backbone of the SPS vision is the sharing of files among site users. In order to share files, SPS makes use of libraries. The three main types of libraries available in SPS are document libraries, form libraries, and picture libraries.
Document Libraries
In many ways, document libraries are the central feature of SPS. Nearly all site users will be involved with creating, retrieving, and sharing documents. You can create document libraries at any level in the portal hierarchy, and assign different permissions to each one. This makes them very useful for facilitating collaboration among organizational teams . What's more, you'll see later that document libraries are fully integrated with Microsoft Office 2003.
Accessing Document Libraries
By default, every area contains a document library, but when you first visit an area, the area page is largely blank. Many of the content elements are hidden from view, including the built-in document library. The simplest way to make the document library visible is for a member of the Content Manager, Web Designer, or Administrator site group to modify the page by creating a listing of the documents. Every site group except Reader has permission to add documents to the library using the Upload Document link on the Actions list. However, Reader and Member will not be able to see the documents until the library is added to a listing. In theory, a Member site group can also create a listing for the library, but in order to add a listing, you need to know the URL of the item. This will most likely be challenging for a typical Member.
Follow these steps to display a document library list:
-
Log in to the portal as a member of the Content Manager, Web Designer, or Administrator site group.
-
Navigate to any area under Topics.
-
Select Edit Page from the Actions list.
-
Select Modify Shared Page Add Web Parts Browse from the upper-right corner of the page.
-
From the Web Parts list click and drag the document library into one of the zones on the page. Figure 3-9 shows the modified page.
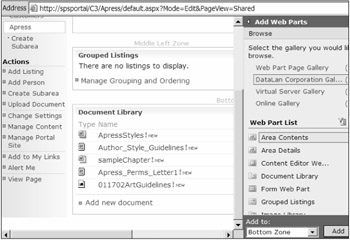
Figure 3-9: Displaying a document library list -
When you are finished, click View Page on the Actions list.
When the area page is modified, it creates a listing of all of the documents in the library. Any site group can open a document directly from the list. Every site group except Reader can also add documents using the Add New Document link that appears below the list. They can also access the complete functionality of the document library by clicking Document Library at the top of the list. This link opens the document library page. From this page, you can create or upload new documents.
When new documents are added to the library, a document profile is created. The document profile is a set of properties that forms metadata about the document. This includes not only obvious elements such as name and description, but it also includes a Status field where you can specify the quality of the document as rough, draft, in review, or final. The document profile associated with the library can be modified to include more and different columns. On the Document Library page, clicking the link Modify Settings and Columns will allow you to add and delete properties in the profile.
Document Management Features
Once documents are part of the library, users can take advantage of the document management features built into SPS. These document management features include check-in, check-out , and version control. Although the Member site group can add new documents and set property values for a document profile, it cannot edit the document or change the properties. In fact, most of the document management capabilities of SPS require that you at least belong to the Contributor site group. Access to the document management features is accomplished through a drop-down list associated with each document. Figure 3-10 shows the drop-down list for a document in a library.
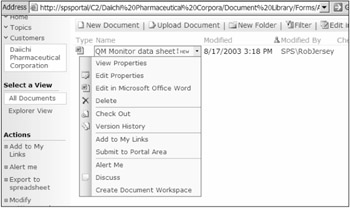
Figure 3-10: Accessing document management features
You can check out documents directly from the document library using the drop-down list. When a document is checked out, it is still listed in the document library and visible to site users. The document can be opened; however, no changes may be saved to the document except by the individual who has it checked out.
Once changes are made to the document, it may be checked back into the library directly from the menu in any Office product by selecting File Check In. You will also be prompted automatically if you exit the Office application. Web designers, content managers, and administrators have the authority to cancel an existing check-out. This action causes the document to be checked back in to the library immediately; however, all changes made to the document since it was checked out are lost. This feature is primarily used to recover a checked-out document when the holder is unavailable for some reason.
By default, the document library overwrites the old document version with the new version and does not keep any history. If you would like to keep version history, then you must enable it from the Versions page. You can access the Versions page from the drop-down menu associated with a document. You then enable version history by clicking Modify Versioning Settings from the Actions list.
Along with version control, you can also enable content approval for a document library. When document approval is enabled, new documents will not be visible to the general population of site users. Instead, the documents must be approved by a member of the Content Manager site group before they become generally available. Rejections and approvals are issued directly in the portal using the drop-down menu associated with each document. Figure 3-11 shows the menu for rejecting or approving a document.

Figure 3-11: Approving or rejecting a document
To approve content, follow these steps:
-
Log in to the portal as a member of the Administrator site group.
-
Navigate to an area where you have the document library displayed.
-
Click the link Modify Settings and Columns in the Actions list.
-
On the Document Library Settings page, click the Change General Settings link.
-
In the Content Approval section, choose Yes.
-
In the Document Versions section, choose Yes.
-
Click OK.
-
Log in to the portal as a member of the Contributor site group.
-
Navigate to the document library page you just modified.
-
On the Document Library page, click Upload Document. Add a new document to the library.
-
Log in to the portal as a member of the Content Manager site group.
-
Navigate to the document library where the new file is located.
-
Click the Approve/Reject Items link on the document drop-down menu.
-
Change the Approval Status to Approved and click OK.
Backward-Compatible Document Libraries
The document library structure provided in SPS2003 is considerably different than that provided in SPS2001. Perhaps the most significant difference is that SPS2003 uses a SQL Server database as the backbone of the document library, whereas SPS2001 used the Web Storage System (WSS). WSS is a system of enhanced folders that provides document management features to documents that are stored within them.
There are two primary reasons for using the backward-compatible document library feature of SPS2003. First, if you have an existing WSS library from a previous installation of SPS2001, then you may want to use the backward-compatible document library instead of migrating documents to the new library system. Second, organizations that are not immediately moving to Office 2003 can use the backward-compatible library with previous versions of Office to provide enhanced capabilities, which I'll discuss later.
Installation
The components to support the backward-compatible document library are not installed by default. Instead, you must explicitly install them from the SPS installation disk. On the installation start page, the required components appear under the Install Optional Components heading. Figure 3-12 shows the installation screen.
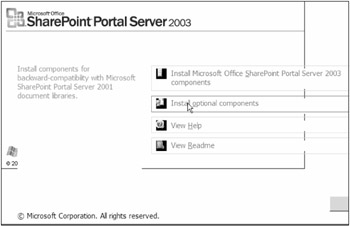
Figure 3-12: Installing the components for backward-compatible libraries
| Note | The SMTP service is a prerequisite for installing the backwardcompatible document library. |
After selecting to install the optional components, you will be given a choice ”to install both the client and server components, or just the client components. The server components are necessary to set up the WSS and create the library. The client components are required for Office applications to access the library. Therefore, you will have to install the client components on every machine where a previous version of Office is installed that requires access to the library.
Once installation is complete, you may access basic administrative functions for the library through SPS Central Administration. From here, the first thing to do is specify the server where the document library resides. From the main page, select Server Configuration Configure Server Topology. On the Configure Server Topology page, click the Change Components button. Reference the server containing the library components here. Figure 3-13 shows the Change Component Assignments page.

Figure 3-13: Referencing the backward-compatible library server
Once you have referenced a server hosting a backward-compatible library, a new option will appear on the central administration page. Selecting Component Configuration Configure Document Libraries (Web Storage System-based) brings up the List and Manage Document Libraries page. From this page you can create a new document library.
When a new library is created, SPS builds a structure in the WSS for new documents. This structure is then associated with a Uniform Resource Locator (URL) address. This address is visible in the List and Manage Document Libraries page and may be used to access the document library directly.
The simplest way to examine the new document library is to create a new Network Place in the file explorer. From the file explorer, you can create a new Network Place and use the URL specified for the library. After you create the new Network Place, you can open it and see the basic library structure. You will notice that the structure consists of several administrative folders as well as a specific folder named Documents, which represents the root of the document store. If you are familiar with the document storage features of SPS2001, you will immediately recognize the structure as similar. Figure 3-14 shows a typical backward-compatible library displayed inside the file explorer.
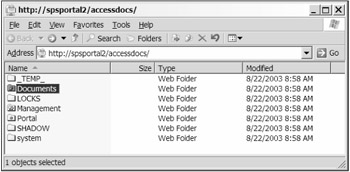
Figure 3-14: Viewing the backward-compatible library
In addition to accessing the backward-compatible document library from a Network Place, you can also access it directly from the portal. Once you have set up and referenced a library, the portal home page will show a new navigation link to the document library. You can perform almost all operations associated with the backward-compatible document library from either the portal or the file explorer.
Administering Users, Roles, and Rights
Once the backward-compatible library is created, you will want to provide access to the portal users. Giving new users permission to access the library is done through SPS Central Administration. From the main page, you can select Component Configuration Configure Document Libraries (Web Storage System-based) to display the List and Manage Document Libraries page. On this page, click the Edit link to perform basic administration.
On the Change Document Library Settings page, you can perform several administrative tasks . General settings like contact information can be changed directly in the page while three hyperlinks allow you to perform additional tasks. At the bottom of the page, you will see links for managing security, document profiles, and content sources.
When you click the Manage Document Library Security link, the system opens the exact same Network Place that you examined earlier. Within the library structure, you will see a folder named Management. Opening this folder reveals two items: Document Profiles and Workspace Settings. Opening the Workspace Settings item displays a property sheet that allows you to give users access to the entire document library. Figure 3-15 shows the property sheet.

Figure 3-15: Adding users to the document library
New users can gain access to the backward-compatible document library by clicking the Add button and selecting the accounts from the directory structure. When you add a user to the document library, you must assign them to a role. The backward-compatible document library uses roles to assign rights to users. The library supports three roles: Reader, Author, and Coordinator . Table 3-2 lists the roles and their associated rights.
| RIGHT | READER | AUTHOR | COORDINATOR |
|---|---|---|---|
| Read documents in standard folders. | X | X | X |
| Read published documents in enhanced folders. | X | X | X |
| Search public documents. | X | X | X |
| Add, edit, delete documents. | ” | X | X |
| Submit documents for publication. | ” | X | X |
| Create or modify subfolders . | ” | X | X |
| Add and remove users. | ” | ” | X |
| Manage document profiles. | ” | ” | X |
| Manage library structure. | ” | ” | X |
| Manage approval process. | ” | ” | X |
Document Management Features
Just like the standard document libraries associated with SPS2003, the backward-compatible library supports several document management features, including check-in, check-out, version control, and approval routing. The difference between the standard and backward-compatible libraries is found in the role definitions. Each user's rights are determined by their role in the backward-compatible library as opposed to their rights within SPS2003.
Authors and coordinators may add new documents to the library. New documents can be added either through the portal or using the web folder available through Network Places. When documents are added to the library, metadata is associated with the document in the form of a profile. The document profiles in the backward-compatible library are similar to those available in the standard libraries. When a document is first added to the library, you will be asked to select a profile for the document and fill in the metadata. This metadata is used to retrieve documents during later search operations. Figure 3-16 shows a typical document profile.
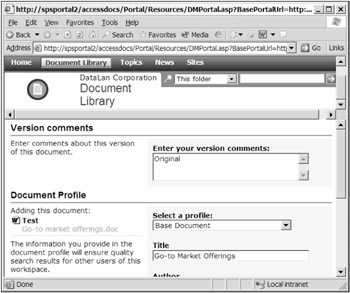
Figure 3-16: Filling in a document profile through SPS
Coordinators can create and edit document profiles for the library. Creating or editing a document profile can be done through the Manage Document Profiles link on the Change Document Library Settings page or directly in the web folder available in Network Places. Either way, you will end up in the Document Profiles folder where you can view all of the current profile definitions. Profiles can be opened and edited, or a new profile can be added by opening the Add Document Profile item. When you add or edit a profile, you may define new metadata fields and specify whether or not they are required.
Once a document is in the library, it may be checked out by authors or coordinators directly from the portal or file explorer. When the document is checked out, no one else can edit it. Additionally, a local copy of the document is down-loaded to your computer for you to work on.
After you have made changes to the document, you may check it back into the library directly from the Office application where you edited it by selecting File Check In. When you check in a document directly from an Office application, you will be prompted to fill in the document profile. You may also make the document available to others by selecting to publish the document immediately. Figure 3-17 shows the document profile from an Office application.
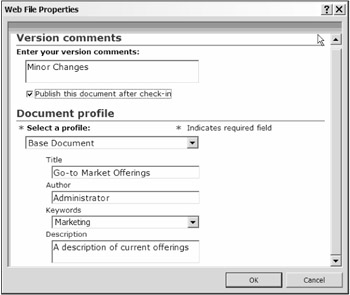
Figure 3-17: Filling in a document profile through Office
Each time a document is checked in, a new version is created. The version history for any document is available directly in the portal where any version can easily be opened for editing. Major version numbers are assigned to documents when they are published. Minor version numbers are assigned to documents when they are checked in.
You can also access version history for any document through the file explorer. In the file explorer, simply locate the document in the library beneath the web folder in Network Places. When you have located the folder, right-click and select Properties from the pop-up menu. The displayed property sheet has a Versions tab that lists the version history. Figure 3-18 shows the property sheet with a typical version history.
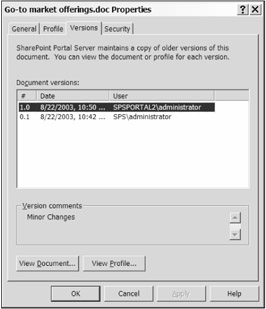
Figure 3-18: Accessing version history
Just like the standard document library, the backward-compatible document library supports an approval process for new documents. The approval process for backward-compatible libraries differs from the standard one in that the process is set up using folders contained in the library. Using the Properties tab for any folder in the library, you may specify the users who must approve a document before it can be published. When you specify these users, you may also select whether all of the users must approve in sequence or whether any one of the users can approve a document. Figure 3-19 shows the property sheet where approvers are defined.
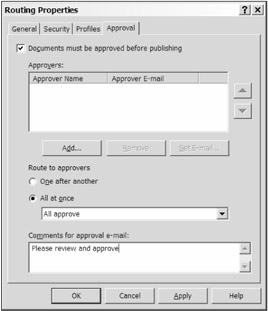
Figure 3-19: Establishing approval routing
Approval routing begins when a new document is saved into a folder with approvers defined. If the routing option on the folder is set to One After Another, then approvers receive an e-mail with a link to the document in the order they are listed on the property sheet. In this case, each approver must approve the document in order before it will be published. If the routing option on the folder is set to All at Once, then every approver receives an e-mail at the same time. Under this scenario, you may specify whether any single approver can approve the document or if it must be approved by everyone before publishing.
Form Libraries
A form library can be thought of as a special document library. The purpose of the form library is to store XML-based forms that can gather similar information. For example, you might create a form library in the Human Resources area of the portal that contains a vacation request form, a 401k change form, or a health insurance change form. In this way, key forms are centralized and easily located through the topic structure of the site.
Although the concept of centralizing forms seems natural enough, you are probably wondering why the forms have to be XML-based. The answer is that these XML-based forms will be used as system integration points to add data to multiple line-of-business systems. The concept is to use an XML-based form to gather data one time and then route the data to all of the systems that require it.
As an example, consider a sales professional returning from a call with a customer. At the end of the day, the sales professional needs to enter several different kinds of data into various line-of-business systems. To start with, the details of the call and status of opportunities must be entered into the Customer Relationship Management (CRM) system. Then, mileage and expenses must be entered into a financial system. Finally, a status report must be created and stored on the file server. In this scenario, the sales professional has to enter data into three different systems, and in all likelihood , much of the data is repeated.
XML-based forms promise to eliminate non-value activities such as redundant data entry by offering a single point for data entry. In the Microsoft view, the sales professional would enter all of the data ”customer, expenses, reporting ”into a single XML-based form. This form would then be routed to the CRM system, financial system, and reporting system to create the required entries. I will discuss the underlying construction of such systems later in the book. For now, I will simply focus on creating the libraries where the documents will be stored.
Creating a form library can be done directly in the portal. Unlike document libraries, form libraries do not exist by default. When you create a form library, it is given a default form template for use with the library. Typically, a form library is used for only one type of form. Therefore, you will have many different form libraries in a typical portal.
To create a form library, follow these steps:
-
Log in to the portal as a member of the Content Manager, Web Designer, or Administrator site group.
-
Navigate to the Human Resources area of the portal.
-
Click the Manage Content link under the Actions list. This brings up the Documents and Lists page.
-
In the Documents and Lists page, click the Create link. This opens the Create page.
-
On the Create page, click the Form Library link. This opens the New Form Library page.
-
In the New Form Library page, name the new library HR Forms and give it a description.
-
Click Create.
Once the form library is created, you can create and upload forms. In Office 2003, XML-based forms are created using Microsoft InfoPath. InfoPath is a product that allows for the design and use of XML-based forms in the business environment. Forms in InfoPath may be designed based on an existing template, a database schema, or from scratch. All of the forms created with InfoPath are interactive with complete control sets like list boxes, options, and text fields. Once the form is created, you can publish it to the form library.
Take these steps to publish an XML-based form:
-
Open Microsoft InfoPath.
-
In Microsoft InfoPath, click the link Design a Form Design a Form.
-
In the Design a Form window, select Design a New Form Customize a Sample.
-
In the Customize a Sample window, select Expense Report (Domestic). Click OK.
-
In the Design Tasks window, select Publish Form. This starts the Publishing Wizard.
-
In the Publishing Wizard, select to create a new SharePoint form library.
-
Type in the URL of the form library page you created earlier. Figure 3-20 shows the Publishing Wizard.
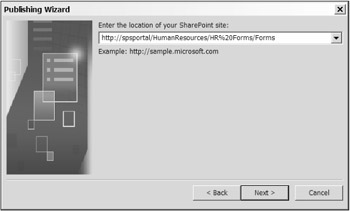
Figure 3-20: Publishing a new form -
Name the new library Expense Reports and give it a description.
Image Libraries
Like form libraries, image libraries are a special type of document library. These libraries are specifically intended to manage digital photography and images such as corporate logos. Although images can be stored in any document library, image libraries have special features to view and use graphical content. Just like any library, image libraries can be created at any area or site. In fact, areas have an image library by default.
Uploading pictures into the library is similar to uploading any document or form. Once the images are uploaded, however, they may be presented in special views available only in the image library. The images may also be edited from the portal using Microsoft Picture Manager or sent directly to any Office application for inclusion in a document. The image library can also be accessed directly as a web folder under Network Places in the file explorer.
Lists
Along with document libraries, lists form the foundation of content within SPS. A list is a collection of information items displayed in an area or on a site. Everyone who has access to the portal will be able to view lists. Every site group except Reader may also add items to a list. Editing and deleting items in a list can be done by every site group except Reader and Member.
When a list appears on a page, users may add items to the list by using the link that appears immediately below the list. For more comprehensive control of list items, users may click the Manage Content link under the Actions list. This gives complete access to add, edit, or delete list items.
To add a list item, follow these steps:
-
Log in to the portal in the Member site group.
-
On the portal home page, locate the Events list.
-
Click the Add New Event link.
-
Add information for a new event. When you are finished, click Save and Close.
-
The new event will now be visible on the portal home page. Click the event title for more details.
-
From the event detail page, select Export Event. This adds the event to you Microsoft Outlook calendar.
Announcements
The most immediate example of a list is the announcements list that appears on the portal home page. This is the only list created by SPS that is not initially empty. Announcements are useful for presenting headlines to users regarding current events or items of immediate importance.
Links
Link list items are hyperlinks to web pages of interest to a team or organization. A blank list of links typically appears on any new site added to the portal. When users add links to the list, they provide the target URL and a description.
Contacts
Contact list items represent team members associated with an area or site. A blank list of contacts is typically created for any new site added to the portal. The blank list is filled by importing new contacts into the list from Microsoft Outlook or entering them manually.
Here is what you need to do to import contacts:
-
Log in to the portal in the Content Manager site group.
-
From the portal home page, click the Sites link to open the Site Directory.
-
In the Site Directory, click the Create Site link from the Actions list.
-
Create a new site based on the Team Site template.
-
When the new site is created, select Lists Contacts to open the list.
-
In the new contacts list, click the Import Contacts link.
-
Select the contacts to import from the address book that appears.
Events
Event list items are headlines associated with meetings, seminars , parties, and so on. When you create a new site, a blank event list typically appears on the home page. Users may enter new events directly from the home page and can also associate a document with the event. This is useful for linking directions or agendas with events.
Tasks
Task items form a to-pdo list for a team. When a new site is created, a blank task list is available. When you create a new task in the list, you may assign it to a team member. The list may then be viewed in summary to track all items for the team.
Issues
Issue items are useful for tracking items such as customer concerns or product defects. When a new site is created, a list of issues is generally not created. You must explicitly create the list for the new site. Once items are added to the list, you may track the response to the issue, its priority, and status.
Alerts
Alerts provide notification to a particular user when an item of interest has been added or updated within the portal. When a new alert is created, the user can define the areas of interest and set up how the notification will occur. SPS can provide alerts pertaining to the following items:
-
Areas
-
Sites
-
Libraries
-
Documents
-
Lists
-
List items
-
Search results
-
Portal users
Adding an alert is accomplished by the individual user and is generally done using the Alert Me link in the Actions list associated with the item of interest. When a user creates a new alert, they can specify how the alert should be delivered. For more sophisticated alerts, users can specify whether notification should occur for new items, changes, or both. Users can also apply a filter to an alert that will look for key words or phrases before sending an alert.
Once the alert is defined, SPS can deliver the alert to a personalized web site, as an e-mail to Microsoft Outlook, or both. Users can also specify whether they want to be notified immediately of changes or have multiple alerts delivered in a summary notification. Figure 3-21 shows a typical notification e-mail received in Microsoft Outlook.
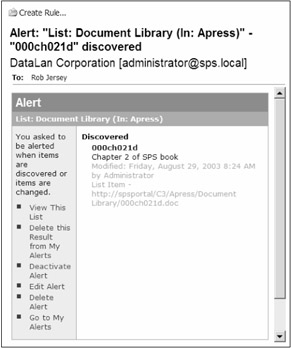
Figure 3-21: Receiving an alert
Discussions
SPS supports two different kinds of discussions: discussion boards and web discussions. Discussion boards in SPS are similar to any newsgroup forum you may have visited on the Internet. Web discussions, on the other hand, are a new way to comment on documents and share those comments with others.
When a new site is created, a discussion board is automatically created. Portal users who have access to the site may start new discussions or participate in existing ones. Discussion boards support expanding and collapsing discussions as well as searching to find postings of interest.
Web discussions allow a way for portal users to view a document online and associate a discussion with the document. Discussions are started using the drop-down list associated with a document in a library. When the discussion is started, the document is opened in the appropriate Office product and a discussion pane appears at the bottom of the document. Figure 3-22 shows an example of a web discussion. I'll cover web discussions in more detail in Chapter 5.
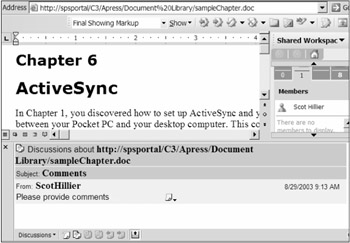
Figure 3-22: Discussing a document
Surveys
Surveys provide a way to poll portal users for input on a subject. When a site is first created, it usually does not have a survey associated with it. Once created, surveys support a wide variety of response types from simple Yes/No answers to free-form text.
You'll need to complete the following steps to create a survey:
-
Log in to the portal in the Administrator site group.
-
Navigate to a site that you created earlier.
-
Click the Create link at the top of the site home page.
-
Select the link to create a new survey.
-
Give your survey a name and description.
-
Click Next .
-
Add a question to your survey and click Finish.
-
Return to the site home page and select your survey from the list.
-
On the survey page, enter a response to the survey.
-
After you have several responses, you can view a summary. Figure 3-23 shows a graphical representation of survey responses.
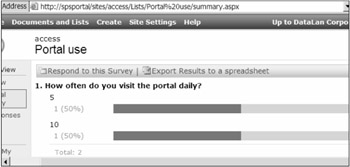
Figure 3-23: Viewing survey results
Searching
Finding information easily is one of the main business benefits of SPS, and the built-in search engine is the primary mechanism for quickly looking across content sources. Searching can be as simple as typing a key word or phrase into the search box located on the portal home page.
The simple search produces a results page initially sorted by relevance and grouped by site. However, the page offers several different views of the results to help users locate information. The available views are sorted by site, author, date, area, or just a simple list of results.
SPS supports an advanced search feature, which is accessed by clicking on the magnifying glass located next to the simple search. The advanced search gives the user much more control over the scope of the search, including where to search and what properties to include.
EAN: N/A
Pages: 92