Exercise 2-1: Creating a Development Environment
Exercise 2-1: Creating a Development Environment
The exercises in this book assume that you have a certain development environment available. This environment includes not only SPS, but also several other products and technologies. In this exercise, you will set up the development environment you will use for the rest of the book.
You should have at least two machines available on which to install Windows Server 2003. For the purposes of this book, you can use almost any edition, but I used the Enterprise Edition. As part of the setup, you will set up one of the servers to act as a domain controller. Therefore, you should be sure that you can dedicate the two machines to your test environment.
This exercise is not intended to walk you through an exhaustive screen-by-screen installation of the required software. Instead, I will focus on special areas of the installation where you need to configure the software or take special care to ensure a correct installation. Generally, I assume that you have some idea of how to install Microsoft server products, but I will try to give enough guidance to keep you from going astray.
Prerequisites
Before beginning your installation, you will want to give some thought to the installation limitations discussed earlier. Although there are certainly pros and cons to any installation, I chose to place Active Directory and Exchange 2003 on one machine and SPS on another. I named the domain controller SPSController and the portal server SPSPortal. Table 2-2 shows a complete list of installed software on each machine.
| MACHINE | LIST OF SOFTWARE |
|---|---|
| SPSController | Microsoft Windows Server 2003, Enterprise Edition Active Directory Microsoft Exchange 2003 |
| SPSPortal | Microsoft Windows Server 2003, Enterprise Edition Microsoft SQL Server 2000 Microsoft SharePoint Portal Server 2003 Microsoft Visual Studio .NET 2003 |
| SPSClient | Microsoft Windows XP Professional Microsoft Office 2003 Microsoft InfoPath |
Installing Windows Server 2003 on SPSController
In this section, you will install Windows Server 2003 on the SPSController machine and create a domain controller. Although an Active Directory domain is not required for SPS2003 to function, I will assume its presence in exercises throughout the book. When you are finished, you will create a second server and join it to the domain.
| Note | The installations of both servers were created using VMware. VMware is a software product that allows a single computer to host multiple operating systems.VMware is not required for the book, but it drastically simplifies the task of managing multiple builds of the operating system. You can obtain VMware from www.vmware.com . |
Getting Started
Boot your computer with the Windows Server 2003, Enterprise Server CD-ROM. Each computer has a different specific method for booting from a CD-ROM. Often you will have to change the boot sequence using the system BIOS. My machines have a special boot menu feature I can select during startup.
Formatting the Partition
When prompted during the installation, be sure to format the installation partition using the NTFS file format. Microsoft SharePoint Portal Server 2003 requires the NTFS file format.
Naming the Server
When prompted during installation, name this machine SPSController . I will refer to this name for the domain controller throughout the book, so it is a good idea to stick with the same name I used.
Skip Joining the Domain
When prompted during installation, do not join an existing domain because this server will be promoted later to a domain controller. When you create the second server, you will join it to this new domain.
Creating the Domain Controller
After the initial installation is complete, log on to the local machine as the system administrator. The Manage Your Server applet will open automatically when you log in the first time.
From the Manage Your Server applet, select the right- facing arrow to add or remove a role to the server. After finishing the Preliminary Steps, select to set up the server in a "Typical configuration for a first server". Follow this by entering the name of a new domain (I used sps.local and will refer to it throughout the book).
| CAUTION | When installing a domain controller,Windows will install the DHCP service. If this service is installed, you should not connect this machine to any network with an existing DHCP server. If you do, this server may issue invalid IP addresses to clients on the network! To avoid this, disable the DHCP service after installation by selecting Start Administrative Tools DHCP. |
Changing Server Policies
Because the domain controller will largely be used for experimentation, you may want to change the policies for passwords so that they can be simplified and will not expire. This will probably save you some time later because you won't forget the passwords you are using. Select Start Administrative Tools Domain Security Policy.
In the Default Domain Security Settings screen, expand the tree under Account Policies and again under Password Policy. Under this node, you can change the definitions for password form and expiration. Figure 2-9 shows the Default Domain Security Settings screen.
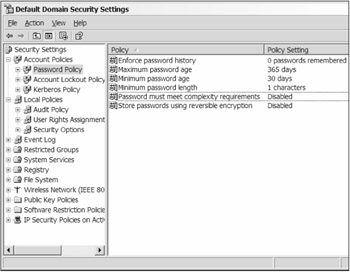
Figure 2-9: Changing password restrictions
Adding Users and Groups to the Domain
After the domain controller is installed, you may add users and groups to Active Directory. Select Start Administrative Tools Active Directory Users and Computers. In the management console, select to add a new user or group . Repeat this until you have several users and groups to work with.
Installing Exchange 2003 on SPSController
In this section, you will install Exchange 2003 and set up mailboxes for all the users. Although Exchange 2003 is not specifically required for SPS to run, the collaborative backbone provided by Exchange 2003 significantly enhances the overall business solution. Before you get started installing Exchange 2003, however, you must install a number of prerequisites.
Configuring Prerequisites
Windows Server 2003 is installed without Internet Information Server (IIS) by default. IIS and several of its components are required for Exchange 2003 installation. To add these components , select Start Control Panel Add or Remove Programs. Then follow the steps below to add the required prerequisites.
-
On the Add or Remove Programs screen, click the Add/Remove Windows Components button.
-
Select the Application Server component and click Details. Figure 2-10 shows the Application Server screen.
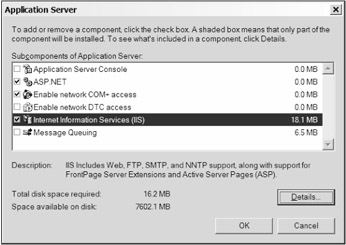
Figure 2-10: Adding required prerequisites -
On the Application Server screen, check the boxes to install the ASP.NET and Internet Information Services (IIS) components.
-
Highlight the Internet Information Services (IIS) component and click Details. This will bring up the Internet Information Services (IIS) screen shown in Figure 2-11.

Figure 2-11: Adding required IIS components -
On the Internet Information Services (IIS) screen, select the NNTP Service and SMTP Service components.
-
Click OK to return to the Application Server screen.
-
Click OK again to return to the Windows Components screen.
-
Click Next to install the components.
Installing Exchange 2003
Once the prerequisites are installed, you may proceed to the installation of Exchange 2003. For the test environment, you can simply choose Typical as your installation type. Figure 2-12 shows the Installation Summary screen.
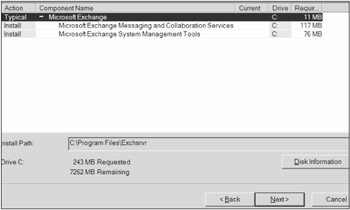
Figure 2-12: Installing Exchange 2003
Configuring Remote Desktop Administration on SPSController
Remote Desktop Administration (RDA) is a handy way to access the SPSController server when you are logged into another machine. This is helpful when you're working the exercises in the book because you can avoid logging into physically separate machines. RDA uses only about 2MB of memory and has little impact on processing power, so Microsoft recommends enabling it for every server.
RDA is enabled from the System Properties dialog on the server. Clients attach to it using the Remote Desktop Connection applet. You can find the client applet at Start All Programs Accessories Communications Remote Desktop Connection on any Windows XP machine. Follow these steps to enable RDA on SPSController:
-
Select Start Control Panel System to open the System Properties dialog.
-
Select the Remote tab.
-
Check the "Allow users to connect remotely to this computer" box, as shown in Figure 2-13.
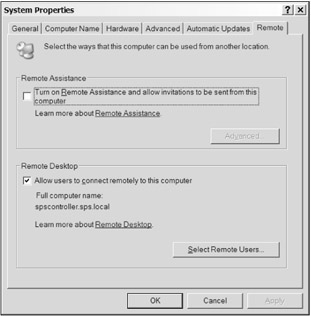
Figure 2-13: Enabling remote desktop administration -
Click OK.
Installing Windows Server 2003 on SPSPortal
Follow the same steps as you did for installing Windows Server 2003 on the SPSController server. There are only two differences in the installation process. First, be sure to name this server SPSPortal . Second, when prompted during installation, join the sps.local domain that you created earlier.
Configuring ASP.NET
ASP.NET is required on the server where SPS will be installed. In order to install ASP.NET, select Start Control Panel Add or Remove Programs. Follow these steps to complete the installation:
-
Click the Add/Remove Windows Components button on the Add or Remove Programs screen.
-
Select Application Server and click the Details button.
-
In the Details screen, select ASP.NET and click OK. Click Next to install the components. Figure 2-14 shows the Details screen.
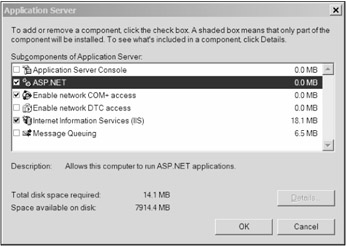
Figure 2-14: Installing ASP.NET
| Note | Under Windows Server 2003, Internet Information Server (IIS) is installed in "lock down" mode. This means that only static HTML may be delivered by the web server until dynamic content is explicitly permitted. Generally, when a dynamic content technology like ASP.NET is installed, the installation routine will enable it in the IIS Manager. However, you should be aware of this limitation in case you want to use other types of dynamic content in your solutions. |
Configuring the Internet Explorer
Windows Server 2003 installs Internet Explorer with Enhanced Security activated. Although this is a good default installation for production machines, it can get in the way during testing and experimentation. To disable Enhanced Security, select Start Control Panel Add or Remove Programs. Follow these steps:
-
Click the Add/Remove Windows Components button on the Add/Remove Programs screen.
-
Uncheck the "Internet Explorer Enhanced Security Configuration" check box. Click Next to uninstall the components. Figure 2-15 shows the Windows Components screen.
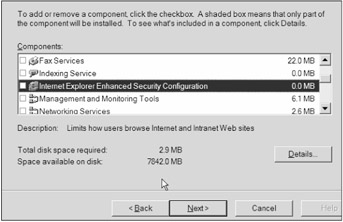
Figure 2-15: Removing Internet Explorer Enhanced Security
Installing SQL Server 2000 on SPSPortal
In a stand-alone server deployment, you may choose to install a separate copy of SQL Server 2000 or use the Microsoft Desktop Database Engine (MSDE). In this installation, I will use a separate copy of SQL Server 2000. The installation of SQL Server 2000 is straightforward with the exception that you will receive a warning indicating that Windows Server 2003 does not support SQL Server 2000. You can continue the installation anyway because you will apply service pack 3 later, which will allow SQL Server 2000 to run on Windows Server 2003. Figure 2-16 shows the warning message.
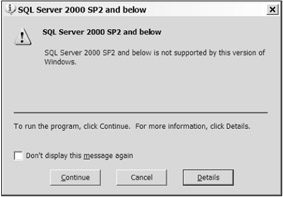
Figure 2-16: SQL Server installation warning
After the initial installation completes, install service pack 3 for SQL Server 2000. During the installation of the service pack, you will be prompted to upgrade the Microsoft Search service. Check the box to perform the required upgrade.
After the installation of the service pack is complete, start the SQL Server service from the SQL Server Service Manager. The Service Manager is accessible by selecting Start All Programs Microsoft SQL Server Service Manager. Be sure that SQL Server is set to start when the server is booted .
Installing SPS on SPSPortal
The installation of SPS2003 follows three phases. First, SharePoint Services are set up on the server. Second, SPS is installed. Finally, proceed through a set of configuration pages to set up the initial portal home. Start by placing the Microsoft SharePoint Portal Server CD in the drive. The installation screen will appear, and you can select "Install Microsoft Office SharePoint Portal Server 2003 components".
When using an existing SQL Server 2000 database, you need to create a domain account for the configuration database administrator. This account needs Create permissions for SQL Server and is also a member of the Local Administrators group for the server where SharePoint is installed. In this installation, I will simply use the Local Administrator account; however, I do not recommend doing so for a production deployment. Figure 2-17 shows the screen where the account information is entered.
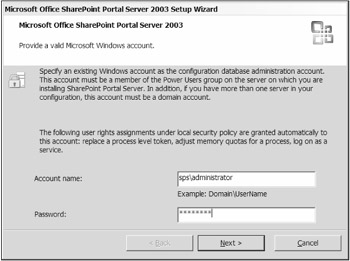
Figure 2-17: Designating the configuration database administrator
Configuring Server Farm Account Settings
Once the initial installation is complete, the browser will open to the Configure Server Farm Account Settings page. This page is part of the SharePoint Portal Server Central Administration site. Figure 2-18 shows the page in the browser.
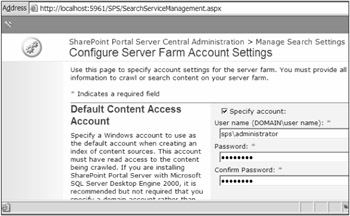
Figure 2-18: Configuring server farm account settings
The Default Content Access Account setting designates the account you should use when creating an index of content sources. Check the box and type the user name of an account that will be used for indexing content. In a typical deployment, this account would have domain-level permissions. Although you would not want to use the administrator account in a true deployment, it is acceptable for your purposes in this scenario (i.e., sps\administrator ).
The Portal Site Application Pool Identity setting designates the account under which the portal sites run. This identity determines the permissions associated with the portal sites. In a typical deployment, this account would also have domain-level permissions and would not be an administrator account. Click OK when you have entered the account information.
Configuration Database Settings
The next page that appears is the Specify Configuration Database Settings page for SPSPortal. In this page, select Create Configuration Database. The database server name should be SPSPORTAL. Click OK when you have entered the account information. Figure 2-19 shows the page in the browser.
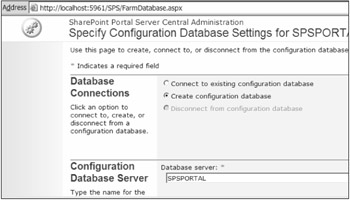
Figure 2-19: Specifying configuration database settings
Configuring Server Farm Account Settings
The next page that appears is the Configure Server Farm Account Settings page for SPSPortal. In this page, add the e-mail address for the administrator in the Contact E-mail Address area (i.e., < administrator@sps.local >). Click OK when you are done. Figure 2-20 shows the page in the browser.
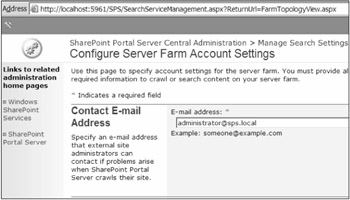
Figure 2-20: Configuring server farm account settings
Component Assignments
The next page that appears is the Configure Server Topology page for SPSPortal. In this page, examine the section entitled Problems with This Configuration. Typically, this section will indicate that you have not set up the Web component, Search component, Index component, and job server. In the Component Assignments section, you will see the four components listed, but not assigned. To assign these components, click the Change Components button. Figure 2-21 shows part of the page in the browser.
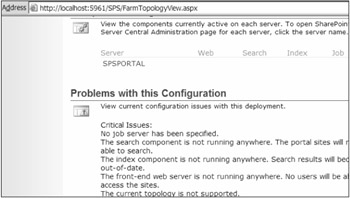
Figure 2-21: Configuring server topology
In the Change Component Assignments page, check the boxes for the Web, Search, and Index components. Then select SPSPortal as the job server. This assigns all of the components to the stand-alone server you have created. Click OK when you are done. Figure 2-22 shows the page in the browser.
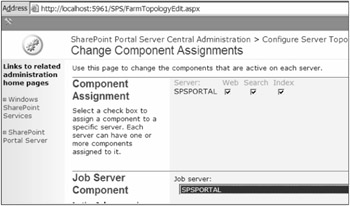
Figure 2-22: Changing component assignments
Global E-mail Settings
After the component assignments are made, you will be returned to the Configure Server Topology page. On this page, click the SPSPortal hyperlink under the Component Assignments section. This link will take you to the SharePoint Portal Server Central Administration page for SPSPortal. On this page, click the hyperlink Server Configuration Configure E-mail Server Settings. Use this page to specify the global e-mail settings for the Exchange 2003 installation you performed earlier. Figure 2-23 shows the page in the browser.
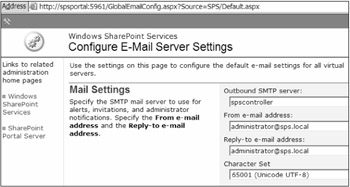
Figure 2-23: Configuring e-mail server settings
Creating the Portal
Once you have finished configuring the e-mail settings, return to the SharePoint Portal Server Central Administration page. On this page click the hyperlink Portal Site and Virtual Server Configuration Create a portal site. This will open the Create Portal Site for SPSPortal page. In this page, specify a name for the new portal (e.g., DataLan Corporation), and contact information for the portal owner. Click OK to create your new portal. Figure 2-24 shows the new portal home page.

Figure 2-24: Creating the new portal
Adding New Users
Once the new portal is created, you will need to give other users permission to access it. You can grant this permission directly from the portal home page. In the lower-right corner of the portal, select Finishing Up Give Users Access to the Portal. This will open the Manage Users page.
SPS supports several different user roles that I will discuss later. For now, simply add a couple of accounts and assign them as Members. When you add the new members , each user will receive an e-mail letting them know that they have been added to the list of authorized users. Figure 2-25 shows the e-mail in Outlook 2003.
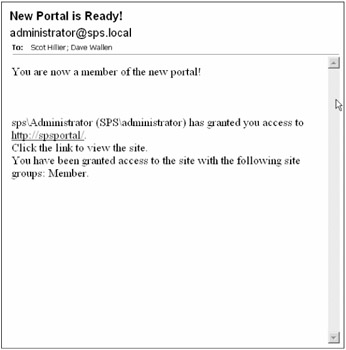
Figure 2-25: Inviting users to the new portal
Installing Visual Studio.NET 2003 on SPSPortal
Visual Studio.NET 2003 is required to work the code examples and exercises in the later chapters of the book. In your installation, you will set it up directly on the SPSPortal server. There are no major issues with the initial installation of the software; however, you should be sure to install both VB.NET and C# because the book contains examples written in both languages.
Preparing SPSClient
In order to work with the examples in the book, you will need to create at least one client machine running Windows XP Professional. You do not need to have any special concerns for the installation other than to join the client machine to the domain you created earlier. After the operating system is installed, you will need to install Microsoft Office 2003 and Microsoft InfoPath. Both of these installations are straightforward; you can simply use the typical installations.
EAN: N/A
Pages: 92