Testing a Swing Application with jfcUnit
Now that we've reviewed the fundamentals, let's get down to testing our application. We are going to be using the SwingSet.jar that came from the original Swing demo that Sun and Netscape put together to demonstrate how to use Swing. An updated version of this jar is available, but quite honestly is more than we need for our purposes.
The first test that we will look at will be the testButton unit test. This tests the simple click and press of a JButton in our application, but before we do that I want to show one of our private methods that we will be using throughout the test process, selectTab().
private JTabbedPane selectTab(String tabName){ Finder finder = new ComponentFinder(JTabbedPane.class); JTabbedPane tabbedPane = (JTabbedPane) finder.find(getOuterFrame(), 0); assertNotNull("Could not find tabbed pane", tabbedPane); helper.enterClickAndLeave(new JTabbedPaneMouseEventData(this, tabbedPane, -1, tabName, 1)); awtSleep(); // suspends the thread to give the tab a chance to load up return tabbedPane; } What does this do for us? Essentially it makes it easier for us to activate the appropriate tab in our application. It does this by first grabbing the outer frame (discussed later in this section) and then making sure that we did not receive an error in doing so. After that it attempts to click on the appropriate tab, and then it puts the AWT thread to sleep so that it has a chance to respond to the action.
Now onto testButton, which tests the simple click and press of a JButton:
public void testButton(){ JTabbedPane tabbedPane = selectTab("Buttons"); Finder finder = new ComponentFinder(JButton.class); JButton button = (JButton)finder.find(tabbedPane, 0); assertTrue(button.getText().equals("One")); button.setAction(new SimpleButtonAction(button)); assertTrue(button.getText().equals("Action Set")); // tells us that the action has been set correctly and that // the buttons text has been changed successfully helper.enterClickAndLeave(new MouseEventData(this, button)); assertTrue(button.getText().equals("I've been clicked")); // click it again to reset it to the original state helper.enterClickAndLeave(new MouseEventData(this, button)); assertTrue(button.getText().equals("One")); } 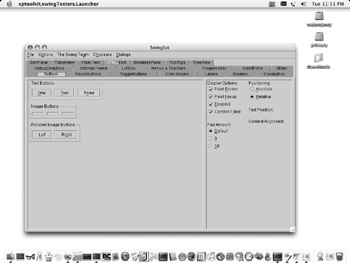
First we set up the proper tab in our application (Buttons in this case), and then we instantiate a ComponentFinder for the component we wish to test, a JButton. Once we have set that up we need to find the first button in our component layout and ensure that it has the proper labeling One. Then we attempt to change the buttons defined action to one that we control (ButtonAction in this case), and then we assert that that change has been made to the button.
Now for the fun part! We call on the helper that we instantiated earlier, and tell it to perform some actions for us. In this case we perform a click action on the button, which in turn should fire off an event that changes the buttons text to Ive been clicked. If all goes well, then this test should pass. Next , we perform the same test again, which should reset it to its original state of One.
Thats about it for the button test. What else could we have done? If the button updated text in a separate area, we could have used another Finder to grab that and then check the values that it contained with what should have been there. Essentially, any interaction that the button has with the rest of the application can be checked in this fashion: a reset button could turn all TextFields empty, so we could check for that, or it could turn some fields on and off.
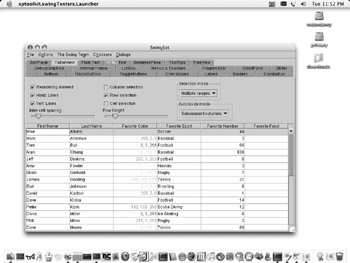
The next test that we will build is testTable. Our goal is to test a JTable to ensure that it is laid out the way that we want it and that we can click into the appropriate column and row.
public void testTable(){ JTabbedPane tabbedPane = selectTab("TableView"); Finder finder = new ComponentFinder(JTable.class); JTable table = (JTable)finder.find(tabbedPane, 0); // we've got the table. now let's make sure it is set up correctly. // this assumes that nobody has touced any of the controls in this tab. // They modify the table. // confirm the number of rows (32), columns (6), and the contents of the first cell (Mike) assertTrue(table.getRowCount() == 32); assertTrue(table.getColumnCount() == 6); assertTrue(((String)table.getValueAt(0,0)).equals("Mike")); // the constructor we're using here: // JTableMouseEventData(JFCTestCase _testCase, JTable _table, int _rowIndex, int _columnIndex, int _numberOfClicks) JTableMouseEventData jtmed = new JTableMouseEventData(this, table, 0, 0, 1); helper.enterClickAndLeave(jtmed); awtSleep(); assertTrue(((String)table.getValueAt( table.getSelectedRow(), table.getSelectedColumn())).equals("Mike")); } Again we define the appropriate tab that our component exists on, and then instantiate a finder for the JTable that we are going to be acting on. Once we have found the JTable we want to test, we start looking at the layout of the table itself to ensure that it is correct; we do this by performing some assertions on the JTable component and what it contains (Mike in our case).
Then we use the helper to perform a click action on a particular cell in the table. We pause the test for a moment, and then we check to make sure that the first cell still contains its default value of Mike.
So, what else could we do here? We could further test our table by changing values in cells or its layout to make sure it is working properly. We could also lock down our table and attempt to make changes on it to see if those succeed. Another option is to use the drag methods to simulate changing the size of a column or row, which could be an interesting exercise on its own.
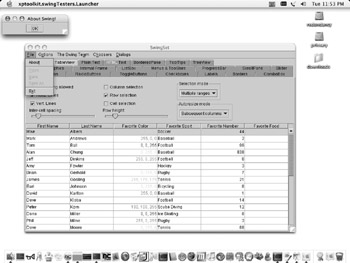
The final test that we will investigate is to test launching a dialog box using the menu system. Additional examples using the menu system can be found in the jfcUnit distribution under MenuNavigationTestCase. This is a little more involved so we are going to step through this.
public void testDialog(){ JFrame outerFrame = getOuterFrame(); //get the first menu Finder menuFinder = new ComponentFinder(JMenu.class); JMenu jm = (JMenu)menuFinder.find(getOuterFrame(), 0); assertNotNull(jm); First, we need to find our menu, this is accomplished using a private method we have defined called getOuterFrame(), here is the code for this method:
private JFrame getOuterFrame(){ if (outerFrame == null){ FrameFinder ff = new FrameFinder("SwingSet"); Set set = ff.findAll(); outerFrame = (JFrame)set.toArray()[0]; //outerFrame assertNotNull("Could not find frame: SwingSet", outerFrame); } return outerFrame; } This method creates a new FrameFinder for the SwingSet frame, then it finds all components that match this finder. Once it has done this we are assuming that only one frame was found and that we only care about the first one in that set and assign it to the outerFrame variable. If it doesnt find the appropriate frame it fails with an assertion failure.
Ok, so we have found the outer frame and arent afraid to use it, once we have that outer frame we instantiate a regular ComponentFinder for our JMenu, in this case the first menu available to us, and ensure that it is not an empty JMenu. Now for the next step, selecting the File menu using jfcUnit and the About menu item.
// select and click the file menu helper.enterClickAndLeave(new MouseEventData(this, jm)); // select the About menu item Finder menuItemFinder = new JMenuItemFinder("About"); JMenuItem jmi = (JMenuItem)menuItemFinder.find(jm.getPopupMenu(), 0); assertNotNull(jmi); // clicks the about menu item helper.enterClickAndLeave(new MouseEventData(this, jmi)); So, again this is relatively straightforward. We use the helper to click the File menu (the first menu element) and use another jfcUnit class called JMenuItemFinder to find the appropriate menu item, About.
Once we have found the appropriate menu item, we go ahead and click on it using the enterClickAndLeave method; this launches our dialog box.
// a dialog is launched List showingDialogs = TestHelper.getShowingDialogs(); JDialog jd = (JDialog)showingDialogs.get(0); assertNotNull(jd); Finder buttonFinder = new ComponentFinder(JButton.class); // it has an ok button which you should click to make it go away JButton jb = (JButton)buttonFinder.find(jd, 0); assertNotNull(jb); helper.enterClickAndLeave(new MouseEventData(this, jb)); assertTrue(! jd.isVisible()); ...
We have now launched a dialog box, so we want to make sure that it is the correct one. We do this using a static method in the TestHelper class called getShowingDialogs(). TestHelper has a number of these methods that enable us to get open windows and dialog boxes that have popped up on the screen. It also has methods that aid in destroying open windows so that we can continue on with testing. It is possible that these methods will be moved into a separate class or classes as the find methods were moved into the Finder classjust something to be aware of.
Now on with the testing. By using getShowingDialogs we have a java.util.List of dialogs, but we only want the active one. Again, we assume that there is only one dialog, so we grab the first element off of the list and then check to make sure that it isnt null. Once we have our dialog box, we want to find the OK button. In our case this is the first button element on the dialog box, so we instantiate a finder for it and then click it. Finally, we check to make sure that the dialog box is no longer visible to the user .
As you can see there is quite a bit to jfcUnit, and weve only scratched the surface a bit. Each application will be different and need to test different UI elements, I highly recommend taking a look at the jfcUnit API to see what will be useful for your project. As with any pre-existing project the best way to add unit testing is to add a unit test any time you change existing code, that way you gradually add your tests plus you ensure that the new code works the way that it should.
EAN: 2147483647
Pages: 228