Using Multiple Entity Beans
|
Updating the Table
Up to this point all you've been able to do is query for rows in the database and make changes to the data already stored. It would be nice to be able to add new rows to the table as well. Let's start from the user's point of view this time and expand your changeLogin.html page to allow a user to add a new login. This involves adding an Add User button to the <form> on the page. Here's the code:
<%@ page language='java' import='entitlements.Login' %> <% ServletContext app = getServletContext(); Login e = (Login)app.getAttribute("login"); %> <head> <body> <form action= "/entitlements/entitlements.LoginMaintenanceServlet" method="post"> Username: <input name="login" value = "<%= e.getLogin() %>"><BR> Timestamp: <input name="timestamp" value = "<%= e.getTs() %>"><BR> Role: <input name="role" value = "<%= e.getRole() %>"><BR> Description: <input name="description" value = "<%= e.getDescription() %>"><BR> Opendate: <input name="opendate" value = "<%= e.getOpendate() %>"><BR> Closedate: <input name="closedate" value = "<%= e.getClosedate() %>"><BR> <input type="submit" name="submit" value="update"> <input type="submit" name="submit" value="add"> </form> </body> </head> Now you need to change the entity bean so it can create a new row. You do this by adding a new method to the local home interface class. The method is simply called create(), and its signature is shown here:
Login create(String login, String ts, String role, String description, String opendate, String closedate ) throws CreateException;
The create() method is a business method in its purest sense because you have to add some code in the implementation class to support its functionality. However, since it returns a local interface object, you must place it in the local home interface class.
You can pass into the create() method all of the fields of the table (as we've done here) or just some of the fields and handle the missing ones programmatically. Before we go any further, let's outline the code in the implementation class:
public String ejbCreate(String login, String ts, String role, String description, String opendate, String closedate ) throws CreateException { setLogin(login); setTs(ts); setRole(role); setDescription(description); setOpendate(opendate); setClosedate(closedate); return login; } public void ejbPostCreate(String login, String ts, String role, String description, String opendate, String closedate) { // since there are no relations, this is empty. } Here, you add two methods to the implementation class. The first is called ejbCreate(), and it has the same parameters as the create() method you exposed in the local home interface class. When the create() method is called on the local home interface, a call is made to the ejbCreate() method, where individual setters are called to populate a new entity bean for the created row. You can place any business logic required during the creation of a new row in the ejbCreate() method. After the method is executed, a call is made to the ejbPostCreate() method, which handles any relationships set up between the current table and other tables in the database. We discuss relationships later in the chapter; for now, the ejbPostCreate() method doesn't have any code to execute.
If you have worked with databases for long, you know sometimes tables are created with an auto-incremented primary key. If the entity bean is related to such a table, you can eliminate the setter for the primary key in the ejbCreate() method. The server creates an appropriate SQL that passes a null to the database for the primary key, thus triggering the insertion of a new key value.
Now let's work on the servlet that will handle the Add Login button as well as the Update button on your changeLogin HTML page. Here's the code:
} else if (submit.equals("add")) { try { Login e = home.create(req.getParameter("login"), req.getParameter("timestamp"), req.getParameter("role"), req.getParameter("description"), req.getParameter("opendate"), req.getParameter("closedate")); } catch(Exception e) {} } In this code, you now have three conditions to check: getting a login, updating a login, and adding a new login. Because you can use the code to handle the new login, it's just a matter of calling the create() method of the local home interface and passing the values for the new login. In return, the bean either returns a new Login bean or throws an exception. Figure 6.9 shows the database before a new row was added using our HTML and servlet code; Figure 6.10 shows the database after the new row was recorded.
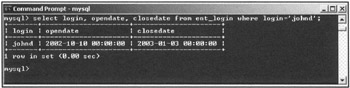
Figure 6.9: Before a new login.
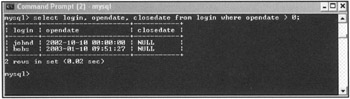
Figure 6.10: After the new login.
Removing a Bean
Probably the easiest task to code and perform with our entity bean is removing a row from the database. In fact, there is no code to write—removing the row occurs by simply calling the remote() method on the appropriate entity bean object. For example:
Login login = home.findByPrimaryKey('johnd'); login.remote(); In this code snippet, we use the findByPrimaryKey() method to obtain the table row with a login of johnd. Using the bean returned by the method, we call remove() to delete the row from the database.
|
EAN: 2147483647
Pages: 180
- Business Continuity Planning and Disaster Recovery Planning
- Initiation of the System Authorization Process
- Appendix B Glossary of Terms and Acronyms
- Appendix C The Information System Security Architecture Professional (ISSAP) Certification
- Appendix D The Information System Security Engineering Professional (ISSEP) Certification