Chapter 12: Data on Ice Revisited
|
| < Day Day Up > |
|
Windows Partitions and USB Storage Devices
You’ve learned to transfer data to your computer by downloading it from the Internet (such as when you are installing applications, fonts, and other files). And you know how to transfer data to and from your computer with CDs and floppies. There are also a couple of other data sources that we have yet to discuss: portable USB storage devices and, for dual-booters, the Windows partition.
USB Storage Devices
Nowadays, tiny portable storage devices that go by names such as PenDrive, JumpDrive, ClipDrive, DiskOnKey, and so on, have become quite popular (see Figure 12-1 on the next page). Because of their small size, these “flash drives” are very handy when you have to transfer fairly large, but not gigantic, amounts of data
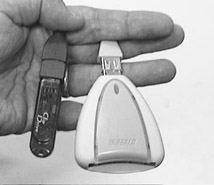
Figure 12-1: A USB flash drive and card reader
from computer to computer (from work to home, for example). They come in a variety of sizes from 16MB to 2GB and are becoming less and less expensive (especially in the 16MB to 256MB bracket).
Memory cards are also popular as portable storage devices; however, to read these cards, you use a card reader (also shown in Figure 12-1). Memory cards are most commonly used in digital cameras. As these memory cards come in a variety of formats, such as CompactFlash, Memory Stick, and SmartMedia, different types of card readers are available to read the different media formats.
As you may already know, USB devices, which are recognizable by their narrow rectangular connector plugs (see Figure 12-2), have become increasing popular, largely because you can plug and unplug them while your computer is running (called hot plugging). While connecting universal serial bus (USB) storage devices to USB ports (which are also shown in Figure 12-2) is about as simple as things can get, accessing those devices so that you can transfer data to and from them is still one of Fedora’s weaker areas, but once you go through the only slightly cumbersome one-time process of setting up your USB storage device, things will be as easy as can be. A little patience will bring great rewards, as the pyWings oracle might say.
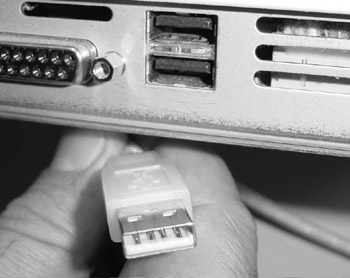
Figure 12-2: A USB connector plug and USB ports
Device Compatibility
As with all forms of computer hardware, you have to wonder whether or not the device is compatible with your system. In the case of Windows or Macintosh compatibility, this is usually quite simply determined by reading the fine print on the side of the box that the device comes in. As you no doubt know by now, Linux compatibility is seldom specified. There also seems to be little in the way of an online guide for Linux compatibility for USB storage devices, probably because many of these devices are manufactured, or at least distributed, by rather small (sometimes no-name) companies, of which there are too many to deal with.
It is pretty safe to say that if the device claims to work on both Mac and Windows, or if it works on recent Windows versions without the need for a special driver, it will probably work on Linux. In the case of card readers, the multi- reader variety, which reads a variety of card types, is more likely to give you headaches. Better, in my opinion, to stick with those specifically designed for one type of card.
If you are the worrying kind, and you are not soothed by my words of encouragement, you can try one of the online Linux forums and ask for some recommendations, or if you have a particular model in mind, ask if anyone has experience with that particular device. And then there is the tried-and-true Google search, as I so often suggest for questions of hardware compatibility. Just type the make and model of the device in question along with the word “Linux,” and see what happens.
Locating Your Device
Before you go about setting up your system to deal with your new USB storage device, it is useful to know how it is actually being handled by Linux. The mass storage driver in Linux deals with all USB storage devices as if they were SCSI (Small Computer System Interface) drives. SCSI (pronounced scuzzy — Ouch!) devices were once the most popular type of peripherals out there, but they have largely been supplanted by the cheaper and easier-to-deal-with USB devices. This means that such devices, whether real SCSI or USB, will be listed in your Hardware Browser as SCSI drives under the /dev listings: /sda, /sdb, /sdc, and so on, depending on how many of these devices you have. As you might have guessed, these listings (sda, sdb, sdc, and so on) stand for SCSI device a, b, c, and so on.
To see what I am talking about, plug your USB storage device into a USB port on your computer; you don’t need to shut down your machine before doing this. Once you’ve done that, you need to find out where the device actually is, according to the computer. Now, of course, you know it is stuck into one of your USB ports, but your system has a reality all its own.
The easiest graphical way to find the USB device is to use your Hardware Browser. Just go to the Main menu and select System Tools > Hardware Browser. You will be asked for your root password, so type it when prompted and click OK. A window will then pop up telling you that it might take some time to check your hardware configuration; but before you finish reading it, the Hardware Browser window will open, and the message window will vanish. On the left side of the Hardware Browser you will see a number of headings, so click the one that says Hard Drives (not the one that says USB devices).
If your USB storage device is hardware compatible with Linux, it will most likely appear in the list as /dev/sda1, assuming it is the only device of that type you are dealing with (see Figure 12-3). If you are working with a second or third device, it might appear as sdb1, or sdc1, and so on.
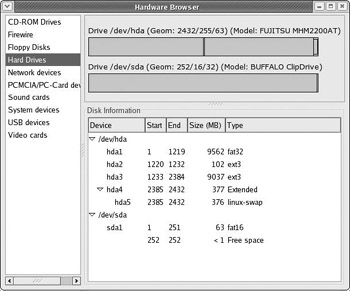
Figure 12-3: Looking at a USB storage device in the Hardware Browser
Setting Things Up — Editing the fstab File
As things are right now, your system is recognizing your USB storage device, but you still really can’t use it, at least not easily. In order to set things up so that you can use your storage device anytime you want with just a couple of mouse clicks, you need to create an entry for the device in your fstab file.
Now I must admit that the first time I heard about this fstab file, and that I was going to alter it in some way, I sort of got the willies. Just the name of the file seemed creepy enough: f+stab. I thought the name was one of those off-the-wall Linux acronyms for something dark and dreary. Alas, I was relieved (or maybe even disappointed) to find out that fstab merely stood for File System Table. By modifying the fstab file, you are simply adding an item to a table. Nothing terrifying about that.
To get at your fstab file, you will use your now-beloved Terminal, so open it by clicking the Terminal launcher in your GNOME Panel. Once you’ve done that, become root by using the su command, and then type gedit /etc/fstab and press ENTER. In case you’re wondering, the first part of that command opens the text editor program Gedit, while the second half tells Gedit to open the fstab file located in the etc folder. Once it all opens, your fstab file should look like the one in Figure 12-4.
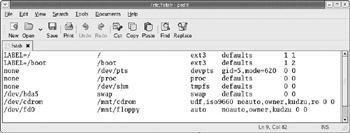
Figure 12-4: Modifying the fstab file
Now that the fstab file is open, you can add an entry for your new USB storage device by using the device location listed in the Hardware Browser. What you need to do is go to the bottom of the list and add something like the following:
/dev/sda1 /mnt/pendrive auto defaults,users,noauto 0 0
Now to explain what this all means, let’s go through it bit by bit.
-
The first element, /dev/sda1 (or /dev/sdb1, and so on), is where the system says your device is located. This is the bit of information that you got from the Hardware Browser. The 1 in sda1 points to the first (usually only) partition on that device.
-
The second element, /mnt/pendrive, is the mountpoint for the drive. This mountpoint doesn’t exist yet, but you will be creating it in the next section. The part of this element that comes after /mnt/ can be anything you like. If, for example, you are setting up a card reader instead of a PenDrive, you could call it /mnt/cardreader.
-
The third element is the file system for the device. To keep things simple, you will be using auto, which should be self-explanatory in this case.
-
The next three elements, which are strung together without spaces (only separated by commas), are the other settings for the device: defaults tells the system to handle this device in its usual way, users gives all users of the machine permission to use it, and noauto tells your system not to mount the device automatically on startup, as it is a removable device that might not be there when you start up. Make sure you don’t type any spaces around the commas in this part of the entry.
-
The last part, the two zeros, is a bit complicated, so just trust me on this one. Make sure that you have just one space between the two zeros.
You don’t need to worry too much about lining up your new entry with the ones before it. However, if you space things out, be sure to avoid using your TAB key to make the spaces, as it causes problems in some text editors. Once you done, click the Save button in Gedit and then quit the program.
Creating a Mountpoint
Now that your fstab has been edited, it is time to create the mountpoint that you listed in your fstab entry. This is quite easy, as you already know the mkdir command. Just go back to your Terminal window, which should still be in root mode, type in mkdir /mnt/pendrive (or replace pendrive with whatever name you gave your storage device in the fstab file) and press ENTER.
Mounting Your USB Storage Device
It should now be very easy to use your new USB storage device. Plug in the device, if it isn’t already plugged in, and right-click your desktop. In the pop-up menu, select Disks > pendrive, and an icon for your new drive will appear on the desktop (in Red Hat Linux 9 you may have to restart your machine before your new storage device name appears in the pop-up menu). After that, you can use it like any other storage device by double-clicking it to open a Nautilus window. You can then drag files to and from the device as if it were a hard disk or floppy.
| Note | Fedora users should note that dragging a file from your USB storage device to your desktop will move the file, rather than copy it; therefore, once you’ve completed the drag-and-drop procedure, the file will be located on your hard disk but will erased from your USB device. On the other hand, dragging a file from your USB device directly to your Home folder or any other location therein will result in the file being copied rather than moved — it will be present on both the hard drive and the storage device after the drag and drop is complete. In the case of Red Hat Linux 9, all drag-and-drop procedures are treated as copies rather than moves. |
Unmounting Your USB Storage Device
Once you are done using your USB storage device, you have to unmount it before you can unplug it from the USB port. If you do not do this, then none of the files you dragged to the device will be saved there, which could be confusing. To unmount the USB device, right-click the desktop icon for the device and then select Unmount Volume in the pop-up menu. The icon will disappear, and then you can unplug the device if you like, though you do not have to. Make sure to close any open Nautilus windows for the drive before trying to unmount it, or the system won’t allow you to do so.
Sometimes, as when unmounting floppies, your system will jump the gun a bit and tell you that it cannot unmount the drive, when in fact it is busy in the background doing just that. As I mentioned before, if you get such a no-can-do message, but the drive icon disappears anyway, you can ignore the system warning. Once the icon is gone, the drive is unmounted.
|
| < Day Day Up > |
|
EAN: 2147483647
Pages: 188