Project 10A: Installing APT and Synaptic
|
| < Day Day Up > |
|
In this project, you will install the APT program, which comes in the form of an easy-to-install RPM. Once you install APT, you will then use it by command line to install its graphical front end, Synaptic. All in all, both steps are very easy.
Getting the APT File
To get started, the only file you will need is the one for APT. You can get this by going to http://freshrpms.net/packages/ and clicking the link appropriate for the version of Linux you are running. After the new page appears, go to the left side of the page and click the apt link, which will take you to the page for that package. You will see the APT file listed at the top of the page.
To download the file, just right-click the tiny floppy-disk icon to the left of the filename, and then select Save Link Target As in the pop-up menu. You do not need the apt-devel file, so don’t bother with that.
10A-1: Installing APT
As APT comes in the form of an RPM file, installation is a breeze, as you now know. Just double-click the RPM file, and then follow the usual RPM installation procedures that you learned in Chapter 8.
10A-2: Entering APT Proxy Settings
If your Internet service provider requires you to connect to the Internet via a proxy server, you will have to add your proxy settings to APT before you can do any updating or downloading. If you do not connect to the Internet via a proxy server, you can skip directly to the next step in the project (10A-3).
Inputting proxy settings in most programs is easily done in the Preferences window for that program. In the case of APT, it is a tad more complicated, but just a tad. To input your proxy settings for APT, you will need to open the apt.conf file. As this file is in root territory, you will have to open and alter it after becoming root.
To get started, open a Terminal window and become root. Once you’ve done that, type gedit /etc/apt/apt.conf and press ENTER. This will open up the apt.conf file in the Gedit text editor (in root mode). Once the file is open, scroll through it and look for an entry beginning with the word Acquire. When you find it, change it so that it looks similar to the entry in the following example, but use the proxy and port information supplied by your service provider or network administrator.
Acquire { Retries "0"; Http { Proxy "http://proxy.yourserver.com:3128/"; In case your provider gives you the proxy address and port number separately (for example, http://proxy.magnumopus.se and port 6048), type a colon after the address and then add the port number after the colon. Using the previous example, that would be http://proxy.magnumopus.se:6048/. Yours will no doubt be different.
10A-3: Updating the APT Database
Now that APT is installed on your system, you are almost ready to use it. I say “almost” because you first have to tell APT to update its database so that it will know what is available for download from the online repositories and what you have already installed on your system in RPM form. To perform the update, open a Terminal window, become root using the su command, and then type apt-get update and press ENTER.
Checking your system and the repositories should take APT a couple of minutes the first time around, so just be patient and ponder your future (or something) until your prompt reappears. Once it does reappear, you will be ready for action.
10A-4: Using APT to Install Synaptic
Your first taste of using APT via the command line (and probably the last you’ll want to have with it) is to download and install Synaptic, the graphical front end for APT.
The general format for the command to download and install a package via APT is: apt-get install package_name. In this case, you are going to be installing Synaptic, so open a Terminal window, become root, and then type apt-get install synaptic and press ENTER. APT will then begin downloading Synaptic, and, once it’s done doing that, it will go on to install it. During this time, APT will show you its progress, as you can see in Figure 10-1.
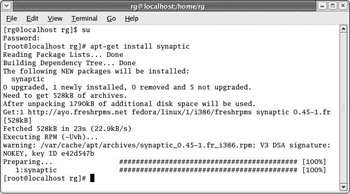
Figure 10-1: Downloading and installing Synaptic
After your prompt reappears, the process is complete, and you can begin using Synaptic instead.
|
| < Day Day Up > |
|
EAN: 2147483647
Pages: 188