KDE
|
| < Day Day Up > |
|
I’ve kept you in the GNOME world for as long as I can, but it is human nature to want to see what is on the other side of the fence. However, I’d like to say a few words before you journey off to KDE land.
Up until now, I have not dealt with KDE in this book other than in regard to a few KDE applications. As I mentioned earlier, this is because I feel that GNOME is much easier for beginners to deal with. GNOME is also the default environment in Fedora and it is thus a bit more developed (at least in Fedora). And finally, I just like it better in terms of look, feel, and convenience (after all, it has the ever-useful Nautilus emblems and CD Burner). If you really want to hear more about the reasons for my GNOME orientation, then take a trip to the Edgy Penguins site (www.edgy-penguins.org/compurants) where I spell it all out.
Once you do get over to the “other side,” you will find that KDE looks amazingly similar to GNOME, as both use the Bluecurve theme, though the window borders in the KDE version are of the pre-Fedora variety. There are other subtle differences here and there, of course, but armed with your newfound Linux skills, you should be able to handle yourself without difficulty. I am a firm believer in the learn-through-exploration school of thought.
Booting into KDE
To boot into KDE, get to your login screen either by starting up your machine or by logging out of your current GNOME session. Click the word Session at the bottom of the login screen. This will open a small window in which you should select KDE and then click OK. Type your username and user password and press ENTER, and a small message window will open, telling you that you have selected to use the KDE desktop for the following session and that you will need to use the Switchdesk utility if you want to make KDE your default environment. The only choice you have in this window is to click OK, so click it, which just tells the system, “Yeah, yeah, I understand, let’s get on with it.”
Now if you are a Red Hat Linux 9 user, you too will be presented with a small message window; however, yours will ask you on the spot if you want to make KDE your default environment for future logins. I would recommend clicking No your first time out, until you know whether you really prefer KDE or not. Either way, it doesn’t really matter, as you can always make GNOME your default desktop again by going through the same process.
Differences Between KDE and GNOME
There are a few things you should know about the KDE environment to make your stay over there a good one: how to kill misbehaving windows, how to take care of general environmental issues (such as customizations and the like), and how to take screenshots. All of these are quite different in KDE.
To get rid of misbehaving windows in KDE, just use the CTRL + ALT + ESC key combo. After pressing these three keys at the same time, your cursor will turn into a rather ominous skull and crossbones, which you can then use to zap away any window that refuses to budge. Of course, if your misbehaving window suddenly starts behaving, or if you suddenly change your mind, you can cancel the scull and crossbones cursor by right-clicking your mouse anywhere — no damage done.
To take care of general KDE environmental matters, use the KDE Control Center, which you can access by going to the Main menu and selecting Control Center (see Figure 19-3). After it opens, you can click the + sign next to Appearance & Themes, where you can perform most of the thematic customizations that you did in GNOME, though many of the KDE themes will be different from those in GNOME, and adding new ones is a bit more cumbersome. Note that you cannot use the themes you installed in GNOME in KDE — they just ain’t the same.
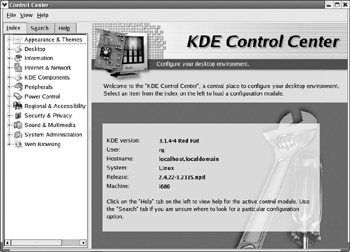
Figure 19-3: Customizing KDE with the KDE Control Center
To take screenshots in KDE, you must use the KDE screen capture program, which you can access by going to the Main menu and selecting Graphics > Screen Capture Program. The program allows you to take shots of either the whole screen or a single window (through use of a timer), and it is pretty straight- forward and easy to understand.
Finally, before leaving you to your own resources in KDE land, I will mention one feature of KDE that I do find rather handy. This is the ability of Konqueror (KDE’s answer to Nautilus) to create thumbnails of all the images in a designated folder and then set them up as a Web page, an example of which you can see in Figure 19-4. To take advantage of this cool feature, navigate to the folder that has the images you want to thumbnail, and then in the Tools menu of the Konqueror window, select Create Image Gallery. The rest should be clear to you after that.
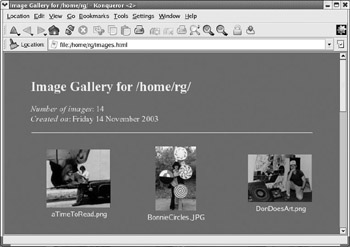
Figure 19-4: An image gallery created in KDE’s Konqueror
If you find that you like this thumbnail feature but don’t really want to have to deal with KDE to take advantage of it, I have a set of instructions you can download for a simple program called Jigl, which does the same thing (www.edgy-penguins.org/LFYM/newprojects.html).
Changing Default Desktop Environments
So let’s say that you’ve taken a liking to KDE and want to stick with it for a while, or that you’ve been giving KDE a try for a while and want to come back home to GNOME. To change your default desktop environment, you will have to use the Switchdesk utility.
You can run Switchdesk by going to the Main menu and selecting System Settings > More System Settings > Desktop Switching Tool. This will bring up a very simple window (shown in Figure 19-5) from which you can choose KDE (or GNOME, if you want to switch back after making KDE your default environment). After making your choice, click OK, and you will get another message window telling you that your default desktop system setting has been updated, and the change you made will take effect after restarting. Just click OK to close that window. Don’t go messing with the TWM selection at the bottom, as it will take you to a creepy place you won’t want to be. I won’t say more than that, but if you do ignore my warning and end up not knowing how to get out of TWM land, just left-click the completely empty TWM desktop, and select Exit from the pop-up menu.
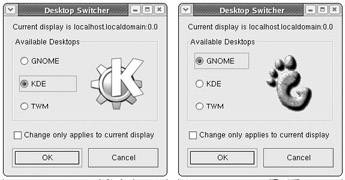
Figure 19-5: Changing the default desktop environment with Desktop Switcher
|
| < Day Day Up > |
|
EAN: 2147483647
Pages: 188