Chapter 19: Leaving the Nest
|
| < Day Day Up > |
|
Getting Ready to Move Out on Your Own
We’ve just about come to the end of our Linux adventure together. However, before I cast you off on your own, there are a few areas left that I should cover so as to round out your total Linux knowledge base up to this point. This chapter really consists of four parts: The first deals with system settings, the second with KDE, the third with keeping your system up to date, and the fourth with a collection of odds and ends that just didn’t fit nicely anywhere else but are important nevertheless.
Some Useful System Settings
Although we’ve already gone over most of what you need in terms of system settings (thematic and printing preferences and the like), there are a couple of other areas that warrant at least a little mention.
Direct Login (Bypassing the Login Screen)
If you are the only person using your machine, you may be wondering why you need to bother logging in every time you start up your machine. Well, actually you don’t have to; it is possible to set things up so that the system will automatically log you in, thus bypassing the login screen.
To set things up this way, go to the Main menu and select System Settings > Login Screen. You will then be prompted for your root password, so type it and click OK. The Login Screen Setup window will appear (see Figure 19-1).
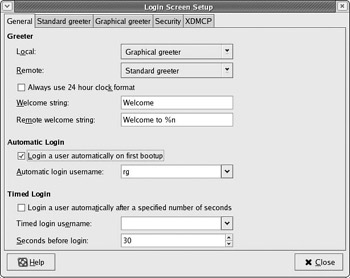
Figure 19-1: Changing the auto-login settings in Fedora Core
In the Login Screen Setup window, go down to the Automatic login section, and check the Login a user automatically on first bootup checkbox. Then, in the Automatic login username drop-down menu, select your username. Once you’ve done that, click the Close button.
Now, the next time you boot up your machine, you will bypass the login screen and go directly to your desktop. Of course, if you need to get back to the login screen for some reason or other (such as when switching into KDE, which I’ll discuss shortly, or switching into another language mode), you can still do so by simply going to the Main menu and selecting Log Out.
Changing Your Screen Resolution
Screen resolution, to give you a very non-technical explanation, refers to the size of everything that appears on your monitor. A high resolution (such as 1024 by 768) gives you more desktop area to work with, but it makes everything appear a bit smaller. A low resolution (such as 640 by 480) makes everything bigger and easier to see, but it also gives you much less desktop space to work in. You may also find that certain monitors just look better at certain resolutions than at others. An LCD monitor that I just hooked up to one my machines looked really flat and blurry at 800 by 600, but when I changed it to 1024 by 768, it was beautiful. You might want to experiment a bit with your screen resolution settings if your screen doesn’t look as good as you think it should.
The numbers, in case you were wondering, refer to the number of pixels (or dots) displayed in the screen’s width and height, respectively.
Changing your screen resolution is quite easy in Fedora. All you have to do is go to your Main menu and select Preferences > Screen Resolution. The Screen Resolution Preferences window will open, and you can select the resolution you want in the Resolution drop-down menu. It is also a good idea to check the specs for your monitor to see if the resolution choice you make requires any change in the refresh rate for your monitor.
Once you have selected your preferred resolution, click Apply, and the resolution will immediately change. A small window will open, asking whether you want to return to the default resolution or keep the changes you’ve just made (see Figure 19-2). You can click whichever button meets your desires at the moment.
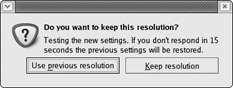
Figure 19-2: Changing screen resolution
Changing Your Color Depth
Color depth refers to the number of colors displayed on your screen. The basic color level is 256 colors; this is sometimes called 8-bit color, as the computer must send eight bits of data to create one pixel on the screen. However, if you want to view graphics, especially photos, a color depth of 256 colors will cause those images to look muddy and blotchy. In this case, it is better to increase your color depth to thousands of colors (called 16-bit color), which should be more than enough.
You may be wondering why you shouldn’t just go wild and pick millions of colors (32-bit color), which would be a logical enough way of looking at things — a sort of why-take-the-Bug-when-the-Cadillac-is-in-the-driveway view of things. Well, to stick with the metaphor, the reason is gas mileage, so to speak. Basically, the more information you have to send to your screen, the more computing power and memory you use, and that slows things down. Consequently, a computer running a text-only, black-and-white system (a 1-bit system) would be considerably faster than the same computer running an 8-bit color system, which would be faster than 16-bit color, which would be faster than 32-bit color.
If you want to change your color depth, then you have to go to the Main menu and select System Settings > Display. After providing the requested root password, you will see the Display Settings window, in which you can change your color depth (you can also change the screen resolution here too). Once you are done, click OK. The changes will take effect after you log out and then back in again, or after you restart your machine.
|
| < Day Day Up > |
|
EAN: 2147483647
Pages: 188