Project 13B: Using XMMS Skins
|
| < Day Day Up > |
|
In Chapter 5, you learned how to customize the look of your system by changing window border and application control themes. However, XMMS is configured to hide its window bars, and it uses controls of its own, so any cosmetic changes you make to your system will have no effect on XMMS. You can, however, directly change the look of XMMS by using its own themes, called skins. The default skin for XMMS in Fedora Core is called Bluecurve, and it essentially follows the default theme of the rest of the system.
Before we can move on, you are going to have to install some skins to work with. This is easily enough done by running Synaptic, typing xmms-skins in Synaptic’s Find box, and then following the usual Synaptic download/installation steps. Once done, you will have a hefty collection of XMMS skins to work with. If you installed your Fedora Core or Red Hat Linux system from a 3-CD installation disk set, the xmms-skins package is already included on the disks, so you can install the skins by using the Package Management window instead. Just click the Details button next to Sound and Video, and then check the checkbox next to xmms-skins to get things rolling.
13B-1: Changing Skins
As you can see in Figure 13-15, what you are going to do in this part of the project is change the default Bluecurve skin (shown on the left of the figure) to the Ultrafina skin (on the right of the figure), which for my money (and I admit I don’t have much) looks a lot better. You may beg to differ, but just go along with me for now. You are free to do anything you like once we part company — no feelings hurt.
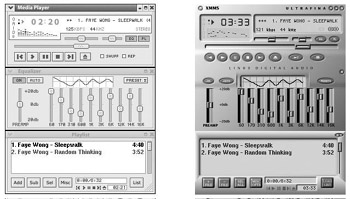
Figure 13-15: Changing XMMS skins: before and after
To bring about this remarkable transformation, you will first need to start XMMS, if it isn’t already up and running. After that, right-click anywhere on the main XMMS program window, and from the pop-up menu select Options > Skin Browser. This will open the Skin Selector window (see Figure 13-16), in which you will scroll down until you find Ultrafina. Once you see it, click it. Like magic, the transformation will be complete.

Figure 13-16: The XMMS Skin Selector window
Boy, that was simple! You can now, of course, browse through the other choices by simply clicking them, one by one, until you find one that does something for you.
As you may have noticed, there is a lot of variation in the world of skins. Some can be so wild that you can barely use them, while others may be quite dull yet very easy on the eye. There is also the configuration of your XMMS components to consider. You may agree that the Ultrafina skin looks much more handsome than the default Bluecurve skin when the components are stacked on top of one another, as in Figure 13-15 on the previous page. However, place the components side by side while using Ultrafina, and it all looks pretty weird, whereas a more traditional stereo system skin, as shown in Figure 13-17 on the next page, seems much more the ticket.

Figure 13-17: XMMS components stacked in classic stereo configuration
13B-2: Downloading Additional Skins
If you’ve gone through the whole lot of choices and found nothing to get your heart a-pumping, you can download still other skins from the Web. The XMMS site (www.xmms.org) has quite a few, but even more can be found on the Winamp site (http://classic.winamp.com/skins). Yes, you’ve guessed right; Winamp skins and XMMS skins are interchangeable. Just be sure not to use those skins designed for Winamp 3, which will not work. You can tell which are which by the file extensions: Winamp 3 skins end in .wal, Winamp 2 skins (the XMMS compatibles) end in .zip, and native XMMS skins end in .wsz.
Once you find some skins that you like, download them in the usual manner.
13B-3: Installing Your New Skins
Once you have downloaded some new skins, you will have to make them available to XMMS by putting them in the right place on your system. You needn’t unzip them, though; you can use them as is, which saves you some minor grief. Anyway, at this stage of the game, this is most easily done by putting them in the .xmms folder within your Home folder.
Directories preceded by a dot are normally hidden from view, so either you can go to the Preferences menu in a Nautilus window and then check Show hidden and backup files in the Preferences window, or you can just open another Nautilus window, and in the Location box type ~~/.xmms/Skins/ and press ENTER. From there on in, it’s a simple drag-and-drop procedure. Just drag the downloaded skin files directly into the Skins folder, and that is that. The next time you open the XMMS Skin Selector, your new skins will be there waiting in the list. All very simple.
|
| < Day Day Up > |
|
EAN: 2147483647
Pages: 188