Building the Web Tier
|
WebSphere Studio Application Developer simplifies the building of J2EE applications. The previous chapter already provided us with a brief introduction to WebSphere Studio, so instead this chapter will focus on using Studio to build the presentation portion of our application. The basic flow of building the presentation logic will be to:
-
Create the projects necessary for the application
-
Create the home page
-
Create the banner and the navigation menu
-
Create the controller
-
Create the model JavaBeans
-
Repeat for adding additional content and pages and updating the controller
The presentation we will be building will start simple, adding complexity in stages. Eventually, the application will look like the following set of composed pieces:
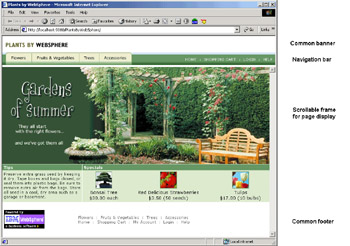
| Note | This screenshot is of the full Plants-By-WebSphere example. In this chapter we will only be building a few parts of it. |
An upper frame will contain a common banner and navigation bar. A scrollable lower frame will contain the page being displayed along with a common footer.
Creating the Projects
The easiest way to build the necessary projects is to use the WebSphere Studio wizards. The web application project will need to reside inside a J2EE enterprise application project where all the modules will eventually be assembled. File | New | Project …
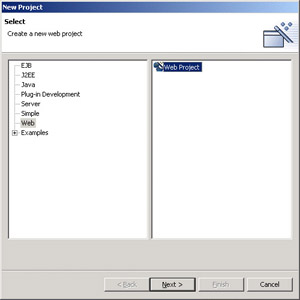
Select Web and then select Web project. Click the Next button. The Create a Web Project wizard is displayed:

There are two kinds of web projects supported by WebSphere Studio. For simpler uses, a static web project can be used for creating static HTML pages. The Plants-By-WebSphere application will use a J2EE web application project that can be used to create dynamic content using JSP pages and servlets as well as static content.
The Web Project Features box allows for some customization of the web project on an as-needed basis. A variety of customizations can be added to the project including:
-
Create a default .cvsignore file
This can be set when using CVS for source management of the project so that the WEB-INF/classes directory is not included in the managed set of files. -
Create a default CSS file
Can be used to help provide a common look and feel for the web application project. The Plants-By-WebSphere application uses a common look and feel, so we'll check this feature. -
Include Tag libraries for accessing JSP objects
These tag libraries allow you to access the page context of a JSP page and the attributes of a web application or HTTP session. You can also set the HTTP request and response for a JSP page. -
Include Tag libraries for database access
This feature gives you a set of beans and a tag library that will help you to access your databases through your web application. -
Include Tag libraries for internationalization
Tag library I18N will be added to your project.The I18N custom tag library contains tags that can help you manage the complexity of creating internationalized web applications. -
Include the JSP Standard Tag library
This tag library is an implementation of the JSP Standard Tag Library. This provides a set of standard tags for common function. This feature should only be added to a web project with a J2EE level of 1.3. -
Include utility Tag library
These tag libraries allow you to handle date- and time-related functions, manipulate strings, and send e-mail. They also include examples that illustrate basic tag library code techniques.
In the Project name field, enter the name of the web application project. For instance, enter PlantsbyWebSphereWAR. It is recommended that the module type be identified in the project name to prevent confusion and collision of names with other projects. Click Next. The J2EE Settings Page will be displayed:
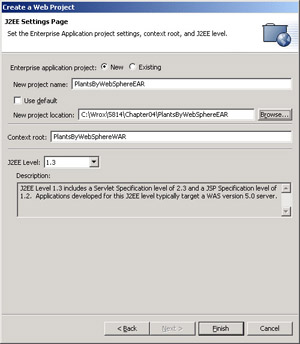
The J2EE Settings Page covers the relationship of the web project to a J2EE application. A choice can be made to include the web project in an existing J2EE application project or to create a new one. We'll create a new one, so ensure the New Enterprise Application Project button is selected and enter the name to use for the J2EE application project. For example, enter PlantsbyWebSphereEAR. In the context root field, enter /PlantsByWebSphere. Make sure the J2EE Level is set to 1.3.
| Note | If the J2EE level option is not displayed, the J2EE preferences may need to be set to enable J2EE 1.3 features. See the Window | Preferences, J2EE settings, Highest J2EE version used for development panel item. |
Click Next if it is enabled. Actually, clicking Finish would work, but the next panel is important to know about. The module dependencies panel will be displayed. If the Next button is not enabled, there are no projects to make this one dependent on:
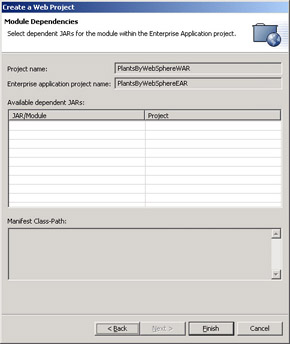
This panel allows other projects to be set up as dependencies. The MVC development pattern allows the development of the presentation and business logic to proceed in parallel and to some extent models the migration of a web-centric application to a more scalable EJB-centric application. When this migration takes place, an EJB project will be added to the application and the PlantsbyWebSphereWAR project will be dependent on it. This could be set up now if the EJB project existed. We'll be developing the EJBs in the next chapter so for the moment just hit Finish.
The workbench will now contain a new web application project in the Navigator view, as well as a new enterprise application project:
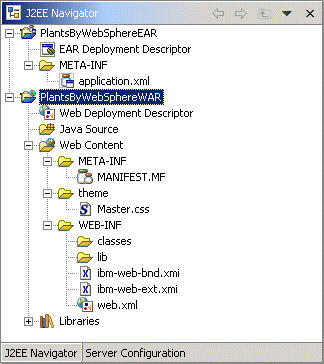
The organization of the project directory structure follows a J2EE platform role-based scheme. Page developers place HTML, JSP files, and other resources in the Web Content folder. Servlets and other logic are placed in the Java Source folder. The build process will take care of compiling Java code in the Java Source tree and packaging the generated classes in the WEB-INF/classes directory of the WAR file. The WEB-INF directory contains the web.xml deployment descriptor for the WAR file as well as the IBM descriptor extensions (ibm-web-bnd.xmi and ibm-web-ext.xmi).
Creating the Home Page
There's also a wizard for creating HTML pages. The File | New menu is sensitive to the current perspective. The perspective currently in use is the Web perspective (as noted by the globe icon on the perspective toolbar on the far left of the screen). The New menu offers selections appropriate for adding to a web application when the Web perspective is selected.
To create the home page, select the Web Content folder of the PlantsbyWebSphereWAR project. Right-click the folder and select File | New | HTML/XHTML File. This displays the new HTML/XHTML File wizard:
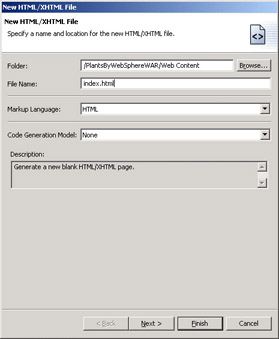
The Markup Language box allows us to select to create either an HTML or XHTML page with or without a frameset.
The Code Generation Model is not used for WebSphere Studio Application Developer.
Enter index.html in the File Name field. If you click Next, you can change the encoding and DOCTYPE used as well as select a stylesheet, though appropriate defaults are already selected. Note, the default encoding and DOCTYPE can be changed by clicking Window | Preferences, Web and XML Files + HTML Files. Click Finish. If asked whether or not to save resources, click Yes. The workbench will now be editing the home page:
| Important | As more projects are included in the application and different perspectives are used, be sure to check the Folder field each time to make sure the new files are created in the correct location. Selecting the destination in the project to create in before selecting File | New can help ensure it ends up in the correct place. |
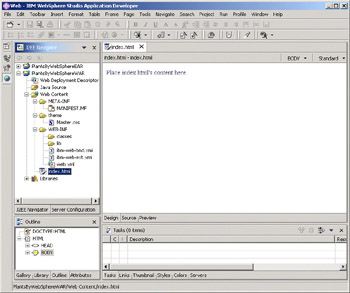
Notice that in the J2EE Navigator view, the index.html has been placed in the Web Content folder.
To change the title for the home page, switch the HTML/JSP editor to its Source view, then expand the HEAD item in the Outline view. Select the TITLE element in the Outline view. The HTML/JSP editor should now have the <TITLE> element highlighted. Change the <TITLE> value from index.html to Plants-by-WebSphere Home Page. Switch back to the Design tab to see the editor's title bar change.
| Note | Of course it's not necessary to go through the long winded process of selecting the <TITLE> tag in the Outline view and then editing its contents. We could have just gone straight to the source, but the Outline view allows you to easily navigate around your files when they become more complex. |
Applying a Style Sheet
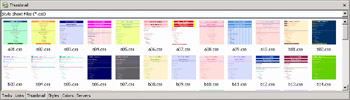
For a different look and feel for the web site, a different cascading stylesheet may be used by the web application. WebSphere Studio provides several style sheets that can be selected from by selecting the Style Sheet item on the Gallery tab in the Outline view. Double-clicking the stylesheets that appear in the Thumbnail view will add the style to the currently edited file:
An alternative is to import a new style sheet or create your own. We will use an existing style sheet. Select the theme folder in the PlantsByWebSphereWAR project in the Navigator view. Right-click and select File | Import to bring up the Import source selection panel:
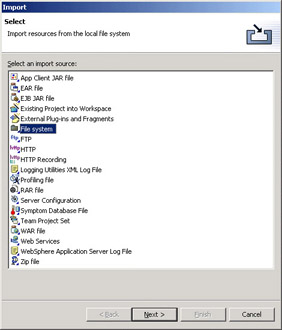
There are many things that can be imported into WebSphere Studio. Importing from the file system allows selection of individual files to be imported into an existing project. Other import sources, such as EAR file, import the entire artifact into a new project. Select File system and click Next. The import wizard will be displayed.
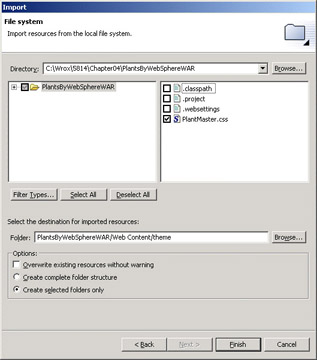
Use the Directory field Browse button to select the directory containing the ![]() PlantMaster.css file.
PlantMaster.css file.
If you have installed WebSphere Application Server (including the samples) then this file can be found in the <WAS_install_root>/samples/src/PlantsByWebSphere/PlantsByWebSphereWAR directory. Otherwise, you can find this .css file as part of the code bundle for this chapter of the book.
Select the ![]() PlantMaster.css file on the right directory content view. Make sure the destination folder is set to the theme directory and click Finish:
PlantMaster.css file on the right directory content view. Make sure the destination folder is set to the theme directory and click Finish:
Select the Master.css file in the theme folder of the PlantsByWebSphere project. Delete it by pressing the Delete key. The validation that occurs after deleting the file adds a task. Select the Tasks tab in the lower right to display the Tasks view:

Double-click the task. This will load the index.html file into the HTML/JSP editor and show us where the offending broken link is.
Change the link theme/Master.css to theme/PlantMaster.css and save the updated index.html file. The task has been resolved and is removed from the Task view.
| Note | Note that WebSphere Studio helps keep projects correct by performing dynamic validation of the project. |
Swich to the HTML/JSP editor's Design view. It now displays the text using a new style.
An alternative process that would have prevented the broken link is to use the style editing capabilities of WebSphere Studio to add the new style and remove the old one. For example, edit the index.html file, drag the new style sheet from the Navigator view onto the Design view to add the new style. Select the Styles tab on the lower view, select the style to remove and use the pop-up menu Remove item to remove the old style.
Creating the Layout
The home page needs a common banner. The banner will contain the navigation menu as well as the site title. A scrollable region for each page will occur below the banner. A frameset can be used to break the page up into a top banner with a scrollable region beneath.
Start by making sure we're in the Design view for index.html in the HTML\JSP editor.
Then select the Frame | Split Frame | Split Horizontally menu item. The Split Frame selection panel will appear:
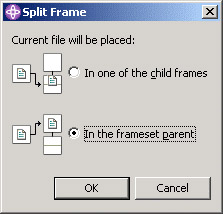
Select the In the frameset parent option to keep the index.html file as the frameset parent. Click OK. This will not only create the frameset in index.html, but it will also create separate HTML pages for each frame. We will specialize these new HTML pages a little later.
We need to give the frames a name for the later targeting of hyperlinks.Use the pop-up menu on the HTML/JSP editor to select Frame | Frame Attribute. This will display a panel with a frame tree, graphical representation of the frameset below it, and attributes to the right. For the frameset size, use 89 pixels and 1 *. Set Show border to No, and Border width to 0:
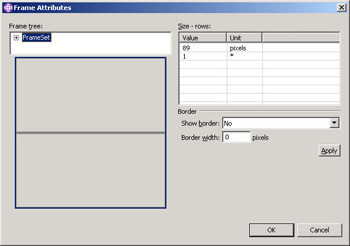
Click on the upper graphical frame to select it. Give that frame a name by entering banner in the Frame name field. Set Scrollbar to No, and use 0 for both Horizontal and Vertical margins:
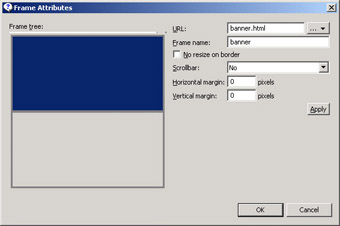
Click on the lower graphical frame to select it. Give that frame the name of work. Use (Auto) for the scrollbar setting, and 0 for both the margins. Click OK.
Save the changes to index.html. This will bring up a Save as dialog for each of the frames. Change the name of newpage1.html to banner.html and change the name of newpage2.html to salesitems.jsp. Later on, salesitems.jsp will be updated to display the items that are on sale. The save could be postponed until later, but this may become confusing as stacked sets of changes can cause different dialogs to pop-up and the context for which they are being displayed may be lost.
Open the Web Deployment Descriptor from the J2EE Navigator view to bring up the Deployment Descriptor editor. The salesitems.jsp file needs to be added to the descriptor. Find the Servlets and JSPs section and click the Details button. Now click the Add button. A panel will be displayed that allows the selection of a servlet or JSP file:
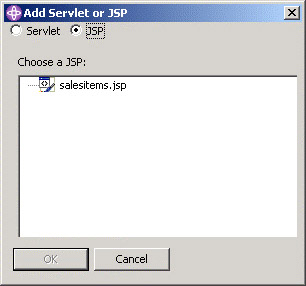
Select the JSP option, then select the salesitems.jsp file. Click OK to add it to the deployment descriptor.
A URL mapping can be added by selecting the salesitems JSP in the Deployment Descriptor editor view and clicking the Add button in the URL Mappings section:
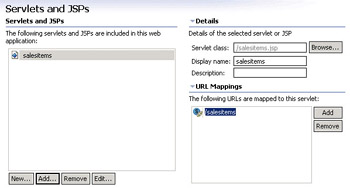
Close the Deployment Descriptor editor and save the changes.
Now let's add some initial content to the page. The index.html file should still be displayed in the editor window with the insert point in the upper frame. Start by adding a logo to the home page banner by clicking the Insert Image File button from the toolbar (or the Insert | Image File | From File menu). Select the ![]() pbw.jpg file, which can be found in PlantsByWebSphereWAR/images directory (either from the sample folder or from the code bundle for this chapter). Click Open.
pbw.jpg file, which can be found in PlantsByWebSphereWAR/images directory (either from the sample folder or from the code bundle for this chapter). Click Open.
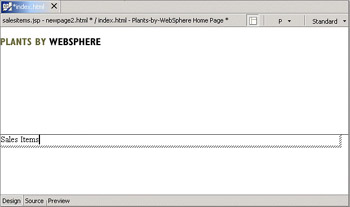
In the bottom frame (that we labeled work earlier), type "Sales Items", as a reminder that the home page view starts with items on sale. Save your changes:
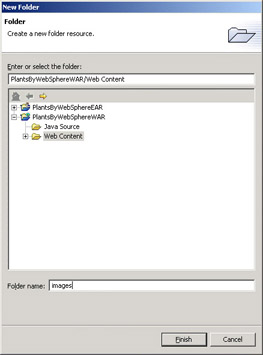
The application will have a lot of images, so we'll organize them by placing them in a common folder. Create the folder by selecting the Web Content folder in the J2EE Navigator view, right-click to bring up a menu and select New | Folder. This brings up the New Folder wizard.
Select the Web Content folder as the parent folder and type images in the folder name field. Click Finish:
In the J2EE Navigator view, drag-and-drop the ![]() pbw.jpg file into the new images folder. This would normally cause a broken link, but WebSphere Studio will automatically update uses of the image file to the new location. Click OK to let WebSphere Studio fix the links. Close the index.html file and save the changes. If you did not save your changes when the image was dropped onto the banner frame, WebSphere Studio will not update the links and you will need to resolve any broken link tasks yourself.
pbw.jpg file into the new images folder. This would normally cause a broken link, but WebSphere Studio will automatically update uses of the image file to the new location. Click OK to let WebSphere Studio fix the links. Close the index.html file and save the changes. If you did not save your changes when the image was dropped onto the banner frame, WebSphere Studio will not update the links and you will need to resolve any broken link tasks yourself.
At this point a basic home page has been created and the procedures for creating a new web application have been covered. Adding additional pages is mostly repetition of what has been covered so far. The following sections are going to cover some page-design aspects related to setting up the MVC pattern.
Creating the Navigation Menu
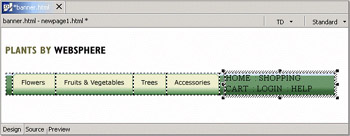
The navigation menu allows you to choose where in the site you want to go. Selection of a menu item sends an input event to the servlet controller for processing. The servlet controller processes the input and displays a new screen. To make this happen, a well-formatted set of menu items that generate requests to the servlet controller needs to be created. Navigation will be part of the common banner, therefore the banner.html file needs to be modified to handle the navigation menu. Eventually, the banner should look something like this:
![]()
The logo has already been taken care of already. From the above picture, we see that there are two groups of navigation controls; one graphical, one textual. These groups need to maintain some proximity to each other as the browser window is resized. Both the graphical and textual navigation controls need to generate a request to the servlet controller. The graphical portions of the banner can be obtained from the same location as ![]() pbw.jpg.
pbw.jpg.
| Note | Select the images folder and use the Import wizard to import the remaining images from the file system. |
The control of the layout will be handled using a table. Although it is possible to edit the banner.html file through the index.html frameset, it is simpler to edit it directly.
Start by making sure we're using the Web perspective, then double-click the banner.html file in the J2EE Navigator view, to open the file in the HTML/JSP editor.
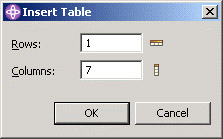
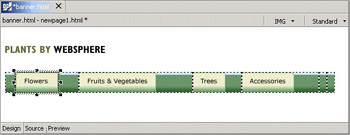
Place the insert point below the logo by clicking beneath it, then click the Insert Table tool on the tool bar (or the Insert | Table menu). A table size pop-up panel will be displayed. Enter 1 for the number of rows, 7 for the number of columns, and click OK. The reason for the choice of the number of columns will become more apparent shortly:
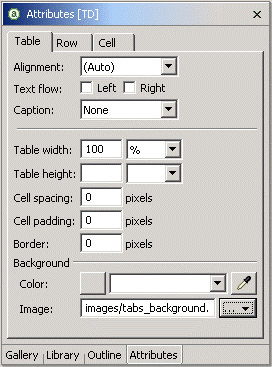
The table attributes need to be adjusted. If a table cell is not selected, click on a table cell. In the Attributes view (in the lower-left corner of the workbench), select the Table tab. Set the Table width to 100%, Cell spacing to 0, Cell padding to 0, and Border to 0. Use the image import button (…) to locate the table background image, images/tabs_background.jpg:
Now, we'll force a fixed padding to be used for the first column by inserting a single pixel image file and setting the width.
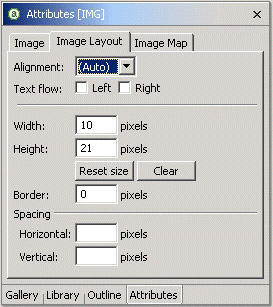
Select the first cell of the table. Click the Insert Image File button and select the images/1x1_trans.gif file. Select the Image Layout tab in the Attributes view and set the size to a width of 10 pixels and a height of 21 pixels:
Now select the second cell of the table. Insert the images/tab_flowers_u.gif image file into the cell. Add "Flowers" as alternative text for the image in the Attributes view. Repeat for the third through fifth table cells with images/tab_veggies_u.gif, images/tab_trees_u.gif, and images/tab_accessories_u.gif. Be careful to make sure the correct cell is selected before inserting each image:
Currently the cells are spaced out along the menu depending on the size of the screen. However, we'd like to keep the four image buttons together. Change the cell width for each of the cells containing the images to match the width of its image. Use the Attributes view to find and set this information.
Now we've got the graphical portion of the menu in place we need to add the text options. So select the last cell of the table and enter the text "HOME : SHOPPING CART : LOGIN : HELP ". The colon separators have two blanks preceding them and one after. These are non-breaking spaces. To enter them, hold the Ctrl key down while pressing the spacebar:
| Note | If the text has wrapped in the cell, uncheck the Wrap lines automatically box on the Cell tab of the Attributes view. |
To apply a different style to the text, first add the stylesheet to the page. Select the Outline tab at the bottom of the Attributes view. Change the HTML/JSP editor view to Source. Select the <HEAD> element in the Outline view, then insert the following just before the </HEAD> element:
<link href="theme/PlantMaster.css" rel="stylesheet" type="text/css"/> Change back to the Design tab to see the new text style.
| Note | Although it is possible to edit the HTML files directly using the Source view, it would have been much easier and less prone to mistakes to apply the new style by dragging the |
Now that the style sheet has been applied to the page in general, we will apply a specific style to the banner text. Select the entire text of the last table cell, and choose Insert | Paragraph | Normal. In the Attributes view, set the Alignment to Right. In the Outline tab of the Attributes view, right-mouse click the <P> tag and select Add Attribute | Class. Change the HTML/JSP editor view to Source. Set the class attribute value to "global" as shown below:
<TD width="100%"></TD> <TD nowrap> <P class="global" align="right">HOME : SHOPPING CART : LOGIN : HELP </P> </TD>
Change the HTML/JSP editor back to Design.
The sixth cell is a spacer for adjusting to different browser window widths. Select the sixth cell and set the width to 100% in the Attributes view. Save the changes. Our navigation menu should now match the screenshot from the start of this section.
The banner can be previewed in index.html by using the Preview view of the HTML/JSP editor. More than likely, the banner has wrapped both horizontally and vertically. Adjusting the frameset can be done by right-clicking in one of the frames and selecting Frame | Frame Attributes.
Creating the Sales Items Page
The salesitems.jsp page is quite simple to construct.
Start by opening the the salesitem.jsp file for editing, then replace the "Sales Items" text we added before with a 2x2 table. Change the table properties so the cell spacing, cell padding, and cell border are 0.
Join the two right-most cells of the table by selecting them both and choosing Table | Join selected cells from the pop-up menu.
Find and insert the images/theme_summer_text.gif image in the top-left cell. Find and insert the images/theme_summer2.gif image in the bottom-left cell. Find and insert the images/theme_summer1.gif image in the right-most cell. Save the changes.
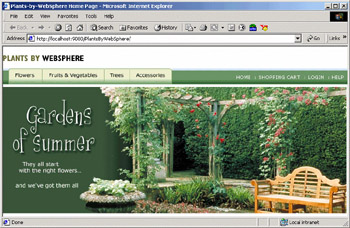
Our home page will now look like this:
Now that the input controls for navigation have been rendered, it's time to deal with the controller that interprets the navigation.
Creating the Servlet Controller
Before starting to build the servlet controller, a quick discussion is in order. There are a variety of ways to build the servlet controller. This application will use a single servlet to handle the requests. Another possible pattern is a servlet per request. There are advantages and disadvantages to this. One advantage is that IDEs such as WebSphere Studio can easily detect broken links. The disadvantage is that it doesn't scale well. There are variations in-between as well. In practice, using more than one servlet controller with each controller handling a similar set of functions tends to work the best. For example, account management functions might be handled by one servlet controller, while catalog interaction might be handled by another.
Our servlet controller is going to handle multiple requests, using parameters to distinguish between each request. It will determine the appropriate navigation and actions to perform based on these supplied parameters. The follow steps describe how to set up the servlet and navigation basics.
Select the Web perspective if it is not already selected, and select the Java source folder. Start the Servlet wizard by right-clicking and choosing File | New | Servlet:
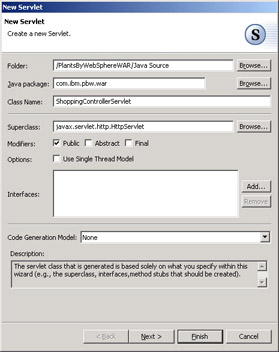
Enter the package name to use for the servlet (we'll use com.ibm.pbw.war) and enter the name of the servlet class, ShoppingControllerServlet.
The superclass will almost always be HTTPServlet unless a common base class is used for developing your servlets. The Use Single Thread Model option will add the servlet SingleThreadModel interface to your servlet. Click Next:
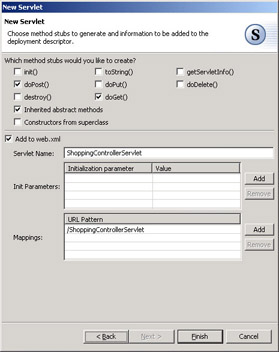
By default only the doGet() and doPost() methods will be created. This stage allows us to specify which additional methods should be created, how the servlet should be initialized, and what URL mapping should be used. The defaults are reasonable for our purposes, so just click Finish.
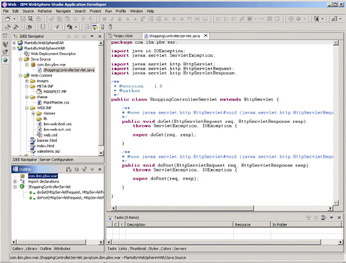
The servlet will be created, set up to handle both GET and POST requests, added to the deployment descriptor and set up with a default URL mapping. WebSphere Studio will now be editing the servlet:
A common pattern to use for building servlets is to use a single method for processing both GET and POST requests. The reason for this will become apparent later on. Add the performTask() method to the servlet using the Java editor. Place the following code at the end of the class. The action parameter will be discussed later:
private void performTask(HttpServletRequest req, HttpServletResponse resp) throws ServletException, IOException { String action = req.getParameter("action"); }
Replace the super method call in both the doGet() and doPost() method implementations with:
performTask(req, resp); This allows the servlet to process both GET and POST requests using a single method implementation and base a course of action upon a parameter setting. The servlet controller will be able to process requests from links as well as forms. The parameter, action, is part of the command language the servlet controller understands. This will be discussed in further detail below.
Before the servlet can process the navigation request, it must be able to redirect the request to an appropriate page. Add the following private method to the servlet class:
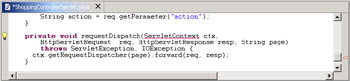
private void requestDispatch(ServletContext ctx, HttpServletRequest req, HttpServletResponse resp, String page) throws ServletException, IOException { ctx.getRequestDispatcher(page).forward(req, resp); }
This method is used by the servlet controller to forward the request to a new page once it has determined what page the servlet controller needs to send the request to.
WebSphere Studio detects and flags problems on the fly. In this case, the method just inserted has a problem:
as indicated by the red squiggly underline, the location marker in the right margin, and the light bulb in the left margin. The fly over help for the problem indicates the ServletContext class cannot be resolved, perhaps due to spelling errors or lack of an import statement. Clicking on the marker in the right margin will scroll the view to the location in the file that has the problem. If WebSphere Studio can provide a Quick Fix, it will be offered by clicking on the light bulb. Click on it to bring up a menu and select the import 'javax.servlet.ServletContext' item to have the import automatically added.
The first action to implement will be to navigate to the pages that display the catalog contents. The application supports partitioning the catalog into groups in order to make the display more manageable (as shown by the different options on the navigation menu). The catalog category to display is a required argument of the showcatalog action command. The action defines the primary behavior and the category defines a specific behavior. Together, they provide enough information to define how the servlet controller and views should perform. The following table illustrates the behavior of the servlet controller with various parameter values:
| Parameter | Controller behavior | |
|---|---|---|
| action | category | |
| showcatalog | flowers | Forwards request to showcatalog.jsp, which displays flower items in the catalog. |
| showcatalog | fruit | Forwards request to showcatalog.jsp, which displays fruit and vegetable items in the catalog. |
| showcatalog | trees | Forwards request to showcatalog.jsp, which displays tree items in the catalog. |
| showcatalog | accessories | Forwards request to showcatalog.jsp, which displays the accessories in the catalog. |
There are two places the code needs to be modified in order to implement navigation to the catalog pages. The first is in the servlet controller, and the second is the navigation menu.
Modify the performTask() method of the servlet controller to recognize the showcatalog action. Once recognized, we forward the request on to the showcatalog.jsp page. Add the following code fragment to the performTask() method after the action is retrieved from the HTTPServletRequest object:
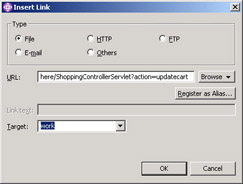
private void performTask(HttpServletRequest req, HttpServletResponse resp) throws ServletException, IOException { String action = req.getParameter("action"); if (action.equals("showcatalog")) { requestDispatch(getServletConfig().getServletContext(), req, resp, "showcatalog.jsp"); } } Now we need to add a link in banner.html to the servlet controller for each graphical tab. To do this, double-click banner.html in the Navigator view. Switch to the Design view, and then select the Flowers cell. Right-click on it and choose Insert Link. This will bring up the Insert Link panel:
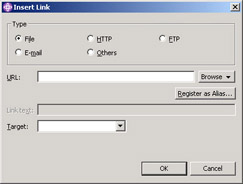
Select the File type radio button. From the Browse button, select Servlet. This will display the Servlet link selection panel:
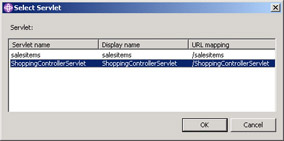
Select the ShoppingControllerServlet and click OK.
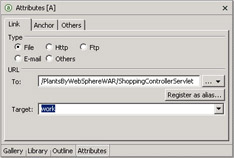
In the Target field of the Insert Link panel, type work. This will direct the link to the main frame of the display. Recall that work was one of the frame names assigned when we used the frame split feature earlier. Click OK.
At this point the link has been created to direct a request to the servlet controller, but it does not have any parameters to carry the information necessary for the servlet controller to determine a course of action.
Bring up a pop-up menu for the Flowers cell and select Attributes. If image attributes are displayed, use the change focus pull-down menu on the upper-right of the HTML/JSP editor to select the anchor (A) node. The Link Attributes should now be displayed:
Add the following parameter information to the end of the URL To field:
?action=showcatalog&category=flowers
This information will be passed on to the servlet as two request parameters. The servlet controller uses these parameters to forward the request to showcatalog.jsp. The JSP page will use the category to determine what to display.
Repeat the last few steps to link up the other naviagation menu buttons with a specific action based on the table shown earlier (changing just the category for the request). Make sure to save all your changes.
Creating the JavaBeans Models
Now that the application supports navigation to the catalog pages, there needs to be data available to display. The JavaBeans model provides an abstract view of the database. It needs to provide enough information to build a view like the following:
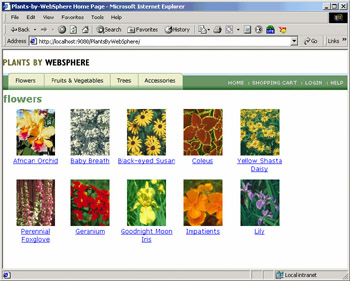
To build this view, the collection of items that form a category (in this screen, all the different products that are flowers) need to be retrieved from the persistent store. Each item will need to at least have an image and a name. The model itself will need a means of retrieving the collection of store items by category. We will create an inventory model that manages a collection of store items.
Create the StoreItem Bean
Select the Java Source folder in the Navigator view. Right-click and choose File | New | Other. This brings up the New selection panel. Click Java in the left-view and Class in the right-view. This brings up the New Java class wizard.
The Source Folder and Package fields are nothing new. The Enclosing type field allows for specification of the outer class of a nested class and will not be used. The specification of other classes the bean extends and implements is handled by the superclass and interface fields. The method stub selection is similar to, though more limited than, the method stub selection for servlets.
Use the Browse button to select the existing package (com.ibm.pbw.war) to create the class in, then enter StoreItem for the name of the class:
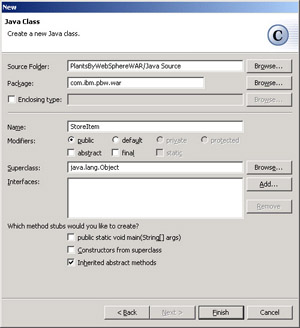
The StoreItem class is likely to be used for passing information back and forth to the persistence layer, so this class should be serializable. Click the Add button, and type the first few letters of "serializble" in the Choose interfaces field. This will narrow the possible choices of interfaces. Select Serializable from the Matching types list and make sure the qualifier is the java.io package. Click Add to complete the interface selection, then Finish on the main screen.
WebSphere Studio provides a simplified means of creating JavaBean properties. In the Java editor, add the following data members to the new class:
public class StoreItem implements Serializable { private String id; private String name; private String imageLocation; private float price; private String pkgInfo; private String descr; private int quantity = 1; private int category; private float cost; Add a constructor that initializes the data members using the following code:
public StoreItem(String idString, String nm, String loc, double dollars, String pkg, int category) { id = idString; name = nm; imageLocation = loc; price = (float) dollars; pkgInfo = pkg; descr = ""; this.category = category; }
Select all of the data members in either the Outline view or the Java editor.
Choose the Source | Generate Getter and Setter menu option to bring up a panel for selecting which getter and setter methods to create:
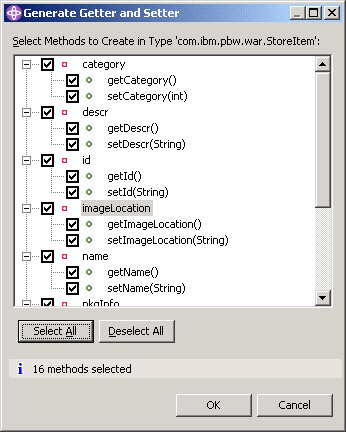
Ensure all of the getters and setters are checked (use the Select All button) and click OK then save the changes.
Create the Inventory Model
For now, the model will be read-only and will be pre-initialized with data. Create a new Java class called InventoryModel in the same package as the StoreItem class that looks like the following:
package com.ibm.pbw.war; import java.util.Collection; import java.util.Vector; public class InventoryModel { private StoreItem flowerItems[] = { new StoreItem("F001", "African Orchid", "flower_african_orchid.jpg", 250.0, "per plant", 1), new StoreItem("F002", "Baby Breath", "flower_bbreath.jpg", 6.0, "2 plants", 1), new StoreItem("F003", "Black-eyed Susan", "flower_black-eyed_susan.jpg", 9.0, "2 plants", 1), new StoreItem("F004", "Coleus", "flower_coleus.jpg", 8.0, "4 plants", 1), new StoreItem("F005", "Yellow Shasta Daisy", "flower_daisies.jpg", 16.0, "2 plants", 1), new StoreItem("F006", "Perennial Foxglove", "flower_foxglove.jpg", 12.0, "3 plants", 1), new StoreItem("F007", "Geranium", "flower_geranium.jpg", 8.0,"per plant", 1), new StoreItem("F008", "Goodnight Moon Iris", "flower_goodnight_moon_iris.jpg", 7.5, "5 bulbs", 1), new StoreItem("F009", "Impatients", "flower_impatiens.jpg", 9.95,"2 plants", 1), new StoreItem("F010", "Lily", "flower_lily.jpg", 6.5, "4 bulbs", 1), }; public Collection findByCategory(String category) { Vector v = new Vector(flowerItems.length); if (category.equals("flowers")) { for (int i = 0; i < flowerItems.length; i++) { v.add(flowerItems[i]); } } return v; } public StoreItem findById(String id) { for (int i = 0; i < flowerItems.length; i++) { if (flowerItems[i].getId().equals(id)) { return flowerItems[i]; } } return null; } }
Use the WebSphere Studio Quick Fix support to fix any problems. This model class will be used by showcatalog.jsp to retrieve the catalog data. Eventually, the implementation of this bean will be replaced with EJB client code to access data in a database. Isolating the persistence code in the model allows the model to change over time without affecting the view. For instance, the Collection class returned by the findByCategory() method could be a specialized Collection class that lazily retrieves chunks of data from a large result set.
Managing State
In general, there is only one instance of a model in the application. If the model is to be a read-only model, it doesn't matter if the model is instantiated everywhere it is needed. If the model supports updates, care must be taken on how many instances of the model exist. In addition, the scope will become important. A single instance of the inventory model for the entire application, shared among all clients, is appropriate. However, the shopping cart model needs to be unique per client.
We'll use the servlet controller to create an instance of the InventoryModel and share it with application scope.
Open the Java editor for the ShoppingControllerServlet, and add a private InventoryModel data member called model to the servlet:
public class ShoppingControllerServlet extends HttpServlet { private InventoryModel model; In the pop-up menu for the servlet in the Outline view, select Override Methods. This will display a panel to add selected parent class methods to the servlet:
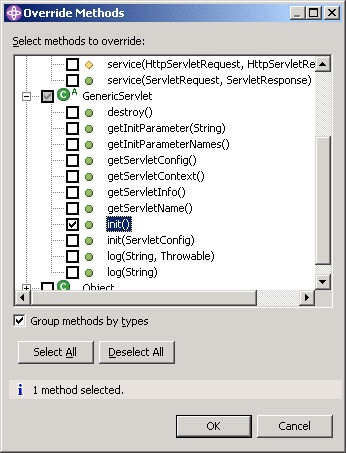
Select the init() method of the GenericServlet class and click OK.
Now use the Java editor to edit the init() method and initialize the data member created earlier:
public void init( throws ServletException { model = new InventoryModel(); } To add the model to the application scope, add the following line:
public void init( throws ServletException { model = new InventoryModel(); getServletContext().setAttribute("model", model); } This line of code will add an application-scoped attribute to allow us to share the model among all components.
Some thought must go into the use of application contexts, particularly if the application will be distributed among multiple servers for scalability. If the deployment descriptor for the web application is marked as Distributable (see the Distributable check box in the deployment descriptor), then the application context cannot be used to share global information. Instead, state information must be maintained in a persistent store such as a database.
A similar situation exists for state managed at the session scope. State that is maintained across multiple requests is usually contained within the HTTP session. WebSphere Application Server provides both session affinity policies for scalable configurations and a variety of session management policies. Session affinity ensures that multiple requests are always directed to the same server. The session management policies affect fail-over if a particular server fails. HTTP session use is covered in the later section Stateful Web Applications Using Session Data, while management issues are covered in more detail in the section on HTTP Sessions.
Adding Dynamic Content
It's now time to add dynamic content to the catalog pages. WebSphere Studio provides support for creating both HTML JSP pages and XML JSP documents. The syntax depends on whether or not an XML document is used. HTML syntax will be used throughout the Plants-By-WebSphere application to keep things simple. There are several ways to add dynamic content to a JSP. The simplest form is to use a JSP expression. The syntax for a JSP expression is:
<%=expression%>
The JSP expression inserts the value of the expression into the output stream. The second form of dynamic content is to insert a scriptlet into the JSP file. The syntax for a scriptlet is:
<% script statements %>
The script statements are a sequence of statements in the language declared for the page. By default WebSphere Studio uses Java. A script is typically used to control the flow of output for the JSP page. It is used to wrap conditional output or iterate over output in the JSP page. For example,
<% if (funds <= 0) { %> <em>Your account balance is extremely low!</em> <% } %> would output the emphasized text if the funds variable defined earlier in the JSP page is less than or equal to zero.
WebSphere Studio provides some assistance for inserting expressions, scripts and other JSP content into the JSP file (see the JSP menu). The following steps will explore the use of WebSphere Studio in creating dynamic content. The dynamic content will include a category-specific heading and table of all the products in the category.
Start by selecting the Web perspective (if not already selected) and creating the showcatalog.jsp page. This is achieved by selecting the PlantsByWebSphereWAR Web Content folder, right-clicking and the choosing File | New | JSP File:
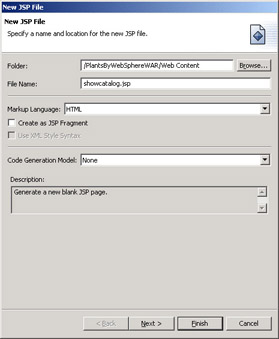
The Markup Language field is similar to the HTML/XML page creation wizard markup language field described earlier. If XHTML is selected for the markup language, it will enable the Use XML Style Syntax field. If this checkbox is checked, the JSP syntax will use XML namespaces for the specification of the JSP logic as described in the Servlet specification (Chapter 5 on JSP Documents).
The next panel of the wizard allows the selection of additional tag libraries to make available in the JSP. Click Next to display the panel for adding page directives:
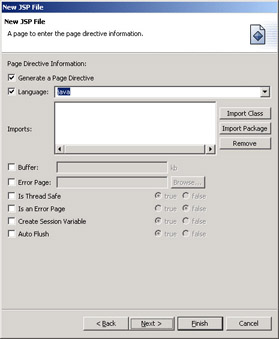
The Generate a Page Directive checkbox will force a page directive to be added to the JSP. The language field allows the selection of either Java or JavaScript. The Imports field allows other Java packages to be imported into the JSP file. If these are not known at the time the page is created, they can be added later (as we'll see).
The remaining checkboxes allow us to set additional attributes on the page. Of particular interest is the Create Session Variable checkbox. This allows the JSP to access the HTTP session using a session variable. This will be used in later JSP pages we create.
Click Next to display the panel for choosing encoding, DOCTYPE, and style sheets.
Click Next to display the panel for choosing the stub methods of the JSP page and whether or not to add it to the deployment descriptor. Click Finish.
In the Design tab of the HTML/JSP editor, delete the default text ("Place showcatalog.jsp's content here").
Create the dynamic header that displays the name of the category chosen by using the JSP | Insert Expression menu item. Then in the Attributes view, enter this expression:
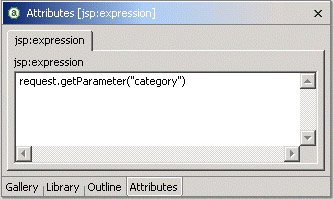
Place the insert point to the right of the inserted expression in the HTML/JSP editor. This will select the paragraph containing the expression (assuming you didn't delete the paragraph when you deleted the text). In the Attributes view, select the Heading 1 paragraph type. This will cause the retrieved category value to be displayed in the H1 heading style.
Creating the dynamic table content is a bit more complex and will require the use of scriptlets. Start off by clicking below the expression in the HTML/JSP editor to set the insertion point so that new insertions will be part of a new paragraph.
To start with, the JSP page needs access to all of the items in the category that need to be displayed. The first scriptlet will declare some variables and initialize them with the set of category items. From the JSP menu choose Insert Scriptlet. In the Attributes view, insert the following scriptlet code:
int count = 0; InventoryModel model = (InventoryModel) application.getAttribute("model"); Vector invItems=(Vector) model.findByCategory(request.getParameter("category")); StoreItem inv;
Note that java.util.Vector, com.ibm.pbw.war.InventoryModel, and com.ibm.pbw.war.StoreItem are shown with non-qualified names. The scriptlet requires the use of fully qualified type names because no package imports have been declared. In order to solve that problem, the appropriate imports need to be added. The JSP language allows for imports using the JSP page directive.
Right-click in the editor and open the Page Properties panel. Switch to the JSP Tags tab:
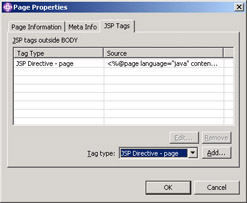
Change the Tag type to JSP Directive – page and click the Add button:
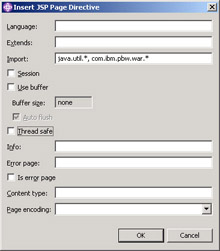
Enter java.util.*, com.ibm.pbw.war.* in the Import field. Uncheck all the checkboxes and click OK, and then OK again on the Page Properties window.
To create the dynamic table, insert a 1x1 table into the JSP after the scriptlet code. It will be customized and modified later to support the variable content of the categories.
In the Cell Attributes view, set Horizontal Alignment to center and Vertical Alignment to top. In the Table Attributes view, set the Table width to 600 pixels, Cell spacing to 5, Cell padding to 5, and Border to 0.
Fill out an example cell by placing any image in the cell of the table. Click the Insert Image from File button from the toolbar or by selecting Insert | Image File | From File. Select one of the images from the images directory (it doesn't matter which as it will be dynamically changed at run time). Set the image width to 80 and image height to 95 in the Image Layout Attributes view.
Place the insertion point after the image in the cell and choose Insert | Paragraph | Normal. Now insert a new JSP expression (JSP | Insert Expression) and configure the attribute with the following code to display the name of the product:
inv.getName()
It's not possible to use the Design view for inserting a scriptlet to iterate over content in a table. Switch to the Source view in the HTML/JSP editor to modify the table to handle a variable number of items. Insert a JSP scriptlet between the <TR> and <TD> elements that looks like the following:
<TABLE border="0" width="600" cellspacing="5" cellpadding="5"> <TBODY> <TR> <% while (count < invItems.size()) { inv = (StoreItem) (invItems.elementAt(count)); %> <TD align="center" valign="top"><IMG border="0" src="/books/1/209/1/html/2/flower_african_orchid.jpg" width="80" height="95">
Note that the while loop statement does not have a closing brace. Scriptlets can surround arbitrary text/HTML to be displayed, but eventually the statement must be syntactically correct.
Place the following two scriptlets and HTML fragments between the </TD> and </TR> tags:
<P><%=inv.getName()%></P> </TD> <% if ( ((count +1 ) % 5) == 0 ) { %> </TR> <TR> <% } count++; } // end of while %> </TR> </TBODY> </TABLE>
These scriptlets set up an iteration around the <TD> element definition that does two things:
-
Creates a <TD> element for each item in the category
-
Starts a new row after every five cells in the table
The dynamic item name has already been taken care of in the cell content by the expression inserted earlier. Make the item image dynamic by replacing the static file declaration in the <IMG> element with a JSP expression. The resulting IMG element should look like:
<IMG border="0" src="images/<%= inv.getImageLocation() %>" height="95" width="80" >
To finish off the dynamic table setup, import all the necessary images defined by the InventoryModel class into the images directory (if you haven't already done so).
Testing the Dynamic Content
The Preview view of the HTML/JSP editor provides a means to look at static content formatting, but for dynamic content, something more is needed. WebSphere Studio provides an integrated runtime that can execute the application. In order to test the web application, deployment configuration information needs to be checked and the web application needs to be installed on a server.
Make sure the Web perspective is selected, and select the PlantsbyWebSphereWAR project and bring up the pop-menu for it. Choose Properties to bring up the web application properties panel:
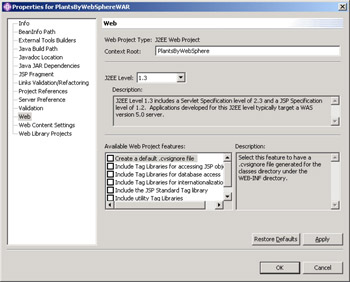
Select the Web node and check the Context Root is set to PlantsByWebSphere. By default, it matches the name of the project. Actually, any value can be used, but the value is what is used to access the application from a browser. Click OK.
Bring up the pop-up menu for the PlantsbyWebSphereWAR project again but this time choose Run on Server. If a panel is displayed for creating a new server, give the server a name and select the WebSphere version 5.0 Test Environment for the server type:
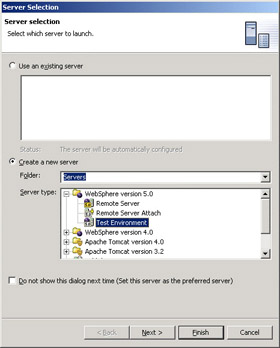
WebSphere Studio can also use a remote application server to run the application instead of the embedded test environment. Other server types provide legacy development and testing capabilities to older versions of WebSphere Application Server as well as non-WebSphere servers.
Wait for the server to start. A Web Browser view will automatically display the web application. Click the Flowers menu image to take a look at the dynamic content:

WebSphere Studio Application Developer in conjunction with WebSphere Application Server supports hot redeploy for rapid edit, compile, and debug cycles.
For example, edit showcatalog.jsp and add some text to the page. Save the file changes. Now if you switch back to the Web Browser view and click the Flowers menu item again, you'll notice that the page changes are reflected in the output without having to redeploy the web application to the server.
Stateful Web Applications Using Session Data
For the most part the application is currently stateless. The inventory model is retained across the application, but is read-only. To round out the application, there are two pieces of information that need to be maintained across method invocations on a per-user basis. One is the navigation path, so that a "return to previous page" dynamic link calculation can be made. The other is shopping cart information. This section will explore building stateful functionality into the web application using HTTP sessions.
HTTP sessions provide a means of retaining user state across multiple requests. The state is kept on the server and a minimal amount of information, a session ID, is passed back and forth between the user and the server to identify the session. WebSphere Application Server provides three schemes of session ID tracking (cookies, URL rewrite, and SSL ID) that are in general managed transparently to the application by the runtime. No direct manipulation of the session ID by the web application is required. The most common form used is cookies.
One session ID tracking scheme, URL rewriting, requires some application help. URL rewriting encodes the session ID in the response page sent back to the user. Each link in the page is changed or rewritten to include the session ID as a parameter. For example, a browser might see the following URL:
/PlantsByWebSphere/ShoppingControllerServlet;$jsessionid=DA32242SSGE2
In addition, if a servlet creates an HTML response directly and that response contains a link, the link will need to be encoded. For example:
out.println("<a href=\""); out.println(response.encodeURL( "/PlantsByWebSphere/ShoppingControllerServlet")); out.println("\">"); A similar situation exists for JSP pages. For example:
<a href="<% response.encodeURL("/PlantsByWebSphere/ShoppingControllerServlet")%>"> The drawback is that it only works for dynamic content (Servlets and JSP pages). Static content is not updated. Use of URL rewriting needs to be considered when designing the screen flows to avoid static content while a session is active since the session ID would be lost when navigating to a static HTML page.
The third option tracks the session ID based on the SSL ID. This only works when an SSL connection is used and if the SSL connection is broken for whatever reason, the session ID is lost.
It is possible to use more than one scheme, such as combining cookies and SSL ID, but the process flow for handling multiple simultaneous schemes is fairly complex and should be consulted in the documentation if use of multiple schemes is necessary.
In order to simplify the design, we'll be using cookies for session tracking in the Plants-By-WebSphere application.
Adding Dynamic Navigation
In order to support a link that navigates back to a previous page, information needs to be saved across multiple requests. For instance, we want the user to be able to navigate from the catalog screens to a detail screen to a shopping cart screen and back to the original catalog screen. The showcatalog.jsp file currently uses the request parameter, category, to determine the category to display. This parameter is required in order to determine what to display. However, the category will not be known when returning from the shopping cart screen. In this case, the category will not be supplied and the saved category will be used instead.
Open the ShoppingControllerServlet in the Java editor, add the following line of code in the performTask() method just before the requestDispatch() method call for the showcatalog action to retrieve the HTTP session from the request object:
if (action.equals("showcatalog")) { HttpSession session = req.getSession(); requestDispatch(getServletConfig().getServletContext(), req, resp, "showcatalog.jsp"); Be sure to resolve any import statement issues created by the use of HttpSession.
Complete the servlet code to place the category in the session object and use it if it is not specified. This will be used by the view JSP pages to determine what to display. The code should look something like the following:
if (action.equals("showcatalog")) { String category = req.getParameter("category"); HttpSession session = req.getSession(); if (category == null || category.equals("")) { category = (String)session.getAttribute("category"); } session.setAttribute("category",category); requestDispatch(getServletConfig().getServletContext(), req, resp, "showcatalog.jsp"); } Now edit the showcatalog.jsp file and replace the scriptlet code that gets the category from the request parameter to get it from the session. The new code should look like:
int count = 0; InventoryModel model=(InventoryModel) application.getAttribute("model"); String category = (String) session.getAttribute("category"); Vector invItems = (Vector) model.findByCategory(category); StoreItem inv; Modify the JSP expression used in the heading to get the category from the session:
<H1><%=session.getAttribute("category")%></H1> Make sure the JSP is enabled for HTTP session use. Go to the Design view and bring up the Page Properties. On the JSP Tags tab, select the existing import page directive we created earlier, and click the Edit button. This will bring up the JSP page directive panel.
Check the Create Session Variable checkbox and click OK. Every JSP page that needs access to the Session object will need the session attribute checked in the page directive. Without it, there will be compilation errors using the session "implicit object".
The application should now be functioning as it did before, but using the session attributes to retrieve the category instead of using the request parameters.
Adding the Shopping Cart
The shopping cart support needs a cart model to represent the proposed purchase, an updated StoreItem for additional descriptive information such as total cost, a detail page that allows product items to be purchased, and a shopping cart display page. We'll start with the StoreItem updates since the rest of the code will depend on that.
Open the StoreItem bean in the Java editor, and add a getCost() method which calculates the cost based on price and quantity:
public float getCost() { return price * quantity; }
Next, we'll create the product detail JSP page. It is a fairly complex JSP page that will look like this:

It consists of several nested tables as well as an HTML form. The HTML form will cause an HTTP POST request to be generated to the servlet controller. This differs from the HTTP GET requests that have been used so far. It also validates the choice made earlier in using a common performTask() method in the servlet controller. The next set of steps will describe how to create the complex layout as well as embed a form into the display page using WebSphere Studio.
Ensure the Web perspective is selected, then create a new JSP file called product.jsp with the New JSP file wizard. Click Next twice to get to the Page Directive Information panel of the wizard. Click the Import Package button to add a package to import. This will add a java.lang.* in the Imports box. Edit this value to be com.ibm.pbw.war.*. Make the session available to the JSP by checking the Create Session Variable checkbox:
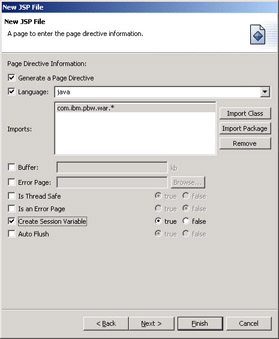
Hit Finish to create the file then remove the default text from the page.
Add a scriptlet to the page to access the inventory model and retrieve the item to display (JSP | Insert Scriptlet). Enter the following scriptlet code in the Attributes view:
String id = request.getParameter("id"); InventoryModel model = (InventoryModel) application.getAttribute("model"); StoreItem item = model.findById(id);
This allows the id, model, and item variables to be used throughout the JSP page.
Now add a new paragraph heading to display the product name using a JSP expression. Choose Insert | Paragraph | Heading 1, then JSP | Insert Expression. Enter the following for the expression attributes:
item.getName() We'll now create the nested table structure around which most of the product information is based. Start with adding the outer table to the page. Place the insertion point below the heading and Insert | Table. Set the table size to 1x2 and click OK. Set the table border to 0.
Place a temporary image in the first cell (Insert | Image File | From File). Choose one of the existing flower images from the images directory. This will be replaced later with an expression to evaluate the proper image to use.
Embed a 3x1 table in the right-most cell (Choose Insert | Table. Set the table size to 3x1 and click OK. Set the table border to 0).
We'll put the item description in the top cell of this newly inserted sub-table. So select the top cell, and choose JSP | Insert Expression. Enter the following in the expression Attributes view:
item.getDescr() Put a horizontal line in the second cell. Select the middle-table cell, and then choose Insert | Horizontal Rule.
The bottom cell is where the form will be handled. Select the bottom cell and choose Insert | Form and Input Fields | Form. In the Form Attributes view, set the Method to Post. Set the Action, using the browse (…)| Servlet button, to the ShoppingControllerServlet URL:
/PlantsbyWebSphere/ShoppingControllerServlet
Switch to the Hidden Fields tab and add the action and id hidden fields and values as shown here:
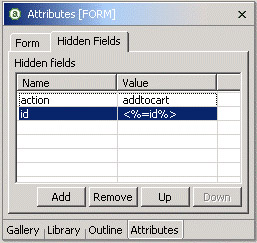
These will be passed to the servlet controller for operating on the model. In this case, the shopping cart model.
Place the insert point in the form in the lower-right cell. Insert a 5x4 table into the form to display the details of the item. Set the border to 0. Your JSP page design should now be looking something like this:
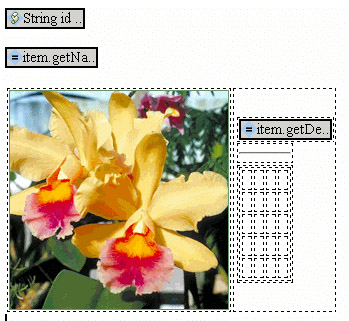
If you haven't already, import the ![]() item_selection.jpg and
item_selection.jpg and ![]() button_add_to_cart.gif images into the images directory.
button_add_to_cart.gif images into the images directory.
Insert the ![]() item_selection.jpg image in the first cell of the first row of the new table.
item_selection.jpg image in the first cell of the first row of the new table.
Select the first cell of the second row. Enter the text "ITEM#" in the cell. Repeat in the second through fourth cells of that row using "DESCRIPTION", "PRICE", and "QUANTITY" respectively. Select all four cells and check the Header radio button in the Cell Attributes view. Set the row's color to #eeeecc in the Row Attributes view.
Use the HTML/JSP editor's Source view to add a attribute to each of the <TH> elements on this row. This defines the stylesheet style to use for the headings. The source should look like the following:
<TR bgcolor="#EEEECC"> <TH >ITEM#</TH> <TH >DESCRIPTION</TH> <TH >PRICE</TH> <TH >QUANTITY</TH> </TR>
Of course don't forget to make sure the stylesheet has been added to this page, using one of the methods described earlier, or setting the class attribute won't have much effect.
Use the Source view to insert the following JSP expressions one in each cell of the third row to display the item specifics (we could use the Design view as shown previously but this is quicker). Add attributes using the Source view to each <TD> element of the row. Set the row color to #ffffdd:
<TR bgcolor="#ffffdd"> <TD ><%=item.getId()%></TH> <TD ><%=item.getPkgInfo%>()</TH> <TD ><%=java.text.NumberFormat.getCurrencyInstance( java.util.Locale.US).format(new Float(item.getPrice()))%></TH> <TD ></TH> </TR>
| Note | The complicated bit of number formatting is simply to take the float price value and display it as a currency value. |
We need to be able to specify a quantity in the detail description that can be used as input for adding a number of items to the shopping cart. Insert a text input field into the last element of the third row (Insert | Form and Input Fields | Text Field):

Set the Name to qty, Input type to Text, Columns, Maximum length to 3 and the Initial value to 1.
Insert a non-breaking space into the first cell of the fourth row (Ctrl plus the space bar). This preserves the height of the row.
Now we want to insert a form button (but using an image of our choosing). So select the first cell of the last row, then choose Insert | Form and Input Fields | Image Button. This will bring up an Insert Image Button panel:
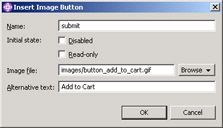
Enter submit as the Name, and select the ![]() button_add_to_cart.gif image for the Image file. Enter the Alternative text and click OK.
button_add_to_cart.gif image for the Image file. Enter the Alternative text and click OK.
Now we want to replace the temporary main product image that we added earlier to be dynamically selected. Select the image in the source view. Replace the filename of the image with a JSP expression that looks like the following:
<TR> <TD><IMG border="0" src="/books/1/209/1/html/2//PlantsByWebSphere/images/<%=item.getImageLocation()%> " width="220" height="220"> </TD>
Make sure to save the changes, and our JSP page design should now look like this:

The catalog page and servlet controller need to be modified to make the page available. The catalog page needs a new action to tell the controller to display product details. The controller needs to interpret the new action and redirect the request to the product page.
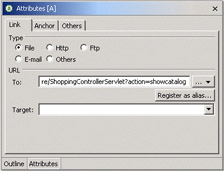
Open up showcatalog.jsp in the HTML/JSP editor. Select the image in the cell and use the pop-up menu to select Insert | Link. This will display the Insert Link panel. Select the File radio button. Click the Browse button and select Servlet. Choose the ShoppingControllerServlet. Add the following to the ShoppingControllerServlet URL:
?action=showproduct&id=<%= inv.getId()%>
This will tell the servlet controller to display product information for the specified ID.
Repeat for the getName() JSP expression below the image and save the changes.
Now we need to edit the ShoppingControllerServlet to respond to this new action request. Add the following action processing code to the performTask() method:
} else if (action.equals("showproduct")) { requestDispatch(getServletConfig().getServletContext(), req, resp, "product.jsp"); }
It's time to create the shopping cart model JavaBean and the page to display it.
Create a JavaBean called CartModel in the same package as the InventoryModel that looks like the following. It will eventually be replaced with EJB access code. Be sure to fix up the necessary imports:
package com.ibm.pbw.war; import java.util.Vector; public class CartModel { private Vector orderItems = new Vector(); public void addItem(StoreItem si) { orderItems.add(si); } public Vector getItems() { return (Vector) orderItems.clone(); } }
Edit the ShoppingControllerServlet source. Add this code that recognizes the action command of the product.jsp and updates the shopping cart model in the peformTask() method:
} else if (action.equals("addtocart")) { HttpSession session = req.getSession(); CartModel cart = (CartModel) session.getAttribute("cart"); if (cart == null ) cart = new CartModel(); String id = req.getParameter("id"); StoreItem si = model.findById(id); si.setQuantity(Integer.parseInt(req.getParameter("qty").trim())); cart.addItem(si); session.setAttribute("cart", cart); requestDispatch(getServletConfig().getServletContext(), req, resp, "cart.jsp"); }
The above code retrieves the model from the application-scoped context. It then retrieves an existing cart model instance from the session scope or creates a new one. A StoreItem is created, which represents the item to be bought and its quantity is set to the number specified on the product form. The controller then updates the cart model and the state of the cart is kept in the session for future reference. Finally, the request is dispatched to the cart screen to display the current contents. The cart screen is going to look like this:
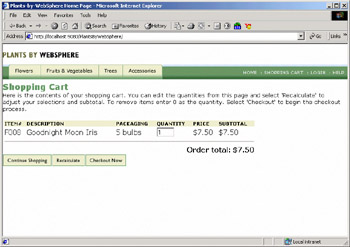
It consists of some static text and a dynamic table similar to the dynamic table created in the catalog view. The dynamic table displays the items in the shopping cart and their current quantity. The quantity can be updated.
Create a new JSP page called cart.jsp using the New JSP File wizard that we saw earlier, making sure to support sessions.
Add an new H1 heading for the "Shopping Cart" text (Insert | Paragraph | Heading1) and then a normal paragraph for the rest of the introductory text, as can be seen in the previous screenshot.
Apply our ![]() PlantMaster.css stylesheet to the page by dragging-and-dropping it from the Navigator view onto our editor. This will update the text we just entered to use the stylesheet.
PlantMaster.css stylesheet to the page by dragging-and-dropping it from the Navigator view onto our editor. This will update the text we just entered to use the stylesheet.
Add a JSP scriptlet (JSP | Insert Scriptlet) to retrieve the cart model from the session using this code:
CartModel cart = (CartModel) session.getAttribute("cart"); Now add a form (Insert | Form and Input Fields | Form) to handle quantity updates to the cart. Set the Action to be the ShoppingControllerServlet and Method to be Post. Add a hidden field with the Name action and Value of updatecart. We'll update ShoppingControllerServlet later to handle this action.
Add a 4x8 table to the form to display the order items (set the border and cell spacing to 0, and the table width to 75%). This table will work in a similar fashion to the dynamic catalog table created earlier. The data displayed is similar to the product detail information page created earlier, with a row per item in the cart.
On the top row of the table, insert the ![]() 1x1_trans.gif image into the first and eighth cells. Then for the second through to seventh cells, add the header text: "ITEM#", "DESCRIPTION", "PACKAGING", "QUANTITY", "PRICE", "SUBTOTAL", respectively. Select the text in these six cells and change the Cell type to Header and apply a background colour of #eeeecc.
1x1_trans.gif image into the first and eighth cells. Then for the second through to seventh cells, add the header text: "ITEM#", "DESCRIPTION", "PACKAGING", "QUANTITY", "PRICE", "SUBTOTAL", respectively. Select the text in these six cells and change the Cell type to Header and apply a background colour of #eeeecc.
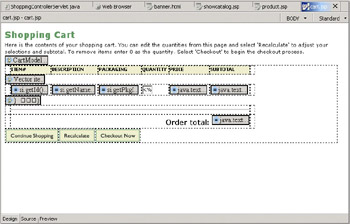
We want the second row of the table to be dynamically generated and populated with data for StoreItems. To do this we need to switch to the Source view and enter the following scriptlet between the first and second <TR> elements of the table:
</TR> <% Vector items = cart.getItems(); Iterator it = items.iterator() float total = 0.0f; while (it.hasNext()) { StoreItem si = (StoreItem) it.next(); if (si.getQuantity() > 0) { float subtotal = si.getPrice() * si.getQuantity(); total = total + subtotal; %> <TR>
| Note | You'll probabaly get a warning about the Vector and Iterator objects not being resolved. To correct this you need to add them to the import page directive statement for the page. |
This code will iterate through the items in the CartModel and set up a StoreItem bean that we can use to populate the table. Of course we need to close the if and while statements after the table row:
</TR> <% } } %>
Now we can modify the cells using JSP expressions. Note that the quantity field should be updatable so use a text field. You can either edit the source or use the Design view. Either way the source should end up looking like this:
<TR> <TD></TD> <TD><%=si.getId()%></TD> <TD><%=si.getName()%></TD> <TD><%=si.getPkgInfo()%></TD> <TD><INPUT type="text" name="<%=si.getId()%>" size="3" maxlength="3" value="<%=si.getQuantity()%>"></TD> <TD>$<%=java.text.NumberFormat.getCurrencyInstance( java.util.Locale.US).format(new Float(si.getPrice()))%></TD> <TD>$<%=java.text.NumberFormat.getCurrencyInstance( java.util.Locale.US).format(new Float(subtotal))%></TD> <TD></TD> </TR>
For the third row of the table we want to insert a horizontal rule. However, we can only insert a rule in one cell but we want it to span the table. To do this we need to join the cells. Select the second through seventh cells and from the pop-up menu choose Table | Join Selected Cells. Now we can insert the horiztonal rule (Insert | Horizontal Rule).
In the the last row of the table we just want to display the order total:
<TR> <TD></TD> <TD align="right"><B>Order total: $<%=total%></B></TD> <TD></TD> </TR> Now we need to add a second table below the first for the three image buttons. Make sure you add this new 3x1 table within the form (if need be just edit the source to move the </FORM> tag to after your new table. Set the border and cell spacing to 0.
In the first cell insert the ![]() button_continue_shopping.gif image. This button will just be a link (unlike the other two in this table, which are input controls) so right-click to insert a link back to the catalog page:
button_continue_shopping.gif image. This button will just be a link (unlike the other two in this table, which are input controls) so right-click to insert a link back to the catalog page:
The link should use an action of showcatalog, but it should not include a category. This will force the previous category to be used.
For the second cell in the table, insert a form Image Button and set the image to ![]() button_recalculate.gif.
button_recalculate.gif.
The third cell needs to move the user to the checkout page so insert an image (![]() button_checkout_now.gif) and insert a link to ShoppingServletController with an action of checkout:
button_checkout_now.gif) and insert a link to ShoppingServletController with an action of checkout:
?action=checkout
By this point the design of the page should resemble something like this:
Now we need to update the ShoppingControllerServlet with the action handler code for updatecart:
} else if (action.equals("updatecart")) { HttpSession session = req.getSession(); CartModel cart = (CartModel) session.getAttribute("cart"); if (cart == null ) cart = new CartModel(); // Iterate through cart items and update their quantities based // on the form fields Vector items = cart.getItems(); Iterator it = items.iterator(); while (it.hasNext()) { StoreItem si = (StoreItem)it.next(); String idName=si.getId(); String qtyString=req.getParameter(idName); if (qtyString != null) { si.setQuantity(Integer.parseInt(qtyString.trim())); } } session.setAttribute("cart",cart); requestDispatch(getServletConfig().getServletContext(), req, resp, "cart.jsp"); }
For completeness, edit banner.html and add a similar link for the "SHOPPING CART" text in the banner menu, but set the action to updatecart. Be sure to set the target to the work frame:
Make a similar link for the "HOME" text in banner.html, but set the action to salesitems.
Now update ShoppingControllerServlet to display salesitems.jsp when the salesitems action is received:
} else if (action.equals("salesitems")) { requestDispatch(getServletConfig().getServletContext(), req, resp, "salesitems.jsp"); }
Save all the changes. At this point you can run the application on a server and test the shopping cart functionality.
Completing the Order Processing
Up to this point, the application has been dealing with local state management or read-only data access. The inventory model is a read-only static set of data, and the cart model is local to the HTTP session. In order to complete the order, we are going to need some information about the individual placing the order and a means of managing placed orders (something more than keeping a shopping cart in the HTTP session).
To do this, we'll create an abstraction using a customer model to represent a collection of customer information and a order model to represent a collection of orders that have been placed. These will be tied to persistent back-end data systems in Chapter 5.
To start, create a bean class to represent the user information that looks like the following (note that it implements Serializable):
package com.ibm.pbw.war; import java.io.Serializable; public class CustomerInfo implements Serializable { private String firstName; private String lastName; private String addr1; private String addr2; private String city; private String state; private String zipcode; private String phone; private String email; }
Use WebSphere Studio's getter/setter generation capabilities (Source | Generate Getters and Setters) to create public getter and setter methods for all of the private data members.
We'll also add another utitlty getter method to facilitate getting a customer's name
public String getName() { return firstName + " " + lastName; }
Create a customer model that manages the set of customer info beans that looks like the following:
package com.ibm.pbw.war; import java.util.Hashtable; public class CustomerModel { private Hashtable customers = new Hashtable(); public void addCustomer(CustomerInfo info) { customers.put(info.getEmail(), info); } public CustomerInfo getCustomer(String emailKey) { return (CustomerInfo) customers.get(emailKey); } }
Now create the order model abstraction with a class that looks like the following:
package com.ibm.pbw.war; import java.util.Vector; public class OrderModel { public String addOrder(CustomerInfo info, Vector orderItems) { return "123"; } }
Note that the addOrder() method doesn't really do anything at the moment. This will be remedied in Chapter 5 and Chapter 7 when we examine persistence and access to Enterprise Information Systems.
Create a checkout.jsp file that contains a form for collecting the user information required by the UserInfo bean class. It should look like:
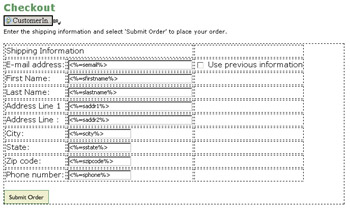
By now you should have a pretty good idea of how to go about creating the above page. If you're not sure then you can look up the code that comes with this book. The non-obvious information that you need to know is that the scriptlet at the beginning is used to set up the field initialization using the following code:
CustomerInfo cinfo = (CustomerInfo)session.getAttribute("cinfo"); String semail = ""; String sfirstname = ""; String slastname = ""; String saddr1 = ""; String saddr2 = ""; String scity = ""; String sstate = ""; String szipcode = ""; String sphone = ""; if (cinfo != null) { semail = cinfo.getEmail(); sfirstname = cinfo.getFirstName(); slastname = cinfo.getLastName(); saddr1 = cinfo.getAddr1(); saddr2 = cinfo.getAddr2(); scity = cinfo.getCity(); sstate = cinfo.getState(); szipcode = cinfo.getZipcode(); sphone = cinfo.getPhone(); }
The input fields are called semail, sname, saddr1, saddr2, scity, sstate, szipcode, and sphone and take their initial values from the Strings set up in the scriptlet; the checkbox field is called useprevious and its value is true; the submit order image button uses the ![]() button_submit_order.gif image; and the form has two hidden fields of name action and value submitorder.
button_submit_order.gif image; and the form has two hidden fields of name action and value submitorder.
To complete the checkout processing, ShoppingControllerServlet needs a checkout action to initiate the checkout processing and display the checkout JSP page. It also needs a submitorder action to submit the order for processing.
Add the following code for the action handling to the performTask() method:
} else if (action.equals("checkout")) { requestDispatch(getServletConfig().getServletContext(), req, resp, "checkout.jsp"); } else if (action.equals("submitorder")) { CustomerInfo cinfo; HttpSession session = req.getSession(); String semail = req.getParameter("semail"); String suseprev = req.getParameter("useprevious"); if (suseprev != null && suseprev.equals("true")) { cinfo = custmodel.getCustomer(semail); session.setAttribute("cinfo", cinfo); requestDispatch(getServletConfig().getServletContext(), req, resp, "checkout.jsp"); } else { String sfirstname = req.getParameter("sfirstname"); String slastname = req.getParameter("slastname"); String saddr1 = req.getParameter("saddr1"); String saddr2 = req.getParameter("saddr2"); String scity = req.getParameter("scity"); String sstate = req.getParameter("sstate"); String szipcode = req.getParameter("szipcode"); String sphone = req.getParameter("sphone"); cinfo = new CustomerInfo(); cinfo.setFirstName(sfirstname); cinfo.setLastName(slastname); cinfo.setAddr1(saddr1); cinfo.setAddr2(saddr2); cinfo.setCity(scity); cinfo.setState(sstate); cinfo.setZip(szipcode); cinfo.setEmail(semail); cinfo.setPhone(sphone); custmodel.addCustomer(cinfo); session.setAttribute("cinfo", cinfo); CartModel cart = (CartModel) session.getAttribute("cart"); String orderId = ordermodel.addOrder(cinfo, cart.getItems()); session.setAttribute("orderID", orderId); if (orderId != null) { session.setAttribute("cart", null); requestDispatch(getServletConfig().getServletContext(), req, resp, "orderdone.jsp"); } } }
Note that the request parameter names must match the checkout JSP form field names. In addition, private data members for CustomerModel custmodel and OrderModel ordermodel will need to be added to ShoppingControllerServlet and initialized in the init() method:
public class ShoppingControllerServlet extends HttpServlet { private InventoryModel model; private CustomerModel custmodel; private OrderModel ordermodel; public void init() throws ServletException { model = new InventoryModel(); getServletContext().setAttribute("model",model); custmodel = new CustomerModel(); getServletContext().setAttribute("custmodel",custmodel); ordermodel = new OrderModel(); } The CustomerModel is also added to the application-level context so that other JSP views can access customer information as necessary.
Lastly, create the orderdone.jsp to display the order ID. The JSP should look like the following:
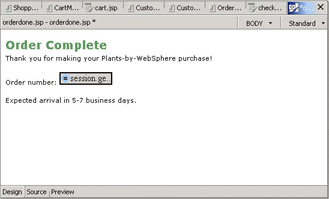
The JSP expression displays the order number picked up from the session. The expression code fragment should be: session.getAttribute("orderId").
Securing the Application
Securing the application is a topic in itself, and is covered thoroughly in Chapter 13. J2EE uses a declarative security model and provides several ways to authenticate (login) a user and check authorization. WebSphere Studio has wizards to simplify the creation of form-based login screens using JSP pages. WebSphere Application Server provides a configurable user registry that contains the set of users that can login and the role privileges that are granted to that user. Resources can be protected using role-based security declarations in the deployment descriptors. The container runtime matches the authenticated user's roles with the declared roles to determine whether or not a user is authorized to access a resource or perform an operation.
For the most part, this J2EE security functionality is sufficient for most applications. One drawback to this model, though, is that it is not completely specified. For example, user registry access is completely unspecified. Any application that needs to directly access or manipulate the user registry must either use a Roll Your Own (RYO) security strategy or use proprietary APIs specific to a vendor to manipulate the user registry. The Plants-By-WebSphere application has chosen to use a RYO strategy.
You'll notice that in our implementation of the presentation layer for Plants-By-WebSphere, we haven't yet touched on registering a customer. We created a Customer model as part of the checkout process but ideally we would want to persist this information to allow the customer to login whenever they return to the site. However, this implementation requires us to configure the security for the application, and as such this functionality will be revisited in Chapter 13.
|
EAN: N/A
Pages: 135