Creating Relationships (Links)


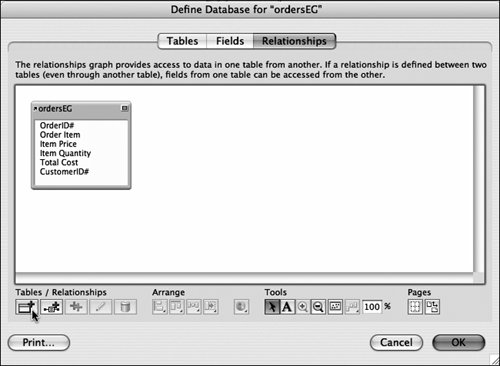
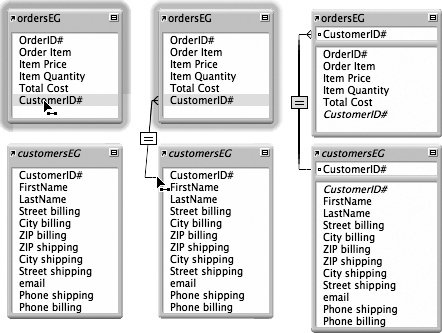
FileMaker's click-and-drag interface in the Define Database dialog box makes this so much easier than it was in earlier versions. The dialog box includes a full set of tool buttons (Figure 10.6). But in most cases your cursor and a double-click are all you need. Remember: With these steps you're creating a relationship, which is what links two files or tables together. Picking which fields from one file to display in the other requires adding a lookup field or portal, covered on pages 136 and 139.

Figure 10.6. The Relationships tab of the Define Database dialog box includes a full set of tools for working with relationships.


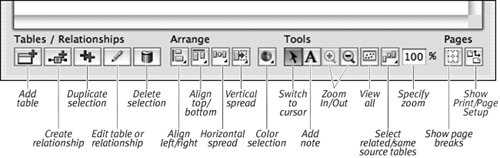
To create a relationship

1.

Open the destination file (ordersEG in our example) and choose File > Define > Database ( in Windows, on the Mac).

2.

When the Define Database dialog box appears, click the Relationships tab and the open database appears as a box listing its fields (Figure 10.7).

Figure 10.7. The Relationships tab shows the open database with a list of its fields.


3.

Click the Add table button () and when the Specify Table dialog box appears, use the File drop-down menu to choose Add File Reference (Figure 10.8). (See the first Tip on next page.)

Figure 10.8. Use the File drop-down menu in the Specify Table dialog box to choose Add File Reference.


4.

Use the Open File dialog box to navigate to the other database with which you want to create a relationship (Figure 10.9). Double-click the database, and it is added to the Specify Table dialog box (Figure 10.10). An identically named table (what FileMaker calls a table occurrence) is created (customersEG in our example). Click OK to close the Specify Table dialog box.

Figure 10.9. Use the Open File dialog box to navigate to the other database with which you want to create a relationship.


Figure 10.10. Once you open the other database, it's added to the Specify Table dialog box.


5.

Repeat steps 3 and 4 if you need to create additional relationships with any other external database.

6.

When the Relationships tab view of the Define Database dialog box reappears, the second database is included (Figure 10.11). Its title is italicized (customersEG in our example) to indicate that this is an external file rather than another occurrence of the first database.

Figure 10.11. When the Relationships tab reappears, the second database appears with all its fields listed.


7.

Finally, to link the match fields, click on the destination file's match field (CustomerID# in ordersEG in our example) and drag your cursor to the identically named match field in the source file (CustomerID# in customersEG in our example) (left and middle, Figure 10.12). Release the cursor and FileMaker links the two match fields and lists them at the top of each box (right, Figure 10.12).

Figure 10.12. Link the match fields by clicking on the destination file's match field (CustomerID# in ordersEG) and dragging your cursor to the identically named match field in the source file (customersEG).


8.

Click OK to close the Define Database dialog box.

Tips

  • In step 3 if you were creating a relationship between two tables in the same database, the other table would be listed automatically in the File drop-down menueliminating the need to select Add File Reference.

  • When would you want to create a relationship between two tables in the same database? A typical case might be where you have self-contained data that fits tidily with the related main table, such as a table of zip codes. But for databases that you expect to contain many records and many fieldssuch as our example databases for orders, customers, and productsit's best to create separate but related databases.


FileMaker Pro 8 for Windows and Macintosh(c) Visual Quickstart Guide
FileMaker Pro 8 for Windows & Macintosh
ISBN: 032139674X
EAN: 2147483647
Year: 2006
Pages: 184
Authors: Nolan Hester

flylib.com © 2008-2017.
If you may any questions please contact us: flylib@qtcs.net