Flylib.com

Books Software


Hack16.Create Drop-Down Stickies


Hack 16. Create Drop-Down Stickies

Use DHTML to position sticky drop-down windows relative to keywords in your HTML .

Attaching a drop-down sticky to a word or phrase in your document is an easy way to add valuable information close to the word, without obscuring it. That way, the user can click on the word and get more contextual information, all without scrolling or lots of mouse movement.

3.7.1. The Code

Save the code in Example 3-7 as index.php .

Example 3-7. PHP and JavaScript cooperate to make drop-down stickies work
<?php
$nextid = 1;
function start_link( $text )
{
  global $nextid;
  $idtext = "a"+$nextid;

?><a href="javascript: void drop( '<?php echo($idtext); ?>' );">
	<span id="a_<?php echo($idtext); ?>"><?php echo($text); ?></span></a>
	<div id="<?php echo($idtext); ?>" class="drop" style="visibility:hidden;">
<table cellspacing="0" cellpadding="0" width="170"><tr>
<td valign="top" width="20">
<a href="javascript: void close(<?php echo($idtext); ?>)"><img src="close.gif"
border="0"></a>
</td>
<td valign="top" width="150">
<?php
}

function end_link( )
{
?>
</td>
</tr></table>
</div><?php
}

function link_header( )
{
?>
<style type="text/css">
body { font-family: arial, verdana; }
.drop {
  padding: 5px;
  font-size: small;
  background: #eee;
  border: 1px solid black;
  position: absolute;
}
</style>
<script language="Javascript">
function drop( sid )
{
  aobj = document.getElementById( "a_"+sid );
  divobj = document.getElementById( sid );
  divobj.style.top = aobj.offsetBottom+10;
  divobj.style.left = aobj.offsetLeft+10;
  divobj.style.visibility = "visible";
}
function close( sid )
{
  divobj = document.getElementById( sid );
  divobj.style.visibility = "hidden";
}
</script>
<?php
}
?>

<html>
<head>
<?php link_header( ); ?>
</head>
<body>
Hey <?php start_link( "this is interesting" ); ?>
That really<br/>
Is interesting <?php end_link( ); ?>. How about that.
<br/>
The popup will go over text and all that.<br/>
And it will stay up until it's dismissed with the close
button.
</body>
</html>

The script defines three functions at the top of the file: start_link, end_link , and link_header . The call to start_link takes the text of the link as an argument. The contents of the drop-down box are then supplied, and the end_link call is made.

To get the CSS classes and JavaScript into the header, you need to call the link_header function within the head tag.


3.7.2. Running the Hack

Copy the code and the images to the server. Point your browser to the index.php script and you will see something similar to Figure 3-10.

Figure 3-10. A clickable keyword in the document

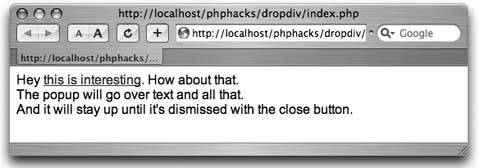
Now click on the link and you will get the drop-down box with a close icon, as shown in Figure 3-11.

3.7.3. See Also

  • "Create Pop-Up Hints" [Hack #12]

Figure 3-11. The drop down positioned under the link


Hack 17. Create Dynamic Navigation Menus

Use PHP to build a navigation menu widget that works consistently across your site .

Writing the navigation menu for your site can be a pain. You don't want to write the same code over and over on every page. Ideally, you would have a PHP menu function that would render the menu with the current page highlighted. This hack gives you that simple menu function (for the low cost of this book, no less!).

3.8.1. The Code

Save the code in Example 3-8, which demonstrates the use of menu.php as index.php .

Example 3-8. Using the menu library
<?php
require_once( "menu.php" );

$page = "home";
if ( $_GET['page'] )
		$page = $_GET['page'];
?>
<html>
<head>
<title>Page - <?php echo($page); ?></title>
<?php echo menu_css( ); ?>
</head>
<body>
<table cellspaceing="0" cellpadding="5">
<tr>
<td width="200" valign="top">
<?php page_menu( $page ); ?>
</td>
<td width="600" valign="top">
Page: <?php echo( $page ); ?>

</td>
</tr>
</table>
</body>
</html>

Example 3-9 shows the library, which is surprisingly simple.

Example 3-9. Making everything work with the PHP library, menu.php
<?php
function menu_css( ) {
?>
<style type="text/css">
.menu-inactive, .menu-active {
		padding: 2px;
		padding-left: 20px;
		font-family: arial, verdana;
}
.menu-inactive { background: #ddd; }
.menu-active { background: #000; font-weight: bold; }
.menu-inactive a { text-decoration: none; }
.menu-active a { color: white; text-decoration: none; }
</style>
<?php
}

function menu_item( $id, $title, $current ) {
$class = "menu-inactive";
if ( $current == $id )
		$class = "menu-active";
?>
<tr><td class="<?php echo($class); ?>">
<a href="index.php?page=<?php echo( $id ); ?>">
<?php echo( $title ); ?>
</a>
</td></tr>
<?php
}

function page_menu( $page ) {
?>
<table width="100%">
<?php menu_item( 'home', 'Home', $page ); ?>
<?php menu_item( 'faq', 'FAQ', $page ); ?>
<?php menu_item( 'download', 'Download', $page ); ?>
<?php menu_item( 'links', 'Links', $page ); ?>
<?php menu_item( 'credits', 'Credits', $page ); ?>
</table>
<?php
}
?>

index.php creates the menu by calling the page_menu function and specifying the page ID. The ID of the page is used to decide which menu item is selected. The index.php script also calls the menu_css function to set up the CSS styles for the menu.

You can change the makeup of the menu by altering the bottom portion of the menu.php file to add or remove menu items. You can also change the look and feel of the menu by altering the CSS class definitions in the menu_css function.

You'll obviously need to change the menu titles and pages in this script to match your own site layout.


3.8.2. Running the Hack

Upload the code to the server and point your browser at index.php . Your display should look like Figure 3-12.

Figure 3-12. The home page

Now click on the FAQ link; you should see something like Figure 3-13.

3.8.3. See Also

  • "Build a Breadcrumb Trail" [Hack #4]

Figure 3-13. The FAQ page