Hack61.Set Up a Home Studio
Hack 61. Set Up a Home Studio
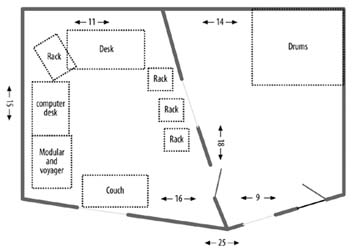
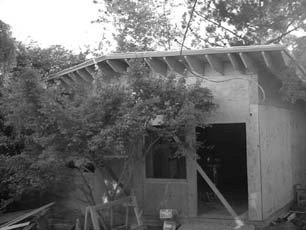
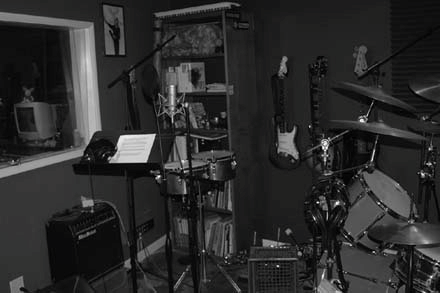
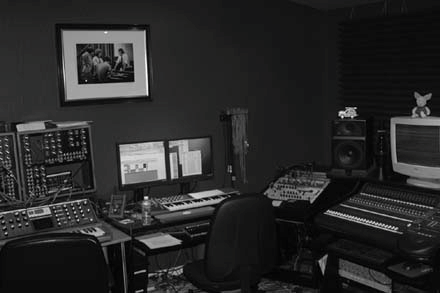
Use a combination of quality hardware and software to produce high-quality shows suitable for both podcast and broadcast. Podcasting makes for a great entry point into the wider world of audio production. That can include more complex podcasts, or producing music or stories for radio. You can upgrade your audio production in two ways. First, you can buy better audio hardware and software, and second, you can improve the dynamics of the space you record in. Of course, you can do both at the same time. 9.2.1. Better Hardware and SoftwareThis section deals with improving your hardware and software setup so that you get a cleaner sound, as well as more flexibility in terms of the sound you can produce. 9.2.1.1 Build a Digital Audio Workstation.Whereas before you got by with some basic recording and editing software, now you will need studio automation software. These systems control the mixer during playback and allow you to route and record audio from multiple sources and destinations. The result is what is called a Digital Audio Workstation (DAW). Digidesign's Pro Tools [Hack #50] software and hardware combinations is one of the industry leaders in DAWs. Its current line, starting with the Mbox, and moving up to the 001 and 002, provide flexible and affordable solutions for home studios. In terms of price, these systems start in the low hundreds and go well into the thousands. Other software options include Mark of the Unicorn's (MOTU) Digital Performer, Apple's Logic, and Steinberg's Cubase. If you decide to go with a nonPro Tools option, you will need to invest in an audio interface, for getting audio in and out. Some of the hardware manufactures in this space include MOTU, Apogee, Edirol, and TASCAM, just to name a few. Your next choice concerns the type of mixing surface [Hack #14] that you want to use. You can use a dedicated mixer such as those from Mackie or TASCAM. Mackie's higher-end boards now support FireWire for recording and control. The benefit of buying a mixer is the ease of routing options, and the availability of preamps for your mics [Hack #13] and card slots for effects. The downsides to using a mixing board are that you are limited to the board's bandwidth and you have to wire it all up to your digital-to-analog (DAC) converters, patch bays, etc. That can take a lot of time and money. Mixers also provide phantom power for your microphones. Control surfaces, on the other hand, look and feel just like a mixing board, but usually only a couple of cables come out the back and connect to your computer. The control surface lets you control any aspect of the DAW (level, pan, aux, bus) via a FireWire or Universal Serial Bus (USB) connection. Make sure your DAW software fully supports the control surface you choose. At Cedub Studio, we use Digital Performer with multiple MOTU DACs running through patch bays and a Mackie D8B mixing board. The Mackie D8B offers HUI, so you can use it as a mixing board and as a control surface. 9.2.1.2 Better microphones.You should buy a variety of microphones [Hack #13] to suit your audio work. All the microphones you buy should use the XLR cabling format. For vocal work on podcasts, we recommend the studio-standard Electro-Voice RE20. Other options include the Shure SM57 and SM58. These are cheap and almost indestructible. If you plan on recording music, you should get microphones that accentuate the acoustic properties of the instruments. 9.2.1.3 Better wiring.With more equipment comes more wiring. You can buy quality cabling or build it yourself. The one thing you should not do is skimp on interconnect quality. Building your own cables allows you to use better materials by leveraging your own time. Home-built cables are 20% of the price of store-bought cables. The result is having a set of cables cut to length, which means less chance of noise. Belkin, Mogami, Switchcraft, and Neutrik will sell you cabling and parts so that you can make your own cables. 9.2.1.4 Microphone preamps.Preamps [Hack #14] take a mic-level or instrument-level signal and convert it to line level. Preamps also provide phantom power for condenser microphones. Mixing consoles provide mic preamps, but external preamps provide more headroom and a cleaner sound. We recommend that the first preamp you buy be a very clean, Class A design because this will give you the most flexibility. A low-noise mic and a clean line allow for more effects and processing. We recommend the AMEK 9098. It's clean, and it provides two channels for two separate microphones. Other preamps, such as tube-based preamps, offer input color and warmth that can be great for defining your sound. The options for microphone preamps are limitless. 9.2.1.5 Hardware effects processors.Between the preamp and the board is where effects will go. Effects [Hack #51] can be hardware or software devices that manipulate the sound (e.g., reverb, flange, equalization, compression). A popular hardware unit is the APHEX 320A Compellor, which is a combination compressor and limiter. The compression helps manage the overall input level and the limiter keeps the signal from peaking. You should avoid external effects hardware, for two reasons. First, most of these effects are now available in software. Software effects are often plug-ins that you can integrate into your DAW, such as Native Instruments' Guitar Rig or the Waves (http://waves.com/) series of plug-ins. You can also use off-board DSP processors such as the Universal Audio UAD-1 or the TC Electronic PowerCore. Second, introducing effects boxes into the signal path can increase noise even if they aren't switched on. Reducing signal path complexity is one way to reduce noise and avoid ground loops. Make sure that as you set up your studio, you make it easy to modify the signal path between the microphone and the mixer. 9.2.1.6 Studio hybrids.In [Hack #34], we covered the use of a telephone hybrid to allow listeners to call in to your show, or for you to call out. The hybrids we mentioned in that hack are personal devices meant for a single line. Studios that host call-in shows have much more elaborate systems that combine special phones, rack-mounted hybrids, rack-mounted control systems, computer monitor hookups, and keyboards. The result is a system that can automatically prompt callers for topic information, queue them up, and feed them audio from the show. The board operator and call screener monitor the incoming calls and feed them into the host. The host can also have a list of who is available. Vendors of such systems include Telos Systems (http://telos-systems.com/), ClearOne (http://clearone.com/), and JK Audio (http://jkaudio.com/). 9.2.1.7 ISDN audio.Another feature of professional studios are ISDN links that feed CD-quality audio direct into the board from ISDN lines. Sonifex (http://sonifex.co.uk) makes a variety of ISDN hardware devices that can go studio to studio or studio to transmitter. With these, you can conduct an interview with someone in another studio, and make it sound as though you are sitting right next to the person. You will get studio-quality sound on both sides of the conversation. If you want to go remote and connect with your home studio, Plain Old Telephone Service (POTS) adapters send high-quality audio signals back to the studio over a standard phone line. Telos Systems, Sonifex, and others sell these POTS codecs. 9.2.1.8 Recording systems.Instead of using a computer-based DAW, you can use dedicated CD recorders or solid-state recording systems [Hack #69]. Computers in the studio can generate fan noise as they are recording. Dedicated standalone systems generate no noise. This can be an advantage in a small studio setting where the microphones are in the same room as the computer. Examples of these dedicated CD recorders include the Tascam CC222MKII and the Denon DN-C550R. 9.2.1.9 Rack systems.Most processing hardware devices are built to fit into rack mounts. If you have an information technology (IT) background, you will recognize the four screws or screw holes at the right and left edges of the hardware device. These are standard form factor mountings meant to fit into a rack system. Rack systems come in a variety of forms to meet your needs. Middle Atlantic Products (http://www.middleatlantic.com/) has a line of office rack mount furniture that looks at home in any office. The line of hard cases from Anvil Cases (http://www.anvilcase.com/) is what you would find backstage at an Aerosmith show. These are handy if you want your setup to be portable. Odyssey (http://odysseygear.com/) even offers rack mount bags that you can sling over your shoulder. Odyssey also makes carpet-lined rack mounts. 9.2.1.10 Monitoring systems.To hear what is being recorded, you will need monitoring speakers in your control room. These special speakers accurately represent audio, without any coloration. Two popular and well-respected near-field monitors are the Genelec 8000 series and the Dynaudio BM5As. Picking monitors is a matter of personal taste. Take CDs you know well to a pro shop and compare a number of speakers. Choose the set you think is the most accurate. Sweep an equalizer through the spectrum and make sure the monitors provide the clarity necessary to hear the changes. You will need headphones as well. For an interview studio, you need to have one set of headphones for each microphone, driven by a headphone mixing system that allows gain control on a per-channel basis. Use the same make and model of headphones at each station. 9.2.2. Upgrade Your SpaceA studio setting allows you to record a sonically clean signal that is free from noise, where noise is defined as unwanted signals, such as hums, hisses, or the sound of planes flying overhead. For podcasting, you might not want a completely clean soundthe natural character of your office or a café could be just what you want. But if you want something clean to use in voiceovers, promos, or spots, or you just want your show to be free from noise, you will need to work on your space. 9.2.2.1 Sound design.To get a clean sound [Hack #15], you need to understand the dynamics of how a particular space will color the recorded sound. The primary component is the shape of the room. The worst shape for a studio room is a square or a rectangle. Square and rectangular rooms are bad because sound waves reflect off the walls and ceilings and create nodes (two waves combine and increase the sound), antinodes (two waves collide and decrease the sound), and early reflections (bits of the sound reach your ears first). The materials in the room can also affect the sound. Flat reflective surfaces such as books or the coating on walls can reflect sound and create problems. These sound anomalies can play havoc on your mixing. Fixing these problems is called sound treatment, and it's a science. Angles, sound pressure, velocity, and room length all play a role in treating a room. Just running out and buying a room treatment package might not help your specific room. Take some time to research what you need for your room. One thing to keep in mind is that you can also go too far. Don't try to create a dead room by covering every inch of wall in foam and curtains. Having some life in a room is important to create a more sonically interesting mix. 9.2.2.2 Room equalization.A cheap but effective room equalization technique comes from Doug Kaye of IT Conversations (http://itconversations.com/). It starts with positioning the microphone where you want it and recording about a minute of speech. Then run the sample through a spectrum display in Audacity. Because you have averaged your voice by speaking for a minute, the peaks you see will be artifacts of the room resonance. Use a parametric equalizer to reduce these nodes and save that preset. In Doug's case, this translates into a preset with a 70 Hz high pass, a 12,000 Hz low pass, and a 12 dB notch that's 0.4 dB wide, centered at 152 Hz. Now you can apply that preset any time you use that microphone in that position. If you change the microphone position, you will need to make another preset. You can also use a hardware noise gate or parametric equalizer to reduce some of the ambient noise. 9.2.2.3 Sound treatments.You can try to create a silent space in your office by using some acoustic treatments such as foam, T-diffusers, and bass traps. Other options include actually changing the shape of the room by building a room in a room, removing 90-degree angles, etc. Even a little treatment can make a huge difference in your room. Auralex (http://auralex.com/) makes a wide variety of acoustic treatments. Even if you build your own studio, you will need some of these treatments in specific locations to deaden selected frequencies. If you don't want to spend money on specialized foam treatments, which can be pricey, try some blankets and throw rugs. Hard surfaces will reflect sound, so you want to cover those in something soft that absorbs sound. With a few treatments and some experimentation with positioning, you can create a mini-studio with a low noise floor [Hack #15] in your home office. Gregg McVicar produces the Earthsongs radio show (http://earthsongs.net/) out of his home office. He uses two sheets of studio foam and four Sunburst360 acoustic dampeners to create a nearly silent space. 9.2.2.4 Buy a booth.Acoustic Rooms (http://acoustic-rooms.com/), WhisperRoom (http://whisperroom.com/), Acoustic Systems (http://acousticsystems.com/), ClearSonic (http://clearsonic.com/), and other companies sell literal "rooms in a box." But these aren't just any rooms: these are mini recording booths that keep external noise out while permitting few reflections in. The smallest starts at around four feet square and goes up to office-size space. 9.2.2.5 Building your own studio.If you want total control and you take your sound very seriously, you can build your own studio. As with any building, you need some free space on your property (usually in the backyard) a permit from the county, a good design, some contractors, and a lot of money. In the next section, we will explain how we created Cedub Studio in our backyard. 9.2.3. Building Cedub StudioBoth of us are musicians and we wanted to build a studio that would allow us to get high-quality recordings, and to play as loud as we wanted without disturbing the neighbors. So, we decided to build another building in Chris's backyard to house the studio. The first step in building the studio was to read some books on the subject. These included Sound Studio Construction on a Budget (McGraw-Hill) and How to Build a Small Budget Recording Studio from Scratch… With 12 Tested Designs (Tab Books). Chris measured the gear and then began plotting the rooms' layout. The design we settled on reduced the number of parallel walls, and separated the control and live rooms. Figure 9-1 shows Chris's final drawing. We hired a studio designer to go over the drawings. It was a huge eye opener. He suggested that heavy, thick, and rigid walls, ceilings, and floors are what keep sound in (and out). All openings have to be totally sealed or doubled. He also suggested building a bass trap into the room design by having the back walls of the room come together at specific angles. This kind of construction is tricky and expensive. Ideally, you'd want to build a room inside a room. With our meager budget, there was no way we would get close to ideal. We decided on a larger control room than live room, given the amount of gear we had and the need for a couch. (We also spend more time mixing than recording, so it had to be comfortable.) To save money we did much of the work ourselves. We handled the foundation trench, the electrical wiring, and the internal finishing, including the inside/outside painting. See Figure 9-2. Figure 9-1. Final layout diagram of Cedub Studio The foundation is slab concrete. It's thick and solid, and with a few carpets, it warms right up. The framing was 2 x 6 bases and offset studs. The ceiling slants from 8 feet in the back to 12 feet in the front with 2 x 12 joists. We put in a 3 x 5 double-pained window between the rooms so that we can see into the live room from the control room. The door between control and live is a single door, and the exterior door is double-layered. The 100-amp service to the building splits into six different circuits: lights, computers, guitar amps, power amps, racks, and one more for good measure. We installed two mic jack panels on either side of the live room (Figure 9-3) that feed into the control room (Figure 9-4). These lines carry 12 mic jacks each and a combination of line-level and speaker cables so that we can plug directly into the wall and then route to the board via the patch bay in the control room. We filled the internal walls with insulation, followed by Auralex SheetBlok (in the live room), sound-deadening board, and 5/8-inch sheet rock. We decided on the final layers partially based on our budget. The ideal would have been insulation, plywood, and two layers of sheet rock. Plywood is expensive stuff, and at the end, we had to go with what we could afford at the time. The final phase of the projectwiring the studio from scratchtook three months. With the wiring done, the "burn in" period began. We had to test every line and iron out the ground loops. Then we began another round of sound reinforcement. We hung four sheets of 4-inch foam behind the mixing console. We placed six T-diffusers above the mixing console with 2-inch foam between and then Venus bass traps in the back of the room. Figure 9-2. View of the studio during framing There are a lot of options to choose from when it comes to upgrading your home studio to suit your needs. If you are considered in your use of time and money you will find the right option for your needs and your budget. 9.2.4. See Also
James Polanco and Chris Walcott Figure 9-3. The live room Figure 9-4. The control room |
EAN: 2147483647
Pages: 144