Hack36.Edit Your Interviews
Hack 36. Edit Your Interviews
Learn how to edit interviews to build an interesting story for your listeners. Scoring the right interview and asking the right questions is just the beginning of the art of the interview. Some interviews contain up to 10 hours of raw material [Hack #33]. Finding the essence of the story and editing it down to something that conveys that theme is an art. I'll discuss four basic types of interview editing in this hack. Categorizing them this way makes it easier to explain the techniques. But you should not feel bound by these categories. There are no hard and fast rules. You can mix and match as you like.
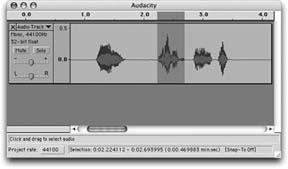
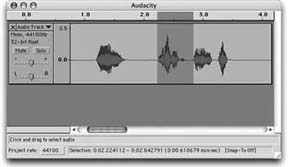
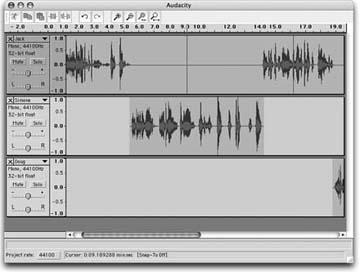
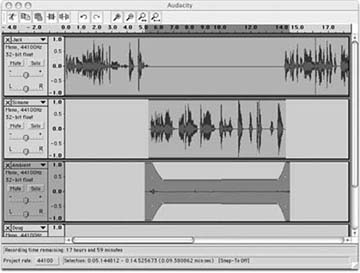
Each form of editing has different tools and techniques that can help you shape the interview the way you want it. While it's easier to explain the different techniques of editing in groups such as this, you should not feel limited by them. If you want to use techniques mentioned in the upcoming "Artful Editing" section when you are doing a news story, use them. There are no hard and fast rules. You should do what you need to do to create the compelling story that you want. 5.5.1. Basic EditingThe most basic edits start with removing any noise from the signal [Hack #15]. A clean signal is much easier to edit than a signal with periodic background noise. The next step is to even out the volume across the interview. This involves using the gain envelope feature in your editor to remove any dips in the signal or to cancel out any jumps in volume. You can also use a compression or normalization filter [Hack #56] to do some of this work for you. After normalizing the volume and removing any noise, chop off the silence at the beginning and end of the file and save the file with a different name. This new file will be the new master copy for the interview. After the initial cleanup, it's time to do any basic content edits. That means removing extra "ums" and "ahs." A general rule in the broadcast industry is to retain a few "ums" and "ahs" to give a feel for the person's manner of speech. To err is human, very human. All of us talk with "ums" and "ahs," so removing them all will make the person sound like a robot. With the "ums" and the "ahs" removed, it's time to take out any retakes. Hopefully, you will have some space before the person started her response again. You should coach her to do that before the interview. With the blank space in there, it's easy to simply select the faulty reply and delete it. That's it for a basic edit of an interview. You might want to fade in at the front and fade out at the back so that when you drop it into your show after the introduction, it won't start abruptly at full volume. 5.5.2. Artful EditingArtful editing occurs when you take a raw interview and shape it like clay until you have it tell the story you want. It starts not in the editor, but with transcribing the interview with a word processor. In the word processor you can copy, paste, and rearrange the original interview as you please. This document becomes the interview script. After you have the script, the next step is to clean the interview, as discussed in the "Basic Editing" section. Naturally, you don't have to clean the passages you won't be using in the script, but it might be easier to clean the entire script. The next step is to take the cleaned interview file and to cut out the segments that you need. Leave some silence before and after each cut so that you can preserve the cadence of the speakers and the natural silence between the segments. With the cuts in hand, you can rearrange them in the scripted order in a new audio file. Fade in at the beginning, and fade out at the end, and you have your completed interview in the order you want. There is certainly an art to the structure and the arrangement of the interview, but there is also an art to the way the sound is shaped. The subsections that follow detail what you should be aware of when you are editing to this extent. 5.5.2.1 Breath sounds.In general, people start a sentence with a short breath in, and then speak fairly loudly, getting progressively softer until the sentence ends. This also works at a macro level with paragraphs of speech: people take a larger breath in the beginning and the sentences tend to start louder and get softer as they expend their breath. Though the effect varies by individual, it's something you should account for in your editing. Ideally, you should remove entire phrases between the end of the expenditure of breath at the end of a sentence, and the intake of air for the new sentence. If you account for the breath sounds, the effect of the edit should be imperceptible. Figure 5-12 shows what you would think would be the correct selection to remove a word from some audio. You bracket the word and then remove it. But it turns out that Figure 5-13 is the correct edit. Figure 5-12. A tight cut around a word Figure 5-13. The correct cut for a word that accounts for the breath The edit in Figure 5-13 selects the breath between the two words so that you don't get a double breath or an absence of breath where there should be a natural breath. 5.5.2.2 Cadence of speech.Some people talk very fast and others speak more slowly. It's almost musical in form, with a beat and a tempo. When you cut between the two speakers, you need to cut the new speaker in at the beat point where the first speaker would have started again. This means that for a fast speaker, the pause between where he finishes his sentence and where the next speaker starts should be short. For a slower talker, the delay should be a little longer. While this level of detail in editing isn't strictly necessary, it will result in an interview that's easier to listen to if you pay attention to it. 5.5.2.3 Contemplative silence.Any musician will tell you that the notes you don't play are just as important as those you do play. Sometimes we stop and think, and the result is silence. And sometimes that silence says more than the words we could fill it with. When a person spends some time thinking about an answer, sometimes the delay is, in itself, noteworthy. This type of delay is effective particularly with big life questions: "Do you regret what you did?" or "Would you do anything differently in hindsight?" It goes almost without saying that it would be unethical to add silence that would imply contemplation if there was none to start with. 5.5.3. News EditingEditing for a news story is similar in form to artful editing. The difference is in the role of the interview. In the artful edit, the interview was paramount. With editing for news, the story is paramount and the samples of interview are used as quotes within the body of the story. The editing starts the same way as in the artful edit. You begin with a transcript of the interviews that you have available for the story. Then you write a story with call-outs for the cuts of the interview that you need. Once you have the interview cleaned, you extract the cuts you need for the story. Then you record the story using a studio setup, and leave gaps for the quotes from the interview. To smooth out the sound, you should apply a short fade-in effect at the beginning of each cut and a fade-out at the end [Hack #58]. With an editing program such as Audacity [Hack #50], you create a two-track setup and place the studio sounds in one track and the interview cuts in another track. Remove the spaces from the studio sounds, and position the interview segments in those gaps. Figure 5-14 shows three tracks: one for the host and one each for two guests. At this point, you can save the interview as a multitrack project. Then you mix-down to stereo or mono for the MP3 export of the finished story. Figure 5-14. A multitrack interview 5.5.3.1 Ambience.The sound of a studio is dead silence. A friend of mine calls this the "disembodied voice phenomenon," and finds a pure voice arriving as if out of a noise-free vacuum very disturbing. Regardless of whether you find it disturbing, there will be a difference between the background noise of the studio and the noise of the interview cuts. This is evident particularly if the interview was done in the field, as they so often are. To account for this difference, you should take at least a minute of blank sound recording [Hack #64] before the start of the interview. Then you can loop this blank sound underneath the interview segments with a fade-in and a fade-out at the beginning and the end of the interview clip. People usually do this by creating a third track for the ambient noise. They use the gain envelope feature to accomplish the fade-ins and fade-outs for the ambient track (as shown in Figure 5-15). Figure 5-15. The multitrack interview with an ambient track Done properly, this will smooth the transitions between the studio sound and the interview sound and will make for a much more pleasant listening experience. Is it worth the effort? It is, because you want your listeners to concentrate on the story's content and the interview quotes, and not be distracted by jarring audio effects. 5.5.3.2 Up cuts.When people put two thoughts together into a single sentence using a conjunction such as and, or, or but, they tend to finish the last word before the conjunction stronger than normal. If you were to cut it there, the sentence would end going up in volume, not going down, as it normally would. This is called an up cut, and it's a sign that someone was cut off before they could finish their thought. Because time is not so critical with podcasts, there should be no reason to cut someone's quote so short as to create an up cut. 5.5.4. Editing EthicsWith today's technology, it's all too easy to turn an interview that said one thing into an interview that says something else. You need to watch out for two things. First, don't rearrange an interview such that it ends up saying something the interviewee did not intend to say. Second, never rerecord your questions. A subtle change of inflection, or worse, a change in the content of the question, can color the answer in a new light. It's unethical to change the question to alter the meaning of an answer. It's important to keep in mind as you are editing that you want the result to appear seamless to your listeners. You should make your edits as imperceptible and natural as possible. The interview is what's important, not the edits that you make to clean it up. 5.5.5. See Also
|
EAN: 2147483647
Pages: 144