Summary
Determining and Defining Views
By now you've probably realized that views can be a substantial asset to the database. During this stage of the database-design process, you'll define a fundamental set of views for the database. Your definition of views won't stop hereyou'll probably define more views when you implement the database within your RDBMS and as you create your end- user application programs. In these instances, you'll use views as a tool to support particular aspects of the implementation or application program. The views you define during the database-design process, however, will focus strictly on data-access and information-retrieval issues.
Working with Users and Management
You'll work once again with the organization's representative group of users and management to identify the types of views the organization requires. After you identify these views, you'll establish and document them, and then you and the group will review the views to make certain that they are properly defined.
Before you conduct your first meeting with the group, review the notes you've taken throughout the entire design process. Your objective is to get an idea of the types of views the organization might need. Almost every organization spends a large amount of time producing and reading reports , so you should focus on that aspect of your notes. You should also review the report samples you assembled during the analysis process.
When you and the group meet, consider the following points to help you identify view requirements:
-
Review your notes with the group. In many instances, talking about a specific topic will spark an idea for a new or required view. For example, someone may realize a need for a view during a discussion of mission objectives.
-
Review the data-entry , report, and presentation samples you gathered during the early stages of the design process. Examining these samples, especially summary-style reports, could easily illuminate the need for certain types of views.
-
Examine the tables and the subjects they represent. Some individuals in the group may identify the need for a view based solely on a specific subject. If someone mentions a subject, such as Employees, it may cause someone else to say, "We definitely need a view that restricts certain employee data for confidentiality reasons."
-
Analyze the table relationships. You'll most likely identify a number of multitable views that you should create for many of the relationships. Several of these views will coincide with views you identified for the report samples.
-
Study the business rules. As you already know, you can use a validation view to enforce a rule that imposes a constraint on a particular field's range of values.
You and the group should be able to identify a number of views by going over the items on this list. After you've identified as many of the required views as possible, your next task is to define them.
Defining Views
You'll now define each view that you've identified using the appropriate tables and fields. Review the relationship diagrams to identify which tables and fields you need for the view's structure. When you've determined what you need, define the view and record it in a view diagram.
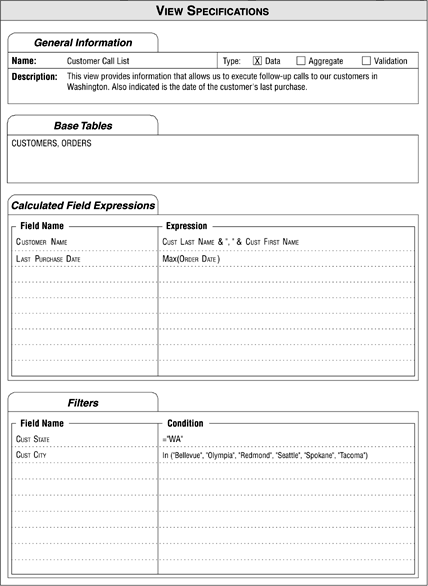
For example, say you've determined that you can use a view for the report shown in Figure 12.12; the name of the new view will be CUSTOMER CALL LIST.
Figure 12.12. Report sample requiring a view.
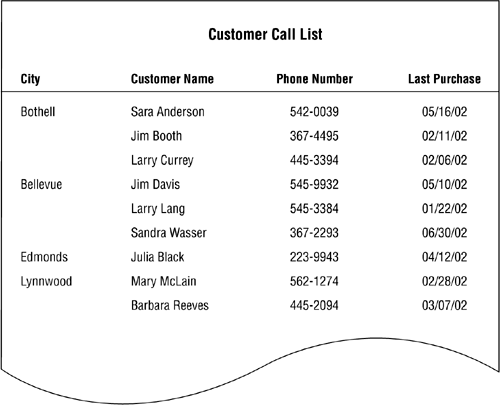
The notes you've taken throughout the design process become useful once again. You reviewed this report during the analysis stage of the design process, and you've noted that this report represents information about customers and their orders; it is from the order data that you can determine when a given customer made his last purchase. Now, review the relationship diagram for the CUSTOMERS and ORDERS tables; you'll use fields from these tables to create the CUSTOMER CALL LIST view. Figure 12.13 shows the relationship diagram for these tables.
Figure 12.13. Relationship diagram for the CUSTOMERS and ORDERS tables.
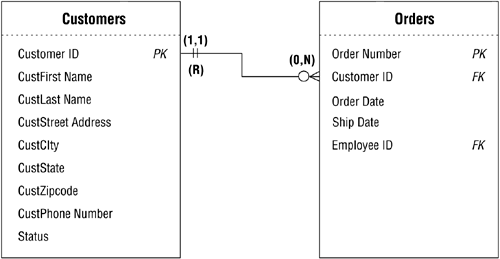
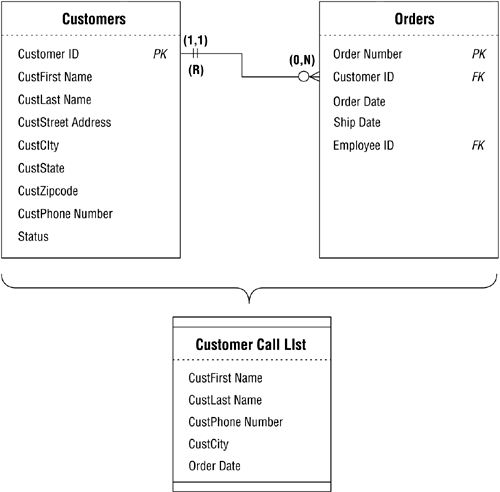
After examining the relationship diagram, you determine you need to use five fields to build this view: C UST F IRST N AME , C UST L AST N AME , C UST P HONE N UMBER , and C UST C ITY from the CUSTOMERS table, and O RDER D ATE from the ORDERS table. You now define the CUSTOMER CALL LIST view by assigning the fields to the view and then recording them in a view diagram. When you're finished, your diagram should look like the one in Figure 12.14.
Figure 12.14. View diagram for the CUSTOMER CALL LIST view.
Using Calculated Fields Where Appropriate
Earlier in the database-design process, you learned that tables couldn't contain calculated fields for a number of good reasons. But one of the characteristics of a view that makes it so useful is that it can contain calculated fields. Recall that calculated fields will display the result of a concatenation, expression, or aggregate function; this makes them an extremely flexible structure to include in a view.
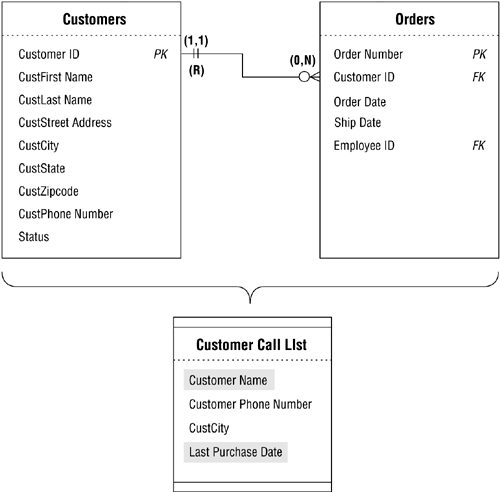
For example, consider the new CUSTOMER CALL LIST view. Although you have the fields you need for the view, you'll have to make one minor modification to the view so that it can display the appropriate data. One of the requirements for this view is that it must display the date of the last purchase made by each customer. In order to retrieve and display the proper date, you'll have to add a calculated field to the view. This field will use the Maximum function [commonly known as Max( )] to retrieve the correct date from the O RDER D ATE field. Name the new field L AST P URCHASE D ATE and add it to the CUSTOMER CALL LIST view diagram. (You no longer need the O RDER D ATE field in the view, so you can remove it from the view's structure.) This is the expression you'll use in the calculated field to retrieve the appropriate date:
Max(Order Date)
Later in this section, you'll learn where and how to record this expression.
Note
Be sure to refer to your RDMBS's documentation to determine the correct syntax for this function and all of the other functions used in this chapter.
Another calculated field you might include in this view is one that displays the complete customer name by concatenating C UST F IRST N AME and C UST L AST N AME . Say, for example, that you want to display the customer name in this manner: "Hernandez, Michael." Create a calculated field called C USTOMER N AME and use the following concatenation expression:
CustLast Name & ", " & CustFirst Name
Add the new calculated field to the CUSTOMER CALL LIST view diagram and remove the C UST F IRST N AME and C UST L AST N AME fields from the view; you don't need these fields anymore because you're now using the C USTOMER N AME calculated field. (You'll soon properly record this expression as well.)
Figure 12.15 shows how your revised view diagram should look after you've completed these modifications.
Figure 12.15. Revised view diagram for the CUSTOMER CALL LIST.
As you've just learned, calculated fields can be quite an asset because you can use them to enhance the information a view provides. You also learned earlier in this chapter that calculated fields are particularly crucial in aggregate views. A good rule of thumb to follow when you think you may need calculated fields is to use them if they will provide pertinent and meaningful information or if they will enhance the manner in which the view uses its data.
If you recall, you created a calculated-field list earlier in the design process (refer to Chapter 6). You can now use this list as a source of calculated fields that you might (or should) use in your views. Review the list as you define each new view and determine whether you can use one of the calculated fields on the list. When you find one that you can use, create it in the same manner as you did in the preceding examples. (If you create a new calculated field that does not appear on your list, however, be sure to add it to the list. This will help you keep your calculated-field list current and in order.)
Imposing Criteria to Filter the Data
Views have another characteristic that makes them extremely useful: You can impose criteria against one or more fields in the view to filter the records it displays. For example, say that the CUSTOMER CALL LIST view included the C UST S TATE field. Although the view would continue to display the set of records it did before, you would also see the state in which each customer lives. Assume, however, that you want the view to show a particular set of records, such as those for customers who live in the state of Washington. You can accomplish this by setting a specific criterion on the C UST S TATE field that will filter the data so that the view displays only those records of customers from Washington State.
Note
In database work, the word "criterion" refers to an expression that is tested against the value of a particular field. The view will include a given record if the value of the field meets the criterion.
This is the expression you will use to filter the records for the CUSTOMER CALL LIST view:
CustState = "WA"
Now the view will display only customers from Washington. If you want to filter the records further to show only those customers who live in specific cities, you add a criterion such as this:
CustCity In ("Bellevue," "Olympia," "Redmond," "Seattle," "Spokane," "Tacoma")
The view will now display Washington State customers who live in the cities specified in the expression. You may wonder why both criteria are necessarythe criterion for the C UST C ITY field should retrieve the appropriate records by itself. The trouble is that many cities are named for other cities, so that cities in two or three different states could have the same name. For example, there is a Portland, Oregon, and a Portland, Maine, both named after Portland, England. The point to remember is that you must use your best judgment when you establish criteria for a viewuse the minimum number of criteria that will cause the view to display the records you require.
When you use a criterion in a view, you must make certain that the field you're testing in the criterion is included in the view's structure. If you do not include the field in the view, you have no way of imposing the criterion. This is an important point to remember because it is a requirement when you logically define a view and when you implement the view in your RDBMS.
The one problem with applying a filter to a view is that there is no way to indicate it on a view diagram; therefore, you must record it on a View Specifications sheet.
Using a View Specifications Sheet to Record the View
A View Specifications sheet must accompany each view diagram you create. It is on this sheet that you will record the characteristics of the view. The View Specifications sheet contains the following items:
-
Name . This is where you indicate the name of the view. Before you record the name, however, test it against the guidelines for creating table names you learned in Chapter 7. These guidelines govern the naming of views as well, with one exception: The name of a view can implicitly or explicitly identify more than one subject. This is because you can define views from two or more base tables, so they do, indeed, represent more than one subject.
-
Type . This is where you indicate whether you're defining a data, aggregate, or validation view.
-
Base tables. This is where you specify the names of the view's base tables. Although the view diagram shows these tables, they appear here as a matter of convenience. The View Specifications sheet does not include field names, however, because you can record and display them more easily and efficiently on the view diagram.
-
Calculated-field expressions . This is where you record the expressions for the calculated fields you included in the view. As you record the name of the calculated field, test it against the guidelines for creating field names you learned in Chapter 7. Calculated field names are governed by these guidelines with two exceptions: You can implicitly or explicitly identify more than one characteristic in a name, and you can use the plural form of the name. But it's still desirable to use the singular form of the name whenever possible.
-
Filters. This is where you record the criteria that the view will use to filter the records it displays. You'll record both the field being tested and the expression used to test it.
Note
When you fill out the Calculated-Field Expressions and Filters sections of a View Specifications sheet, use the expressions with which you are most familiar. You'll modify them as necessary when you implement the database in an RDBMS.
Fill out a View Specifications sheet for each view you create and attach the sheet to the proper view diagram. Both of these items will serve to document the view fully. Figure 12.16 shows a completed View Specifications sheet for the CUSTOMER CALL LIST view. (Keep in mind that the view has been updated to include the C UST S TATE field.)
Figure 12.16. Completed View Specifications sheet for the CUSTOMER CALL LIST view.
Reviewing the Documentation for Each View
Once you've completed the task of defining and documenting each view, review all of your views once moreensuring that the quality of the information each view provides is well worth the effort. As you review each view, keep the following points in mind:
-
Make certain that you've defined the view properly. Think about the information the view should provide. Are you establishing the correct type of view for the required information? Did you use the appropriate base tables to define the view? Did you include all the necessary fields within the view's structure?
-
Make certain that the calculated fields you've created are suitable for the view. Do they provide pertinent and meaningful information? Do they serve to enhance the manner in which the view displays its data?
-
Make certain that the filters will retrieve the required records. First of all, do you need a filter for this view? If the answer is yes, do you know exactly which records you want the view to display? Do you believe that the filter will work correctly?
-
Above all, make certain that you have a view diagram and View Specifications sheet for each view. This documentation will be very useful when you finally implement the database in an RDBMS.
CASE STUDY
Your work on Mike's database is finally nearing an end. You meet with Mike and his staff to determine whether there is a need to establish views for the database. The agenda you've set up for the meeting involves the following steps:
-
Review the notes you've compiled during the design process.
-
Review each of the various samples you gathered during the early stages of the design process.
-
Examine the subjects represented by the tables in the database.
-
Analyze the table relationships.
-
Review and study the business rules.
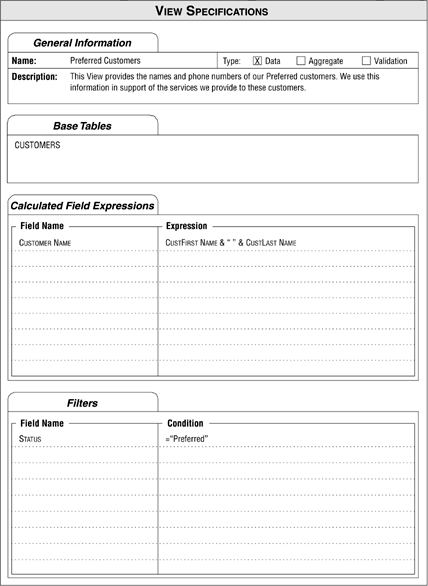
As the meeting progresses, you identify several views that you need to define, including a PREFERRED CUSTOMERS view and a VENDOR PRODUCT COUNT view. The first view will provide the name and phone number of each customer who has a "Preferred" status, and the second view will provide information on the total number of different products each vendor supplies .
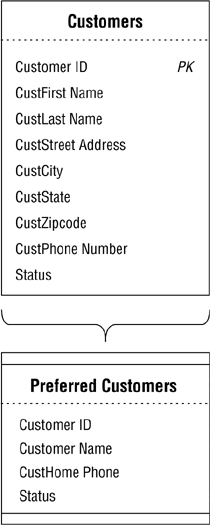
You base the PREFERRED CUSTOMERS view on the CUSTOMERS table and use the C USTOMER ID, C UST F IRST N AME , C UST L AST N AME , C UST H OME P HONE, and S TATUS fields for the view's structure. Before you construct the view, however, Mike asks if there's any way to display the first name and last name together. You respond that it can be done, so you create a calculated field called C USTOMER N AME that concatenates both of the fields together; this field will now replace the C UST F IRST N AME and C UST L AST N AME fields. Figure 12.17 shows the view diagram for the PREFERRED CUSTOMERS view.
Figure 12.17. View diagram for the PREFERRED CUSTOMERS view.
After you create the view diagram, you make note of the expression that you'll use to filter the view's data:
Status = "Preferred."
Then you complete a View Specifications sheet for the PREFERRED CUSTOMERS view. Figure 12.18 shows the results of your work.
Figure 12.18. The View Specifications sheet for the PREFERRED CUSTOMERS view.
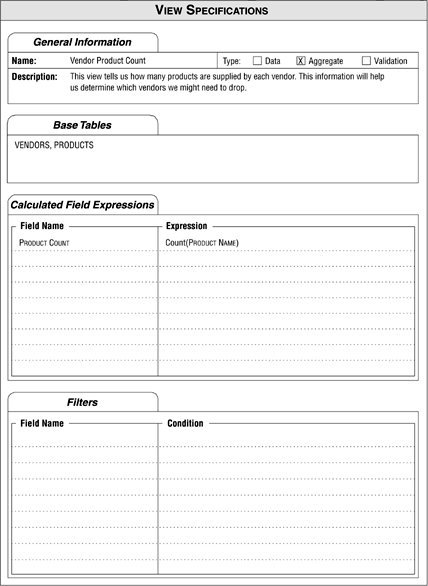
Now you define the VENDOR PRODUCT COUNT view using the VENDORS and PRODUCTS tables as the view's base tables. You use the V ENDOR N AME field from the VENDORS table to display the names of the vendors. Next, you create a calculated field called P RODUCT C OUNT to display the total number of products each vendor supplies. This is the expression the field uses to calculate the total:
Count(Product Name)
Now you create a diagram for the view, as shown in Figure 12.19.
Figure 12.19. View diagram for the VENDOR PRODUCT COUNT view.

After determining that a filter is unnecessary for this view, you finish documenting the view by completing the View Specifications sheet shown in Figure 12.20.
Figure 12.20. View Specifications sheet for the VENDOR PRODUCT COUNT view.
You then repeat this process for every view you've identified for Mike's database.
| |
| Top |
EAN: 2147483647
Pages: 203