Serviceguard Example Scenario
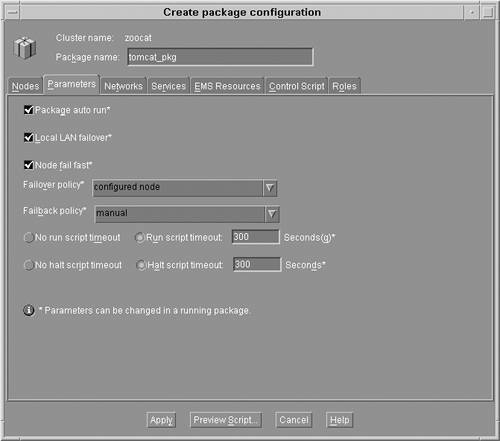
| This scenario describes the process for configuring the Serviceguard cluster that was used in the scenario in Chapter 15, "Workload Manager," where the integration of Serviceguard with Workload Manager was highlighted. Two nPartitions will be configured in a Serviceguard cluster responsible for hosting a Tomcat application server in a Serviceguard package. The zoo16 nPartition is the primary host for the package. The rex04 nPartition serves as the adoptive node for the package when zoo16 is unavailable. When not serving as the adoptive node for the Serviceguard package, rex04 is used for testing purposes. As shown in the Workload Manager scenario, when the Serviceguard package is active on rex04, it is the highest-priority workload and gets most of the resources on the system if it needs them. Cluster Hardware ConfigurationThe diagram shown in Figure 16-2 provides a detailed view of the hardware configuration for the two nodes in the cluster. Each of the nPartitions has a mirrored root disk attached to separate SCSI interfaces. If a disk, SCSI cable, or SCSI interface card were to fail, one of the mirrored disks would continue to be available. In addition, the data disks are also mirrored on separate SCSI buses to ensure that at least one of the disks will be available. Figure 16-2. Cluster Hardware Configuration Each of the nPartitions has three network adapters. Two of them are configured in HP-UX with auto-port aggregation; a single IP address is assigned to two of the interface cards. Using this configuration, either of the cards, network cables, or switches could fail and the nPartitions network connectivity would not be lost. A separate network interface is connected to a dedicated heartbeat LAN. This LAN is isolated from the rest of the network to ensure that network saturation on the production LAN doesn't result in delayed transmission of heartbeat messages, which would cause the cluster to fail. The primary LAN interfaces are also used to transmit heartbeat messages to prevent cluster failure if one of the devices on the heartbeat LAN fails. The final aspect of hardware configuration is power. Each of the nPartition servers must be connected to separate power circuits. In addition, each of the LAN switches and each copy of the mirrored disks should be connected to separate power circuits. The next step is to configure the operating environment. This consists of setting up the operating system and core applications on each of the nodes in the cluster. Operating Environment ConfigurationThe next step in configuring a cluster is to set up the operating environment. Starting with the kernel, all nodes in the cluster should have their kernel tunables set consistently to ensure that the packages will operate as expected in the event of a failure. Next, the shared storage must be mountable by any node in the cluster, but none of the nodes should mount the storage unless the package is active on the node. Shared storage devices should either not be listed in the /etc/fstab file or they should be commented out such that they are not automatically mounted. The final steps necessary for configuring the operating environment are related to networking. The Serviceguard commands rely heavily on network communication and name resolution. Every node must be able to resolve the hostname for every other node in the cluster. Therefore, the /etc/hosts file on each node in the cluster should contain the hostnames and IP address of every node in the cluster. To ensure reliable name resolution, the /etc/nsswitch.conf file should be modified such that the /etc/hosts file is used as the primary source for resolving hostnames. Domain name system (DNS) or other name-resolution services may be added to the /etc/nsswitch.conf file as alternate name resolution services. Finally, HP highly recommends that you set up all the nodes in the cluster to use the network time protocol (NTP) to ensure that the clocks on all the nodes are synchronized. Quorum Server ConfigurationAt this point the hardware and operating environments for the cluster have been configured. Before you configure the cluster and the cluster packages, you must set up the quorum server unless you are using a lock disk. In this scenario, zoo7 will be used as the quorum server. The first step for setting up a quorum server is to install the software package, which is contained in the product bundle B8467BA. After installing the software, you need to add the following entry to the /etc/inittab file (the location of the log file can be altered as needed): qs:345:respawn:/usr/lbin/qs >> /var/adm/qs/qs.log 2>&1 After adding the entry to the /etc/inittab file, you'll need to edit the authorization file to allow cluster nodes to use the quorum server. A quorum server can be used by multiple clusters. The file /etc/cmcluster/qs_authfile defines the cluster nodes that are allowed to use the quorum server. This file has a very simple format that consists of one system's hostname per line. Every node in the cluster should be listed in this file. The /etc/cmcluster/qs_authfile file for this scenario contains the following entries: # cat /etc/cmcluster/qs_authfile zoo16.fc.hp.com rex04.fc.hp.com Finally, start the quorum server by using the command init q. As specified in the /etc/inittab file, the quorum server will use the file /var/adm/qs/qs.log to log messages. The configuration of the quorum server is now complete, and the process of configuring the cluster and the package can begin. Cluster Software ConfigurationConfiguring the software aspect of the cluster is the next step. This example scenario will use the graphical user interface Serviceguard Manager to perform the configuration of the cluster and the package. These steps can also be performed by editing a configuration file instead of using the GUI. If you choose to edit the configuration file directly, you can create a template for the cluster configuration by executing the following command: # cmquerycl -v -C /etc/cmcluster/zoocat.ascii -n zoo16 -n rex04 Before starting Serviceguard Manager, you should perform two steps on each of the nodes in the cluster. First, you should include the file /etc/cmcluster.conf in any user's .profile file who will be managing the cluster. This file defines variables that specify the location of files and directories Serviceguard uses. Second, you must create the /etc/cmcluster/cmclnodelist file on every node so Serviceguard Manager will be able to create a cluster using the nodes. For this scenario, the file is identical on both zoo16 and rex04 and contains the following two lines: # cat /etc/cmcluster/cmclnodelist rex04 root zoo16 root Now the Serviceguard Manager GUI can be started. It is located in /opt/sgmgr/bin/sgmgr. The first screen shown is a welcome screen that allows a previous file to be opened or a live set of systems to be configured. For this example, the default setting is selected and Serviceguard Manager is connected to live systems. Following the welcome screen, the screen in Figure 16-3 is displayed. This screen is used to specify the server, username, and password and provides the means to select the option to view all unused nodes. In this case, zoo16 is specified as the server and the option to View All Clusters and Unused SG Nodes is selected. When you click on the Connect button, Serviceguard Manager discovers all of the clusters and unused nodes on the local network. Figure 16-3. Serviceguard Manager New Session Screen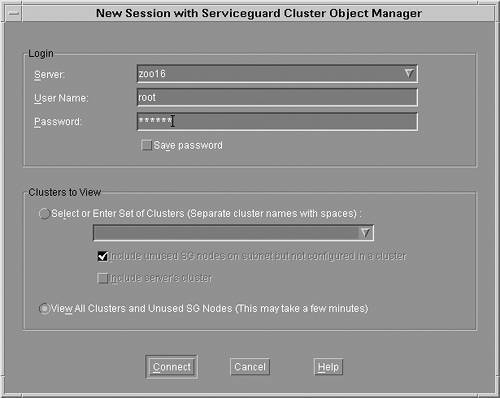 Tip If an unused node does not appear in Serviceguard Manager, it is likely that the /etc/cmcluster/cmnodelist file was not properly created or the file does not contain an entry for the server and user specified in the Serviceguard Manager login screen. The screen shown in Figure 16-4 is the main Serviceguard Manager window. Notice that all of the unused nodes are listed on the left-hand side. In this case, the two of interest are zoo16 and rex04. Zoo16 is selected and then the Create Cluster action is selected from the Actions menu. Figure 16-4. Serviceguard Manager Main Screen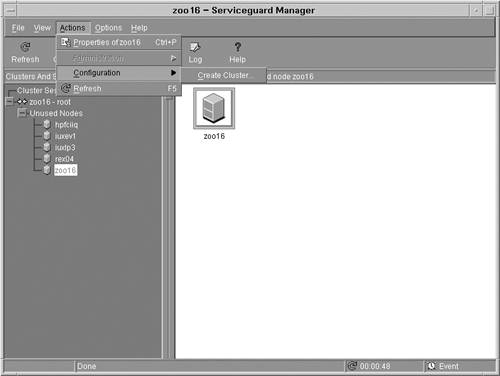 Selecting the Create Cluster action produces the dialog shown in Figure 16-5. It provides the ability to configure all the parameters that can be specified in the configuration file. The first step in configuring the cluster is specifying the name of the cluster. The cluster in this scenario is named zoocat, which is specified in the Cluster name field. After the cluster name has been specified, the first tab to be completed is the Nodes tab. Both rex04 and zoo16 are selected from the list on the right-hand side and added to the Cluster node list. After the nodes in the cluster have been selected, the next step is to configure the parameters for the cluster. Figure 16-5. Serviceguard Manager Cluster Node Configuration Screen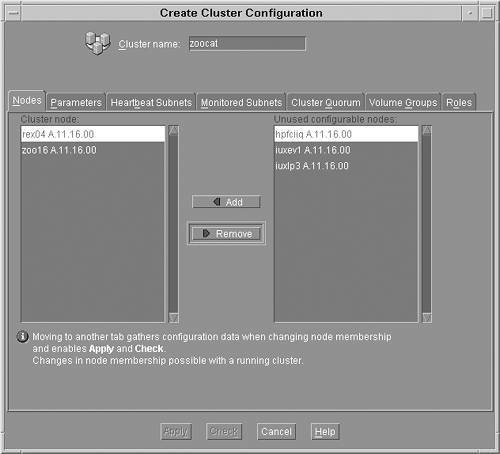 Figure 16-6 shows the Parameters tab of the cluster configuration screen. The following parameters can be configured on this screen.
Figure 16-6. Serviceguard Manager Parameter Configuration Screen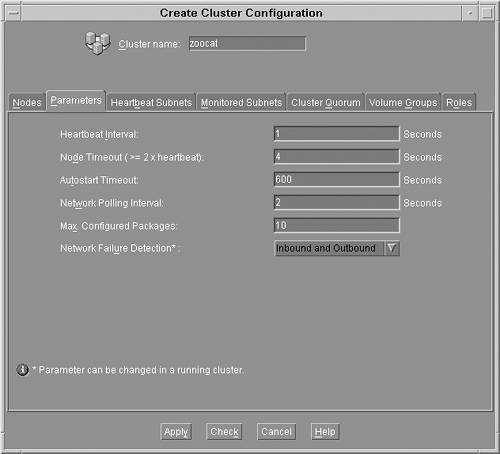 The screen shown in Figure 16-7 provides an interface to specify the heartbeat subnets for the cluster. In this example, both the 10.10.10.0 and 15.1.48.0 networks will be used as heartbeat networks. The 10.10.10.0 subnet is dedicated to the cluster heartbeat and the 15.1.48.0 network is used as a secondary carrier. Figure 16-7. Serviceguard Manager Heartbeat Subnet Configuration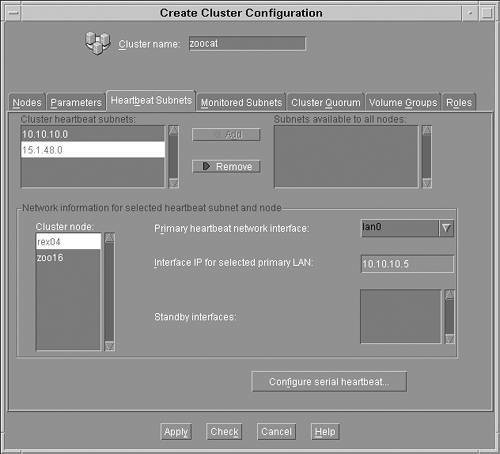 The lower portion of the screen provides the ability to specify which network interface should be used as the primary heartbeat network. In this scenario, rex04 will use lan0 as the primary network interface because it is connected to the 10.10.10.0 dedicated heartbeat network. For zoo16, lan2 is selected because it is also connected to the 10.10.10.0 network. There are no standby interfaces on either system, so that field is left blank. The screen shown in Figure 16-8 provides the ability to specify additional subnets that will be monitored by Serviceguard to ensure that they are functioning properly. In this example, both of the subnets used by the cluster nodes are used as heartbeat subnets, so there is no need to configure them again in the Monitored Subnets tab. In fact, only networks that are not configured to be heartbeat subnets appear in this screen. Figure 16-8. Serviceguard Manager Monitored Subnets Configuration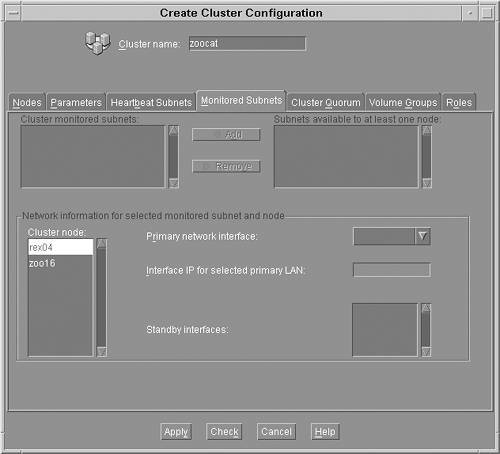 The next task is configuring the cluster quorum as shown in Figure 16-9. This scenario uses a quorum server that is running on a separate node, zoo7. Here the hostname for the quorum server is specified and the polling interval is configured. This value is how frequently the quorum server will be polled to ensure that it is available. Finally, a timeout extension can be specified that provides a grace period when the quorum server can be unavailable without being marked as down. Figure 16-9. Serviceguard Cluster Quorum Configuration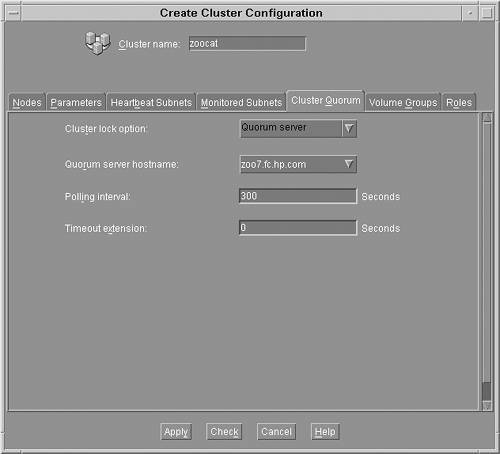 The next tab is for configuring Volume Groups. In this example, there are no shared cluster volume groups, so the tab is left blank. The final tab that requires information when you are creating a cluster is the Roles tab. This tab can be used to give non-root users the ability to perform administrative duties on the cluster. Figure 16-10 shows that a non-root user, bryanj, has been granted cluster-wide administrative privileges. User roles are added by clicking on the Add button and then specifying the following information:
Figure 16-10. Serviceguard Manager Roles Configuration In this scenario, the user bryanj has cluster-wide administrative privileges from any node in the zoocat cluster. The final step in configuring the cluster is to perform a validation of the cluster's configuration. The screen shown in Figure 16-11 is the Operation Log detailing the process of checking the configuration for the zoocat cluster. This task can be initiated at any time during the configuration process by clicking on the Check button at the bottom of the screen to verify the inputs that have been specified. In addition, if the cluster is being configured by editing the configuration file directly, then the following command can be used to check the configuration file: # cmcheckconf -v -k -C /etc/cmcluster/zoocat.ascii Figure 16-11. Serviceguard Manager Check Cluster Configuration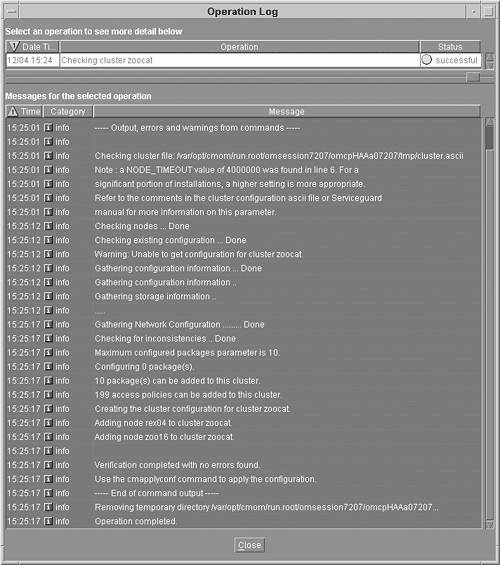 As the output from the command shows, there are no errors in this configuration, so it can be safely applied to all of the nodes in the cluster. Figure 16-12 shows the main Serviceguard Manager screen after the Apply button on the cluster configuration dialog has been clicked. When editing the configuration file directly, use the following command to apply the configuration to all nodes in the cluster: # cmapplyconf f v C /etc/cmcluster/zoocat.ascii Figure 16-12. Serviceguard Manager Inactive Cluster View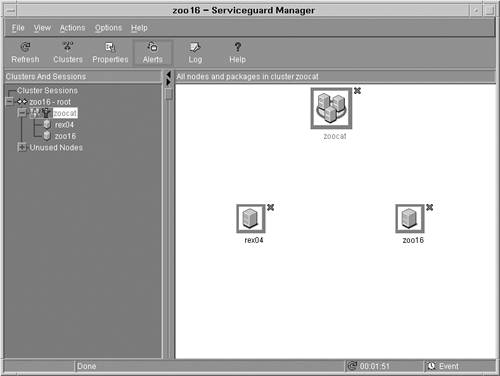 This screen shown in Figure 16-12 illustrates the cluster and the two nodes that are part of the cluster. Currently the cluster and all of the nodes are in the down state because the cluster has not been started. Before demonstrating the process of configuring a package for the cluster, a quick look at the configuration file generated by Serviceguard Manager is warranted. The file shown in Listing 16-1 shows the textual configuration of the cluster. Listing 16-1. Serviceguard Cluster Configuration File # cat /etc/cmclcuster/zoocat.ascii CLUSTER_NAME zoocat HEARTBEAT_INTERVAL 1000000 AUTO_START_TIMEOUT 600000000 MAX_CONFIGURED_PACKAGES 10 NETWORK_POLLING_INTERVAL 2000000 NODE_TIMEOUT 4000000 NETWORK_FAILURE_DETECTION INOUT NODE_NAME rex04 NETWORK_INTERFACE lan0 HEARTBEAT_IP 10.10.10.5 NETWORK_INTERFACE lan900 HEARTBEAT_IP 15.1.49.180 NODE_NAME zoo16 NETWORK_INTERFACE lan2 HEARTBEAT_IP 10.10.10.6 NETWORK_INTERFACE lan900 HEARTBEAT_IP 15.1.51.53 QS_HOST zoo7.fc.hp.com QS_POLLING_INTERVAL 300000000 USER_NAME bryanj USER_HOST CLUSTER_MEMBER_NODE USER_ROLE full_admin Package Toolkit ConfigurationThe next step in configuring the cluster is preparing the application to run as part of a Serviceguard package. In this scenario, the Tomcat server will run within the package. This section applies specifically to the Tomcat application; however, it is shown as an example of the general procedures that must be followed to run an application within a Serviceguard package. Every application will have unique configuration files and startup/shutdown scripts. The Serviceguard application includes several toolkits that are delivered in the /opt/cmcluster/toolkit directory. The standard toolkits provided with Serviceguard facilitate integration with Oracle, Tomcat, and other applications. To use the Tomcat toolkit, copy all of the files under /opt/cmcluster/toolkit/tomcat to the /etc/cmcluster/pkg/tomcat_pkg directory. Then you can customize the files without polluting the original files. The Tomcat directory includes a configuration file; several scripts for starting, stopping, and monitoring Tomcat; and a file containing documentation for the toolkit. The first file of interest is the hatomcat.conf file, which is shown in Listing 16-2. This file is used to define the home and base directories for the Tomcat server. Additionally, the Java home directory is specified in this file. The remaining parameters in the file need not be modified unless the environment requires you to do so. Once you have updated the configuration file, execute the /etc/cmcluster/pkg/tomcat_pkg/toolkit.sh script specifying the start and stop parameters to ensure that Tomcat can be started and stopped using the toolkit scripts. You should correct all errors associated with running the command before you continue with the configuration of the package. After the script is functioning properly, it is crucial to copy the script and the configuration files to the exact same location on all of the nodes in the cluster and ensure that they have the appropriate permissions set. Important Before continuing, it is vital that you copy the package toolkit configuration files to all nodes in the cluster. Failure to do so will cause the package to fail during a package migration. Regardless of which package or toolkit you are using, each node must have a copy of all associated scripts and configuration files necessary to run the package. Listing 16-2. Tomcat HA Toolkit# cat /etc/cmcluster/pkg/tomcat_pkg/hatomcat.conf #!/usr/bin/sh ########################################################## # HA Tomcat Toolkit User Configuration Script # Version: B.02.11 ##################################################### # This script contains a list of predefined variables # that the toolkit user must assign proper values on # them. With no function and running statement in it, # this script purely provides the user a simple format # of configuration data and, eventually, will be # included by the toolkit main script in order to run # toolkit functions. # # This script includes all user configuration features # and it is the only toolkit interface to the user. ##################################################### # Define the Catalina Home directory. This is the base # directory where Tomcat is installed. /opt/hpws/tomcat # is the default installation location CATALINA_HOME=/tomcat/opt/hpws/tomcat # Define the Catalina base directory. This is the # base directory where Tomcat configuration files # like server.xml reside. To know more please refer # Tomcat configuration guide. If this is not defined # the toolkit will use CATALINA_HOME as the base # directory. This should be unique for each tomcat # instance and usually residing on the shared disk CATALINA_BASE=/tomcat/opt/hpws/tomcat # The userid used to start the tomcat daemon. It can # be either www or root. No other user can start # tomcat. It is advisable that tomcat is not started # as root since it may lead to security vulnerabilities TOMCAT_USER=www # Base directory of Java Development kit. This software # is a pre-requisite for #running Tomcat JAVA_HOME=/opt/java1.4 # Maintenance flag is used to bring this toolkit # into maintenance mode. If set to yes then this # will enable maintenance feature in the toolkit. # Tomcat Toolkit will look out for a file # "tomcat.debug" in the tomcat package file directory # where all the tomcat toolkit files reside. If the # file exists monitoring is paused, tomcat can be # brought down for maintenance and package would # not be failed over to the adoptive node even though # tomcat instance has been brought down for maintenance. # After the maintenance work, it is the user's # responsibility to make sure that Tomcat is brought # up properly. You should delete the file # "tomcat.debug" in the package directory. This # would enable toolkit to continue monitoring Tomcat # server application. # # Note if Maintenance flag is set to "no" then the # above feature would not be available. MAINTENANCE_FLAG="yes" # Define the parameters for monitor process. # You can either use default or alternative values # for the following three variables. Uncomment and # update the variable values if you want to alter them. # This is the tomcat server listening port. This is # configured in the configuration file # $CATALINA_BASE/conf/server.xml. The toolkit checks the # existence of tomcat process by periodically checking # whether this port is listening. If multiple instances # of tomcat are configured then this port needs be unique # for each instance. MONITOR_PORT=8081 # The interval (in seconds) between checking if Tomcat # server daemon is up and running. The default setting # is 5 seconds. MONITOR_INTERVAL=5 # The number of times to attempt to check the tomcat # server daemon before giving up and exiting. The default # setting is 2 times. RETRY_TIMES=2 After configuring Tomcat to start and stop using the Serviceguard toolkit scripts, update the default Tomcat configuration file, /etc/rc.config.d/hpws_tomcat, to prevent Tomcat from being started when the operating system is booted. Failure to perform this step could result in two instances of Tomcat attempting to use the same network port, which will cause the second instance to fail during startup. The final step in configuring Tomcat to run in a Serviceguard package is to add an alias for the Serviceguard package's IP address. In this example, the package will be assigned the IP address that resolves to the hostname zoo14.fc.hp.com. Since clients will be connecting to the Tomcat server using the package IP address or hostname rather than the address of zoo16 or rex04, you must configure the server to respond to the requests. To configure Tomcat with the package hostname, the following text is added to the /tomcat/opt/hpws/tomcat/conf/server.xml configuration file. [...] <!- Define the default virtual host -> <Host name="localhost" debug="0" appBase="webapps" unpackWARs="true" autoDeploy="true"> <Alias>zoo14.fc.hp.com</Alias> [...] Creating a Serviceguard PackageAfter configuring the Tomcat application to run within a Serviceguard package, the next step is to configure the package so it uses the newly customized configuration files. Figure 16-13 shows the Serviceguard Manager screen with the Create Package menu item, which is available from the Actions menu. As with the cluster configuration process, instead of using Serviceguard Manager to create the package configuration, the tasks can be performed from the command line and by manually editing the configuration files. To create a configuration template, the following command can be used: # cmmakepkg p /etc/cmcluster/tomcat_pkg/tomcat_pkg.config Figure 16-13. Serviceguard Manager with Newly Created Cluster After creating the package template, it must be manually edited according to the needs of the package. The screen shown in Figure 16-14 provides the ability to configure the name of the package, which is specified as tomcat_pkg in this scenario. Also shown in this screen is the Nodes tab, which provides the ability to specify which nodes the package will run on and the order in which nodes will be selected. Both zoo16 and rex04 can host the package, and zoo16 is placed at the top of the list so it is the primary node. The adoptive node will be rex04. Figure 16-14. Serviceguard Manager Create Package Nodes Screen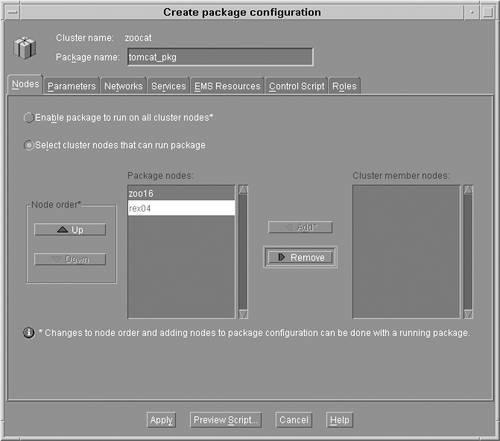 The next tab is for configuring the parameters of the package. The following parameters can be specified for each package:
The next step is to configure the networks to be used by the package. The screen in Figure 16-16 shows the available networks in the zoocat cluster. The 15.1.48.0 network has been selected because it will be the only network used for the package. (Remember that the 10.10.10.0 network is dedicated as the heartbeat network.) Figure 16-16. Serviceguard Manager Package Networks Screen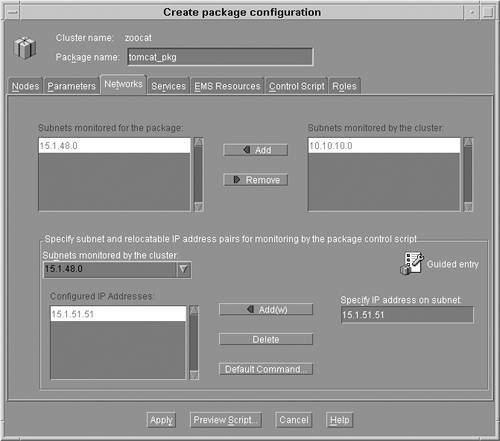 The bottom portion of the screen is used to configure the IP address to be associated with the package. In this case, zoo14.fc.hp.com, or 15.1.51.51, is assigned to the package. This IP address is input in the Specify IP address on the subnet field and then added to the list of Configured IP Addresses by clicking on the Add button. The next step in configuring the package is to specify the services to be associated with the package. The screen in Figure 16-17 shows the list of services associated with the package. Selecting a service from the list and then clicking on the modify button allows a service to be edited. Clicking on the Add button results in the dialog shown in Figure 16-35, which allows a new service to be created for the package. Figure 16-17. Serviceguard Manager Package Services Screen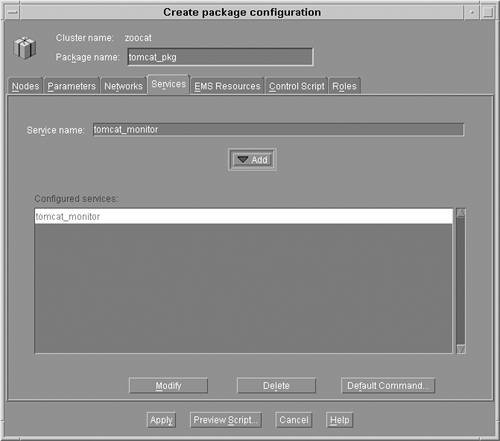 The dialog shown in Figure 16-18 provides the settings for configuring a package service. The following options are available in this dialog:
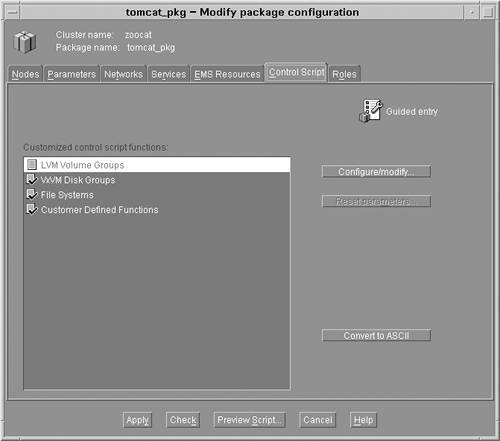
Figure 16-18. Serviceguard Manager Service Parameters Screen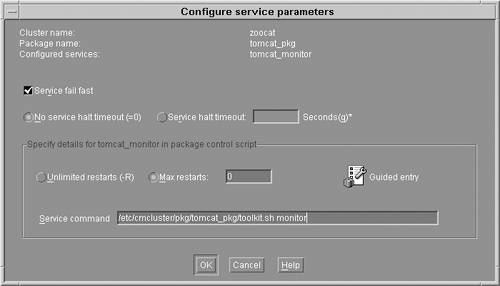 The next tab specifies EMS Resources to be monitored by Serviceguard. In this example scenario, there are no EMS resources specified as a package dependency, so the screen is left blank. The next tab is the Control Script tab, which is used to customize the control script for the package. The control script can be customized to specify the LVM volume groups, VxVM disk groups, and file systems. In addition, customer-defined functions can be implemented, which are generally used to start and stop the package. There are no LVM groups associated with the Tomcat package in this scenario so there are no customizations necessary for that portion of the script. Each of the other three possible customization choices are selected; the next step is to click on the Configure/modify button for each customization. The screen shown in Figure 16-20 shows the settings for the VxVM disk groups. In this example, the name of the package VxVM disk group is appdg. This value is input into the Specify VxVM disk group field and then the Add button is clicked on to add it as a package VxVM disk group. The Mirror resynchronization in parallel on package startup option specifies that Serviceguard should not wait for a problem with a disk mirror to be corrected before starting the package. In most cases the default value, unchecked, should be used for this setting. Figure 16-20. Serviceguard Manager Disk Group Screen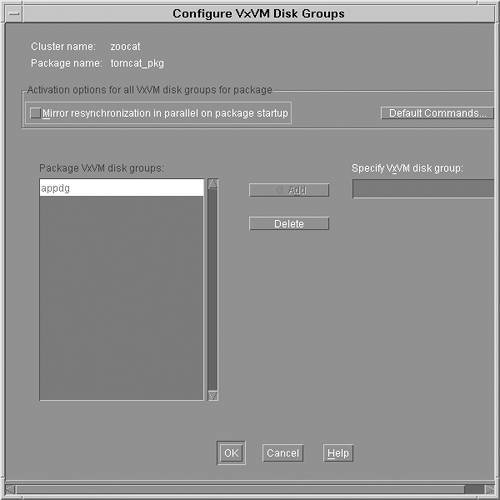 The next customization of the control script is shown in Figure 16-21. This dialog allows you to specify which file systems are associated with the package. Options are also available that let you tune file system checking and mount operations that are performed when migrating the package. Figure 16-21. Serviceguard Manager File System Screen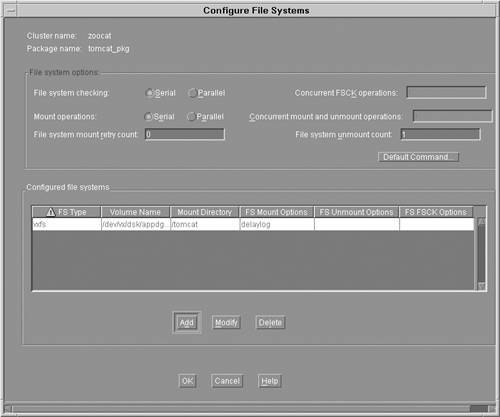 The table in the lower half of the dialog lists the file systems that will be mounted when the package is activated. Clicking on the Add button allows additional file systems to be appended to the list. Values for each of the columns shown in the table can be specified when associating a new file system with the package. The final customization of the control script for customer defined functions is shown in Figure 16-22. In this example, the script that was provided as part of the Tomcat toolkit is specified to start and stop Tomcat. These are the same commands that have already been verified to properly start and stop the Tomcat server. Figure 16-22. Serviceguard Manager Run and Halt Package Commands
The final option provided as part of configuring the package is the Roles tab. This screen is used to define package specific roles in addition to those that may have already been configured at the cluster level. The roles configured in this section apply only to the package, whereas those shown previously can apply to the entire cluster. For this scenario, no package specific roles will be defined. At this point, you can click on the Preview Script button to look at the script before you apply it to the nodes in the cluster. In addition, the Check button tells Serviceguard to perform verifications on the generated configuration file. If you are manually editing the configuration file, you can checked it by executing the following command: # cmcheckconf -v -P /etc/cmcluster/tomcat_pkg/tomcat_pkg.config The next step is to apply the configuration to all of the nodes in the cluster. Clicking on the Apply button will deploy the package configuration and script to all the nodes in the cluster. From the command line, you can use the following command to apply the configuration: # cmapplyconf -v -f -P /etc/cmcluster/tomcat_pkg/tomcat_pkg.config The package configuration has now been distributed to each of the nodes in the cluster. The content of the package configuration file is shown in Listing 16-3. Upon careful inspection of this file a common question is, "Where are all of the settings that were specified in Serviceguard Manager for starting and stopping Tomcat?" The answer to this question is shown in Listing 16-4, which is the package control script that is also created as part of the Serviceguard Manager package configuration process. Listing 16-3. Serviceguard Package Configuration File # cat /etc/cmcluster/tomcat_pkg: PACKAGE_NAME tomcat_pkg PACKAGE_TYPE FAILOVER FAILOVER_POLICY CONFIGURED_NODE FAILBACK_POLICY MANUAL NODE_NAME zoo16 NODE_NAME rex04 AUTO_RUN YES LOCAL_LAN_FAILOVER_ALLOWED YES NODE_FAIL_FAST_ENABLED YES RUN_SCRIPT /etc/cmcluster/tomcat_pkg/tomcat_pkg.sdf.sh RUN_SCRIPT_TIMEOUT 300 HALT_SCRIPT /etc/cmcluster/tomcat_pkg/tomcat_pkg.sdf.sh HALT_SCRIPT_TIMEOUT 300 SERVICE_NAME tomcat_monitor SERVICE_FAIL_FAST_ENABLED NO SERVICE_HALT_TIMEOUT 0 SUBNET 15.1.48.0 The file shown in Listing 16-4 is the control script that will be executed when starting and stopping the package. This file contains not only the variables but also the commands that are used. A template for the control script can be created using the following command line and manually editing the file instead of using Serviceguard Manager: # cmmakepkg -s /etc/cmcluster/tomcat_pkg/tomcat_pkg.sdf.sh Listing 16-4. Serviceguard Package Control Script # cat /etc/cmcluster/tomcat_pkg/tomcat_pkg.sdf.sh [...] . ${SGCONFFILE:=/etc/cmcluster.conf} # Set PATH to reference the appropriate directories. PATH=$SGSBIN:/usr/bin:/usr/sbin:/etc:/bin # CVM DISK GROUP ACTIVATION: CVM_ACTIVATION_CMD="vxdg -g \$DiskGroup set activation=exclusivewrite" # VxVM DISK GROUPS VXVM_DG[0]=appdg # FILESYSTEMS FS_FSCK_OPT[0]="" LV[0]="/dev/vx/dsk/appdg/tomcatvol" FS[0]="/tomcat" FS_TYPE[0]="vxfs" FS_MOUNT_OPT[0]=""; FS_UMOUNT_OPT[0]=""; FS_FSCK_OPT[0]="" # VOLUME RECOVERY VXVOL="vxvol -g \$DiskGroup startall" # Default # FILESYSTEM UNMOUNT COUNT FS_UMOUNT_COUNT=1 # FILESYSTEM MOUNT RETRY COUNT. FS_MOUNT_RETRY_COUNT=0 CONCURRENT_VGCHANGE_OPERATIONS=1 CONCURRENT_FSCK_OPERATIONS=1 CONCURRENT_MOUNT_AND_UMOUNT_OPERATIONS=1 IP[0]=15.1.51.51 SUBNET[0]=15.1.48.0 # SERVICE NAMES AND COMMANDS. SERVICE_NAME[0]=tomcat_monitor SERVICE_CMD[0]="/etc/cmcluster/pkg/tomcat_pkg/toolkit.sh monitor" SERVICE_RESTART[0]="" function customer_defined_run_cmds { /etc/cmcluster/pkg/tomcat_pkg/toolkit.sh start test_return 51 } function customer_defined_halt_cmds { /etc/cmcluster/pkg/tomcat_pkg/toolkit.sh stop test_return 52 } [...] Activating the ClusterThe cluster and the Tomcat package have both been created and applied to all of the nodes in the cluster. However, the cluster is still not active and the package is not running. The screen shown in Figure 16-23 shows the cluster, each of the nodes in the cluster, and the package. To start the cluster, the Run cluster zoocat item is selected from the Actions menu. This command starts the cluster and the package since the auto run option was specified for the Tomcat package. As an alternative to using Serviceguard Manager, the following command can be used to start the cluster: # cmruncl v Figure 16-23. Serviceguard Manager Run Cluster Action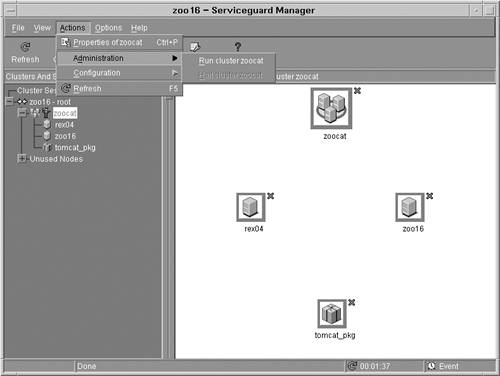 The screen shown in Figure 16-24 depicts the cluster and the package as both being active. As is evident from the tree hierarchy, the tomcat_pkg is running on the primary node, zoo16. Figure 16-24. Serviceguard Manager with Cluster and Package Active Alternatively, the command line can be used to view the status of the cluster and the package, as shown in Listing 16-5. Listing 16-5. Serviceguard Cluster Status from Command Line # cmviewcl CLUSTER STATUS zoocat up NODE STATUS STATE rex04 up running zoo16 up running PACKAGE STATUS STATE AUTO_RUN NODE tomcat_pkg up running enabled zoo1 At this point, the cluster and package are both running. In order to ensure that the package will operate as expected in a failure situation, HP highly recommends that you go through a series of tests to ensure that the cluster and the package behave as expected. Testing the ClusterTesting of the cluster is a very important step to ensure that the package behaves as expected. A simple configuration error could cause the package to fail to start on an adoptive node when the primary node fails. The screen shown in Figure 16-25 is a simple web page accessed through the Tomcat server. Notice that the URL (which is internal to HP) in the browser window contains zoo14, which is the package's hostname. Also notice that the content of the page shows the server that is running the Tomcat application. In this case, the server is running on zoo16. Figure 16-25. Example Page When Tomcat Package Is Running on Primary Node In Serviceguard Manager, you can use the Move package to node item on the Action menu to test whether the package can be migrated to rex04. If the command is successful, the package will be quickly migrated to rex04. From the command line, the package can be moved by executing the following three commands: # cmhaltpkg v tomcat_pkg # cmrunpkg v n rex04 tomcat_pkg # cmmodpkg e tomcat_pkg The screen shown in Figure 16-26 demonstrates the extreme power Serviceguard provides. Notice that the URL in the browser is identical, but the web page now shows that the Tomcat server is running on rex04 instead of zoo16. In the situation where zoo16 has failed, users will see little, if any affect because the package will be quickly started on rex04. Figure 16-26. Example Page When Tomcat Package Is Running on Adoptive Node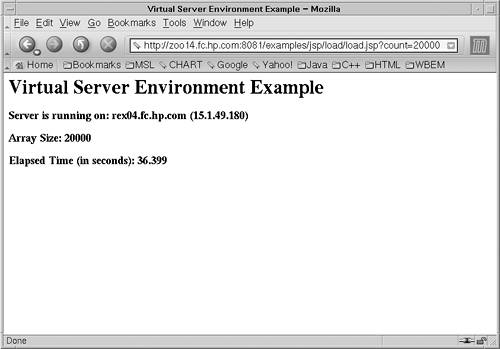 After you have completed the cursory test that ensures that the package can be moved from one node to another, you should perform several additional tests. These tests are based on simulating hardware failures. Testing of each network card should be performed by individually unplugging the network cable to each of the network cards. The cluster should continue to function, even when a cable has been removed from one network card. Storage should be tested to ensure that each of the disks can be removed and the package can continue to function. Finally, power circuits should be tested to ensure that a failure of a single circuit will not affect more of the cluster than expected. |

EAN: 2147483647
Pages: 197