Workload Manager and Virtual Partitions Scenario
| The first example scenario illustrates the use of WLM across two vPars, migrating CPUs between them as the workloads demand. This scenario is an extension of the scenario described in Chapter 7, "Secure Resource Partitions." In this scenario, instead of fixed-size virtual partitions that use PRM to allocate the resources to each of the Secure Resource Partitions, Workload Manager is used to migrate CPUs between the two virtual partitions based on the demands of the workloads. Table 15-1 shows the high-level configuration of each of the Secure Resource Partitions and the virtual partitions that contain them.
Overview of WLM and Virtual Partition ScenarioThis example scenario consists of the following steps.
Configuring WLM on the First Virtual PartitionThe WLM configuration wizard will be used throughout this example scenario. This tool is a Java-based wizard that configures one WLM configuration file at a time. When managing multiple partitions, it is necessary to run the wizard in each partition. The wizard allows users to define one or more workloads running in each OS image and to allocate CPU resources to those workloads. The WLM wizard has many screens available that do not apply to this example scenario or are simply navigation choices, such as selecting whether to configure another workload or continue on in the wizard. The screens and choices that aren't relevant to this example scenario are not shown. The WLM wizard is started on the zoo21 vPar by executing the command /opt/wlm/bin/wlmcw. This command starts the graphical user interface. When the wizard begins, the user must specify the maximum number of CPUs that will exist in the partition. This value is used later in the wizard to adjust the maximum capacity for each of the workloads. For this example, the maximum number of CPUs is set to eight, which is the total number of CPUs in the nPartition. After the user specifies the maximum number of CPUs, the workload identification screen of the wizard is presented, as shown in Figure 15-4. This screen provides the ability to specify the name of the workload group, whether the workload is for an Oracle database server, and whether the group is based on a PSET. If the workload is identified as an Oracle database server, then the subsequent screen of the wizard is customized for Oracle workloads and facilitates the configuration of WLM. In this example, the first workload being defined is hr_db. This name is used throughout the resulting configuration file to refer to the hr_db workload. The workload is an Oracle database, so the corresponding checkbox is selected. Finally, the workload will not be based on PSETs because sub-CPU resource sharing is desired for this configuration. Therefore, the corresponding PSET checkbox is not selected. Figure 15-4. Workload Manager Configuration Wizard Specifying Workload Identity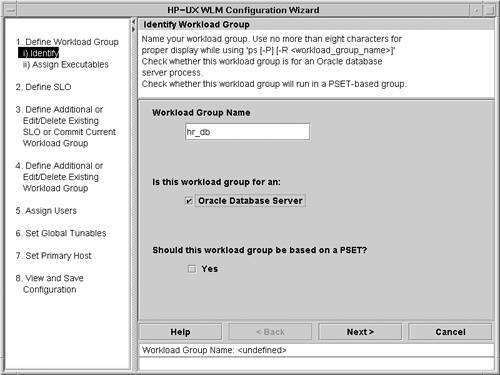 Since the workload was identified as an Oracle database, the next screen displayed is specific to Oracle database workloads. The screen shown in Figure 15-5 enables users to specify the Oracle database home directory and the ORACLE_SID for the workload. Both of these values are used to identify the workload processes within the system. Since there are two instances of the Oracle database running within the zoo21 vPar, it is necessary to configure the Oracle values not only to distinguish the hr_db workload from other processes on the system but also to distinguish the Oracle instances from one another. Figure 15-5. Workload Manager Wizard Oracle Information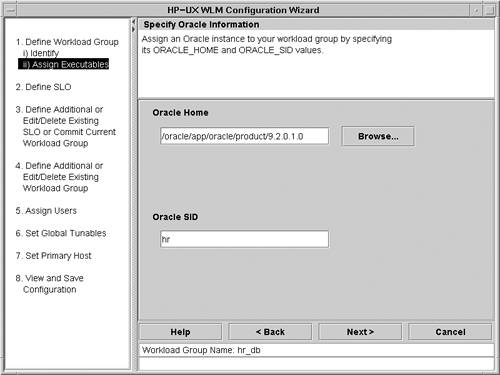 The next step is to specify the name of the SLO for the hr_db workload and its priority. The name of the SLO is used in the configuration file and is also prominent in the WLM monitoring application. Therefore, a name that can be readily associated with the workload is advisable. The priority values range from 1 to 100, with 1 being the highest priority. In this case, the hr_db_SLO will be given a priority of 10. It will be the highest-priority workload in the configuration, but starting at 10 allows a higher-priority workload to be added at a later time without having to adjust the priorities of the existing workloads. Since the hr_db workload has the highest priority, resources will continue to be allocated to it until its SLO is satisfied. This configuration can result in a workload with a lower priority getting starved because the hr_db workload has both the highest priority and a maximum entitlement of all 800 CPU shares. Therefore, if the hr_db needs all 800 CPU shares to meet its SLO, it will get them. As should be apparent, the result can be dramatic for lower-priority workloads. Figure 15-6. Workload Manager Wizard Service Level Objective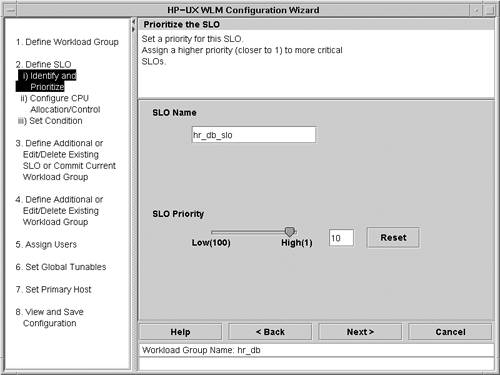 In this example scenario, CPU usage is used as the metric for CPU allocation as shown in Figure 15-7. Using this metric, additional CPU resources will be added to the workload when the workload is using more than 75% of its entitlement. Resources will be released from the workload when the workload is using less than 50% of its entitlement. The result of this policy is that WLM will attempt to keep the utilization of workload's CPU entitlement between 50% and 75%. Figure 15-7. Workload Manager Wizard CPU Allocation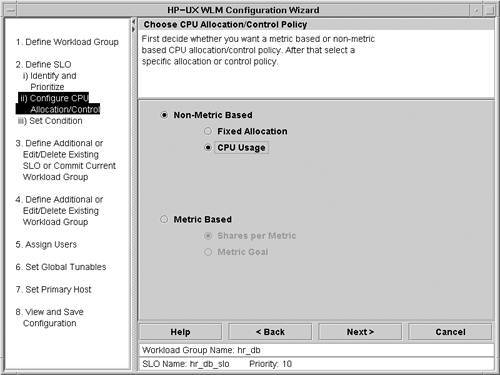 WLM also supports a fixed CPU allocation policy that provides a static allocation of resources to a workload. This option is useful in situations where regardless of utilization of the workload's CPU entitlement, the allocation of resources should remain the same. The drawback of fixed resource allocation is that the overall system resource utilization will likely be lower because unused resources will not be shared with other workloads. When metric-based policies are selected, a workload's entitlement will be adjusted based on the performance, usage, or other type of metric associated with the workload or the system. For example, example WLM configuration files are provided with WLM that illustrate how workload entitlements can be adjusted based on the number of users connected to an Oracle database. The various Workload Manager toolkits that are shipped along with WLM provide a set of example configuration files and data collectors that can be used to tightly integrate applications with WLM for metric-based policies. The following steps should be considered when implementing a metric-based policy:
See the HP-UX Workload Manager User's Guide for more information on integrating applications with WLM. The next screen, Figure 15-8, enables users to limit the amount of CPU resources that will be allocated to the hr_db workload. One CPU is represented as 100 shares. This allows partial CPU entitlements to be configured. For example, allocating 250 shares would result in the equivalent of 2.5 physical CPUs. Figure 15-8 shows the range of minimum and maximum CPU entitlements from 100 (1 CPU) to 800 (8 CPUs). The maximum value presented on this screen (800 CPU shares) reflects the maximum number of CPUs specified in the first screen of the WLM configuration process, which asked for the maximum number of CPUs that will exist in the partition. Figure 15-8. Workload Manager Wizard CPU Limits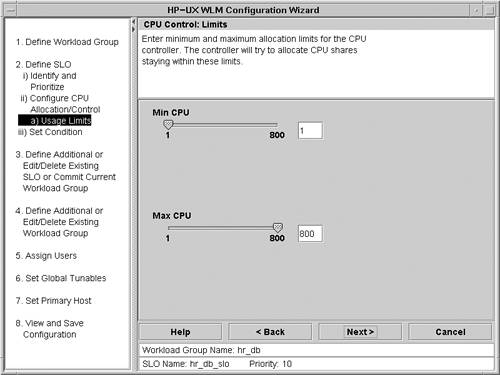 Tip When you are configuring vPars that will be used with WLM, HP recommends that you configure the minimum number of CPUs to be one for every vPar and the maximum to be the total number of CPUs in the server or nPar. The WLM configuration can be used to specify less-extreme values if the settings used in the vPars configuration are not appropriate for the workloads. The benefit of this configuration is that the WLM boundaries can be adjusted dynamically, whereas the minimum and maximum values of vPars require a reboot to modify. After the minimum and maximum number of CPU shares have been specified, the next screen (which is not shown) allows you to specify a condition string. The condition string can be used to specify the days of the week in which the policy is applicable. It can also be used to activate a policy only when a given metric is above a certain threshold, such as the number of users logged into the system. In this example scenario, no condition string is specified; this means that the policy applies at all times, under all conditions. At this point in the wizard, all of the configuration settings for the hr_db workload have been completed. The WLM configuration wizard allows additional workloads for the partition to be specified. In this case, another workload definition is required for the payroll_db. Figure 15-9 shows the first step for configuring the second workload. The configuration of the payroll_db workload is performed on the system where the workload will run, which happens to be the same system where the hr_db is hosted, the zoo21 vPar. This is the same screen shown in Figure 15-4. The vast majority of the configuration steps for the payroll_db are identical to the hr_db. The primary difference is the priority that is assigned to the workload. In this example, the hr_db is the highest-priority workload and the payroll_db is the lowest. Therefore, when the hr_db database instance requires resources, it will get as much as it needs up to the maximum entitlement. Figure 15-9. Workload Manager Wizard Identify Workload Group After you have completed all of the configuration steps for the payroll_db workload, the screen shown Figure 15-10 appears. At this point, additional workloads could be configured by selecting the Add Another Workload Group option. In this example, both the payroll_db and the hr_db have been configured, so the appropriate selection is Proceed to Next Step. Figure 15-10. Workload Manager Wizard Proceed to Next Step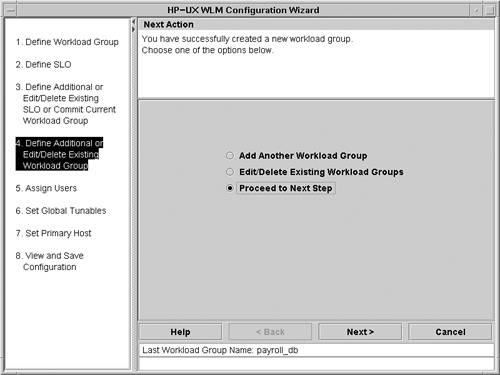 Assigning users to the workload groups is the next step in the configuration wizard, which is not shown. When users are assigned to a workload group, processes owned by the specified users are associated with the workload group and are allocated resources according to the specified SLOs. This screen is not shown because both the hr_db and payroll_db workloads are identified by the process specification and Oracle SID, not the users executing the workloads. Global WLM tunables can be configured next. In this example, only the distribute_excess tunable is modified. This tunable directs WLM to allocate unused resources to alternate workloads instead of the default behavior, which is to allocate the unused resources to the OTHERS group. The only workload groups that will receive the excess resources are those with active workloads. Those with condition strings that result in the workload being inactive will not receive resources. The global tunables screen is not shown. Figure 15-11 shows the screen for configuring the primary host for the workload group. The primary host is responsible for running the wlmpard daemon, which serves as the global arbiter. In addition, the configuration of the wlmpard daemon is performed on the system selected as the primary host. This scenario uses zoo21 as the primary host. As a result, zoo21 will run the wlmpard daemon. This daemon is responsible for deciding where and when CPUs should be migrated between the zoo21 and zoo19 vPars. Figure 15-11. Workload Manager Wizard Set Primary Host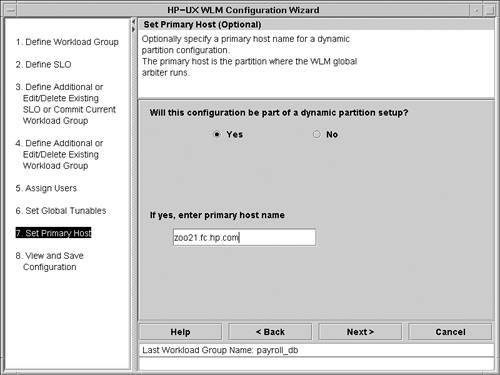 The final step in the WLM configuration wizard is shown in Figure 15-12. The configuration file that has been built must be saved to disk. Before you save the file, you can click on the View Configuration button to preview the configuration that will be saved. Generally configuration files are saved in the /etc directory. Figure 15-12. Workload Manager Wizard Save Configuration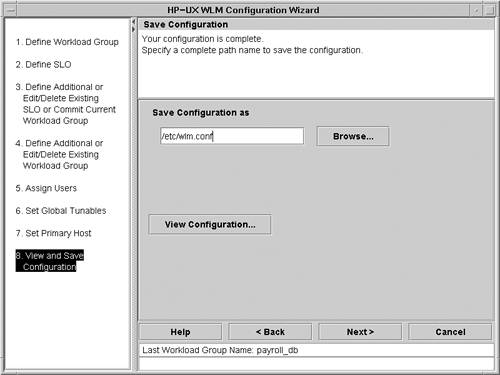 Viewing the Generated WLM Configuration FileThe resulting configuration file for zoo21 is shown in Listing 15-1. This file contains the WLM configuration parameters for both workloads in zoo21. It does not contain any information for the workloads in zoo19, nor does it provide the configuration settings for the global arbiter, wlmpard. Each of these requires a separate configuration file. Listing 15-1. Workload Manager Configuration File for zoo21 # cat /etc/wlm.conf # # HP-UX WLM configuration: originally created using wlmcw(1M). # # See wlmconf(4) and /opt/wlm/share/doc/WLMug.* for details. # # Validate with /opt/wlm/bin/wlmd -c /etc/wlm.conf # Activate with /opt/wlm/bin/wlmd -a /etc/wlm.conf # # # Primary host for the dynamic partition setup. # primary_host = "zoo21.fc.hp.com"; # # The PRM structure is used to define workload groups # and optionally assign applications and users to # those groups. # prm { groups = payroll_db : 3, hr_db : 2; apps = payroll_db : /oracle/app/oracle/product/9.2.0.1.0/bin/oracle "ora*pay roll", hr_db : /oracle/app/oracle/product/9.2.0.1.0/bin/oracle "ora*hr"; } # # SLO (Service-Level Objective) structure. # slo payroll_db_slo { # Priority of this SLO. pri = 20; # The workload group this SLO applies to. entity = PRM group payroll_db; # Request no less than mincpu of available shares. mincpu = 1; # Grant no more than maxcpu shares for this SLO. maxcpu = 800; # Allocate available CPU shares to achieve goal. goal = usage _CPU; } # # SLO (Service-Level Objective) structure. # slo hr_db_slo { # Priority of this SLO. pri = 10; # The workload group this SLO applies to. entity = PRM group hr_db; # Request no less than mincpu of available shares. mincpu = 1; # Grant no more than maxcpu shares for this SLO. maxcpu = 800; # Allocate available CPU shares to achieve goal. goal = usage _CPU; } # # Global tune structure is used to set values to # global tune variables. # tune { # Set interpretation of share: # 1 => share is 1/100 of one CPU # 0 => share is 1/100 of all CPUs # Do not set to 0 if using PSET groups. absolute_cpu_units = 1; # If resources remain, give to user-defined groups # (1 = yes; 0 = no)? distribute_excess = 1; # Set rate (seconds) at which WLM changes resource # allocations: wlm_interval = 5; } Creating the Workload Manager Partitions Configuration FileIn addition to the WLM workload configuration file, a configuration file is required for the wlmpard daemon as shown in Listing 15-2. This file can be adapted from the one provided by WLM in the /opt/wlm/examples/wlmconf directory. The systems listed in the partitions list constitute a partition set. In this example, the partitions in the partition set are the two vPars in this configuration, zoo19 and zoo21. The interval parameter in the configuration file directs WLM to consider moving CPUs between vPars every 10 seconds. Setting this value higher results in less-frequent migration of CPUs but can result in unnecessarily long delays in migrating resources when they are needed. Important The vPars listed in the partitions configuration file must reside within the same nPartition or server. Since CPUs cannot be migrated across nPartitions or servers, it isn't possible for WLM to perform resource adjustments in an environment where the virtual partitions don't reside within the same nPartition. Listing 15-2. Workload Manager Partitions Configuration File for zoo21 # cat /etc/wlmpar.conf # # Adapted from /opt/wlm/examples/wlmconf/vpar_usage_goal.wlmpar # vpar { partitions = zoo21 : zoo21.fc.hp.com, zoo19 : zoo19.fc.hp.com; interval = 10; } Starting Workload Manager on the First Virtual PartitionNow that both configuration files are in place on zoo21, you should verify the syntax of the file. The command /opt/wlm/bin/wlmd c /etc/wlm.conf will verify that the configuration file contains no errors. This step is especially important when the WLM configuration is edited by hand. The next step is to start WLM daemon on the zoo21 vPar with the command /opt/wlm/bin/wlmd -a /etc/wlm.conf. After running this command, the WLM daemon will be running and adjusting resources allocated to each of the workloads within zoo21. However, you have not yet started the global arbiter, so no resources will be migrated between the two vPars. In order to start the global arbiter, its configuration file should be checked for errors. The commands to validate and start the wlmpard daemon are very similar to those used for the wlmd daemon, but the global arbiter's command is wlmpard instead of wlmd. To check the configuration file for the global arbiter, execute the command /opt/wlm/bin/wlmpard -c /etc/wlmpar.conf. Assuming there are no errors, you can start the global arbiter with the /opt/wlm/bin/wlmpard -a /etc/wlmpar.conf command. In addition to starting the two WLM daemons responsible for ensuring SLOs are being met, you can start another daemon that enables you to remotely monitor the workloads and their SLOs using the WLM GUI. This daemon can be started by executing the /opt/wlm/bin/wlmcomd command. The final configuration task for zoo21 is to configure WLM so that it automatically starts when the system is booted. A configuration file is provided in /etc/rc.config.d/wlm for this purpose. The file should be modified so the wlmd daemon is automatically started by setting the variable WLM_ENABLE to 1. The global arbiter variable WLMPARD_ENABLE should also be set to 1, and the remote monitoring daemon WLMCOMD_ENABLE should be set to 1 if desired. HP also advises that you explicitly configure the location of the wlmd and wlmpard configuration files for the respective daemons. If these two configuration files are not explicitly configured, WLM will use the configuration files that were used the last time each of the daemons was executed. Configuring Second Virtual PartitionThe configuration of the zoo19 vPar is almost identical to the configuration of the zoo21 vPar. The names and priorities of the workloads are different, but everything else is the same. Therefore, simply copying the /etc/wlm.conf configuration file from zoo21 to zoo19 and editing the lines for the workload names is the easiest method. The file shown in Listing 15-3 is the resulting configuration file for zoo19. Notice that the primary host is zoo21.fc.hp.com. Only one of the vPars serves as the primary host. Also notice that the names of the workload groups and their priorities have been updated to reflect the workloads running within this vPar. Listing 15-3. Workload Manager Configuration File for zoo19 # cat /etc/wlm.conf # # HP-UX WLM configuration: originally created using wlmcw(1M). # # See wlmconf(4) and /opt/wlm/share/doc/WLMug.* for details. # # Validate with /opt/wlm/bin/wlmd -c <filename>. # Activate with /opt/wlm/bin/wlmd -a <filename>. # # # Primary host for the dynamic partition setup. # primary_host = "zoo21.fc.hp.com"; # # The PRM structure is used to define workload groups and optionally assign # applications and users to those groups. # prm { groups = sales_db : 2, finance_db : 3; apps = sales_db : /oracle/app/oracle/product/9.2.0.1.0/bin/oracle "ora*sales", finance_db : /oracle/app/oracle/product/9.2.0.1.0/bin/oracle "ora*finance"; } # # SLO (Service-Level Objective) structure. # slo sales_db_slo { # Priority of this SLO. pri = 15; # The workload group this SLO applies to. entity = PRM group sales_db; # Request no less than mincpu of available shares. mincpu = 1; # Grant no more than maxcpu shares for this SLO. maxcpu = 800; # Allocate available CPU shares to achieve goal. goal = usage _CPU; } # # SLO (Service-Level Objective) structure. # slo finance_db_slo { # Priority of this SLO. pri = 12; # The workload group this SLO applies to. entity = PRM group finance_db; # Request no less than mincpu of available shares. mincpu = 1; # Grant no more than maxcpu shares for this SLO. maxcpu = 800; # Allocate available CPU shares to achieve goal. goal = usage _CPU; } # # Global tune structure is used to set values to # global tune variables. # tune { # Set interpretation of share: # 1 => share is 1/100 of one CPU # 0 => share is 1/100 of all CPUs # Do not set to 0 if using PSET groups. absolute_cpu_units = 1; # If resources remain, give to user-defined groups # (1 = yes; 0 = no)? distribute_excess = 1; # Set rate (seconds) at which WLM changes resource # allocations: wlm_interval = 5; } Starting Workload Manager on the Second Virtual PartitionThe zoo19 vPar does not require a configuration file for the wlmpard because zoo21 is serving as the primary host. The next step is to check the syntax of the configuration file by using the command /opt/wlm/bin/wlmd c /etc/wlm.conf. Just as with the zoo21 vPar, the WLM daemon is then started with the command /opt/wlm/bin/wlmd -a /etc/wlm.conf. Assuming that there are no errors in the configuration, the WLM daemon is now running and adjusting resource entitlements for each of the workloads within zoo19. Since the global arbiter is running on zoo21, resources will now be migrated between the two vPars as the workloads demand. As with zoo21, HP recommends that you start the daemon that enables remote monitoring of the workloads and their SLOs using the WLM GUI. This daemon can be started by executing the /opt/wlm/bin/wlmcomd command. The final configuration task for zoo19 is to configure WLM so it automatically starts when the system is booted. A configuration file is provided in /etc/rc.config.d/wlm. This file should be configured to automatically start wlmd by setting the WLM_ENABLE variable to 1. The global arbiter daemon is not configured for zoo19, as it should run only on zoo21. The remote monitoring daemon can be enabled by setting the WLMCOMD_ENABLE variable to 1. HP advises that you explicitly configure the path to the configuration file for wlmd. Overview of Monitoring Workloads with Workload ManagerBecause Workload Manager doesn't require any user interaction to perform its normal operations, it can be easy to forget that it is running in the background. Several monitoring interfaces make it possible to see what WLM is doing. The first monitoring interface is the wlminfo command. This command provides a number of subcommands that allow all of WLM's actions and metrics to be monitored. The following subcommands are supported by the wlminfo command:
There is also an interactive mode to the wlminfo command. This is invoked by specifying the i flag on the command line that brings up the WLM graphical user interface. The WLM GUI can be invoked in a number of ways. It can be invoked from the command line using either wlminfo i or wlmgui. Since the GUI is a Java application, it can be executed from any HP-UX, Linux, or Windows system. Since both zoo21 and zoo19 have been configured to allow remote monitoring through the wlmcomd daemon, the WLM GUI can be used to monitor the workloads. In this scenario, the WLM GUI will be executed on zoo21. The command /opt/wlm/bin/wlmgui will bring up the screen shown in Figure 15-13. Figure 15-13. Workload Manager Graphical User Interface Adding a Partition Set
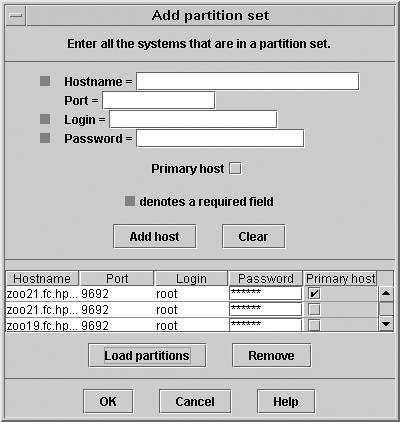
This dialog is used to specify the partition set to be monitored. For this example, zoo21.fc.hp.com is entered into the Hostname field. The default port number will be used, so the Port field is left blank. The Login and Password fields must be specified. Since zoo21 is the primary host, the corresponding checkbox should be selected. Clicking on the Add host button adds zoo21.fc.hp.com as the primary host to the list of partitions. Finally, clicking on the Load partitions button loads the names of all the partitions within the partition set into the list. Remember, the partitions in this partition set were defined in WLM partition configuration file shown in Listing 15-2. Notice that two instances of zoo21 are listed. This is expected because the first entry is the primary host instance and the second is the partition to be monitored. Selecting OK on this screen contacts each partition and displays the initial screen. Once you are in the WLM GUI, a number of different screens are available as shown in Figure 15-14. The three primary tabs along the top of the screen provide the following functions:
Figure 15-14. Workload Manager Configuration Viewer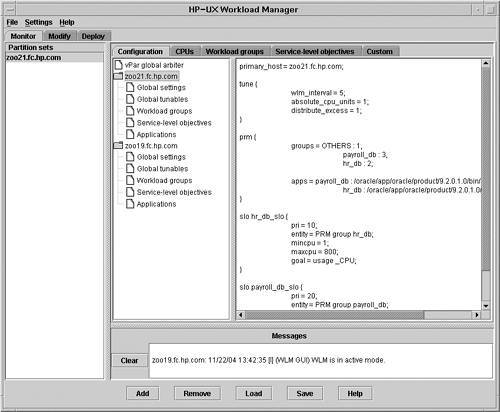 The panel on the left of the screen shown in Figure 15-14 enables you to define sets of partitions that are being managed or monitored as a group. Typically these groupings would be the sets of partitions on nodes where WLM is running. However, there is no requirement that all of the systems listed run under the same primary host. Instead, the list of partitions could be any arbitrary set of partitions where WLM is running. It is possible to create a partition set for all the partitions that are running the instances of an Oracle Real Application Clusters (RAC) or WebLogic cluster, for example. Certainly WLM cannot reallocate resources between partitions on different nodes, but graphs can be created that show what resources are being allocated to each of the nodes in the cluster. The five tabs on the upper-right-hand side of the screen shown in Figure 15-14 provide the following functions:
In addition to the standard tabs and graphs, you can create a dashboard view by selecting the desired graphs and clicking the New Window button, which opens a new window containing only the selected graph. Performing these steps with each desired graph enables you to tile multiple graphs for a dashboard view of the most important metrics relating to the running workloads. Finally, the panel in the lower-right-hand corner displays all messages written to the WLM message log on all of the managed systems. The screen shown in Figure 15-15 illustrates two SLO graphs available for the hr_db_slo. The top graph shows the high and low usage thresholds that control when the hr_db_slo will request more CPU resources and when it will release unused resources. In this case, Workload Manager's goal is to keep CPU utilization between 50 and 75%. In this graph it is clear that there was a period of time when the hr_db_slo was at 100%. During this time, all of the available CPUs that could be migrated to the zoo21 were assigned to the workload and the workload continued to consume all of the CPU resources. Figure 15-15. Workload Manager HR Group Service Level Objectives Graph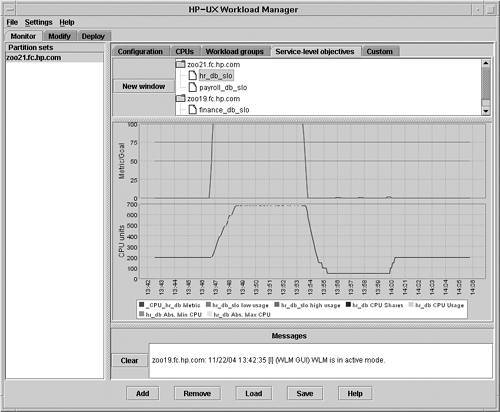 The lower graph shows the number of shares allocated to the workload, which was 700 during peak utilization; seven CPUs were allocated to the hr_db workload. It is also apparent from the lower graph that the hr_db workload consumed the entirety of the allocated resources during the workload's peak. As soon as the resources were no longer required, the workload's entitlement was adjusted and the resources were made available to the other workloads in the partition set. The screen shown in Figure 15-16 provides similar graphs to those discussed for the hr_db_slo, but these are for the finance_db_slo. The top graph shows the percent of resources being consumed by the workload. In this example, the workload began to peak at about 13:51 hours. Careful examination of the lower graph shows that it wasn't until 13:54 that additional shares were allocated to the workload. The reason for this apparent delay is because the hr_db_slo was assigned a higher priority and the hr_db workload consumed all of the available resources. If you look back at Figure 15-15, you will see that the hr_db workload was at 100% utilization between the time of 13:51 and 13:54. As a result, even though the finance_db_slo was requesting additional resources, they were not allocated because the hr_db workload had a higher priority. As soon as the hr_db workload's demand decreased, the resources were allocated to the finance_db workload. Figure 15-16. Workload Manager Finance Group Service Level Objective Graph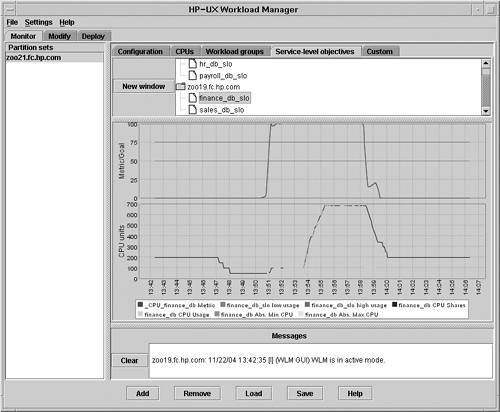 The final graph shown for these workloads is in Figure 15-17. This graph shows the number of CPUs allocated to the selected partition. Each vPar began with four CPUs. When the hr_db workload became busy, three of the CPUs in zoo19 were moved to zoo21. After the hr_db workload lightened, the CPUs were moved to the zoo19 vPar, where the finance_db workload needed them. Figure 15-17. Workload Manager CPU Allocation Graph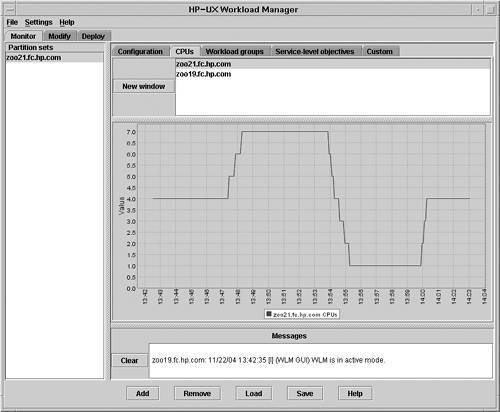 Modifying the Workload Manager ConfigurationThe screen shown in Figure 15-18 provides an interface for modifying any attribute supported by WLM. The selected portion of the configuration is the Service-level objectives for the zoo21 vPar and the hr_db_slo. In this screen, the priority, the minimum and maximum CPU, or any other parameter could be modified. The WLM GUI also provides a mechanism to deploy new or modified configurations using the Deploy tab. This allows remote configuration and modification of WLM managed workloads through a graphical user interface. Figure 15-18. Workload Manager Modify Configuration Screen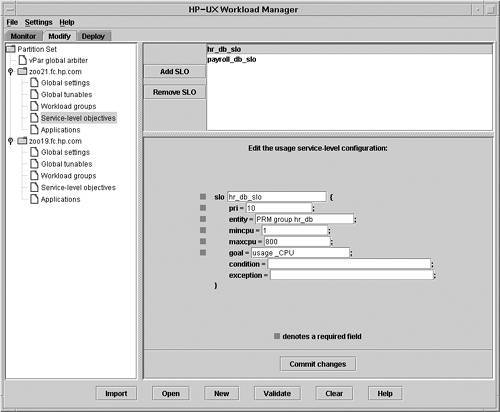 Workload Manager Virtual Partition Scenario SummaryThe scenario described in this section provides an example of deploying WLM to manage multiple workloads running in separate vPars. Each of the workloads is configured with a specific priority and SLO. These priorities and SLOs are used by the global arbiter running in one of the vPars to determine when CPUs should be migrated from one vPar to another. The end result is a dynamic environment that ensures the highest-priority workloads receive the necessary resources. Additionally, the implementation of WLM yields overall higher hardware utilization because resources that aren't busy can be used by another workload or even be moved to a different vPar. |
EAN: 2147483647
Pages: 197
- The Second Wave ERP Market: An Australian Viewpoint
- Enterprise Application Integration: New Solutions for a Solved Problem or a Challenging Research Field?
- The Effects of an Enterprise Resource Planning System (ERP) Implementation on Job Characteristics – A Study using the Hackman and Oldham Job Characteristics Model
- Distributed Data Warehouse for Geo-spatial Services
- Healthcare Information: From Administrative to Practice Databases