| Chances are that you've configured a personal computer or workstation to pick up its network information dynamically from a DHCP server. Most ISPs work this way, and more and more company LANs are being configured with DHCP. In this section, you'll see how to install and configure a DHCP server for a small LAN. To install a DHCP server (Fedora Core) Fedora Core includes a DHCP server in its list of available packages; all we need to do is install it. 1. | Launch the Package Management application (Figure 5.8) by opening the Applications menu in the top left of the screen and choosing System Tools > Add/Remove Programs.
Figure 5.8. Fedora Core's Package Management application lets you install additional packages. 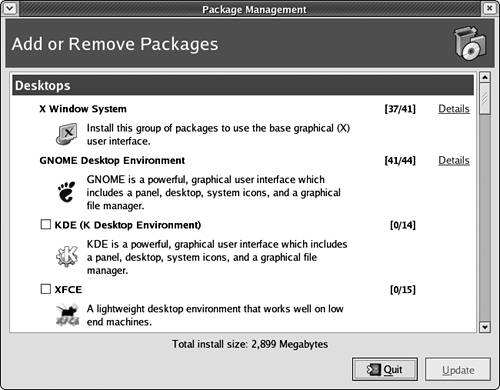
| 2. | If you're not logged in as root, you'll be prompted to enter the root password. Type the password, then press Enter.
| 3. | Scroll down to the Servers section in the package category list and find the Network Servers category.
| 4. | Click the Details link to display the Network Servers Package Details dialog (Figure 5.9).
Figure 5.9. The Network Servers Package Details dialog lets you choose specific network servers. 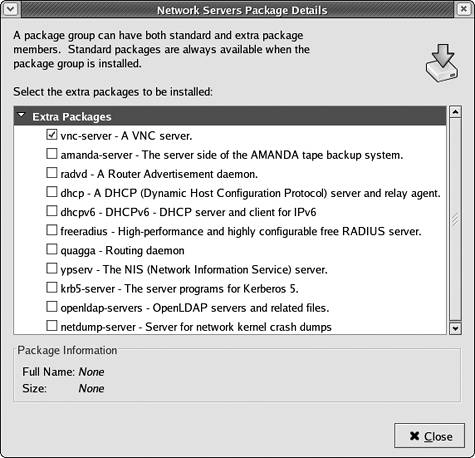
| 5. | Check the box next to dhcp, then click the Close button to return to the Package Management window.
| 6. | Click Update. The Package Management window displays a dialog (Figure 5.10) showing details about the packages you're installing.
Figure 5.10. A dialog opens, showing details about the packages to be installed. 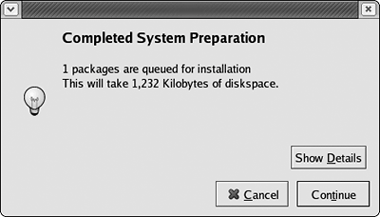
| 7. | Click Continue to begin the installation. The Package Management window prompts you to put in the appropriate Fedora Core installation CD (Figure 5.11).
Figure 5.11. The Package Management application will prompt you for one of the Fedora Core installation CDs. 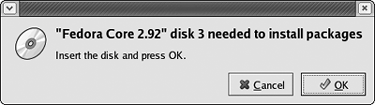
| 8. | Insert the required CD, then click OK to continue.
| 9. | The Package Manager installs the DHCP server and displays an Update Complete dialog. Click OK to close the dialog, and then close the Package Manager window.
|
To install a DHCP server (FreeBSD) The DHCP server provided as part of the FreeBSD ports system is from the Internet Systems Consortium ( www.isc.org), a nonprofit corporation dedicated to supporting the public Internet. 1. | Log in as root.
| 2. | cd /usr/ports/net/isc-dhcp3-server
Change to the DHCP server directory.
| 3. | make install clean
Build and install the DHCP server, then clean up.
The ports system displays a dialog listing options for the DHCP server (Figure 5.12).
Figure 5.12. A couple of helpful additional packages can be installed on FreeBSD with the DHCP server. 
| 4. | Press Tab, then Enter to go with the default options.
The DHCP server software is downloaded and installed.
|
 Tips Tips
Unfortunately, there is no supported DHCP server that you can run under Cygwin or Mac OS X. You might be able to get the ISC DHCP server ( www.isc.org) to work with both systems, but you'd be entering uncharted territory. For Cygwin, it would probably be a better idea to find a native Windows DHCP server. And the Mac OS X Server operating system can act as a DHCP server, and includes graphical tools (the Server Admin application) for configuration and administration. Cygwin users on Windows 2000 Professional or Windows XP Professional can support DHCP clients through their Internet sharing features. Please refer to your OS documentation for more information.
To configure your DHCP server Although you don't need to tell client systems anything about the DHCP server (other than the fact that theyshould use DHCP), you do need to tell your DHCP server a few things about the network it's configuring. 1. | Log in as root or use su to become root (or use sudo).
| 2. | cd /etc (for Linux)
or
cd /usr/local/etc (for FreeBSD)
Change to the configuration directory for the DHCP server.
| 3. | cp /usr/share/doc/dhcp-3.0.1/
|  dhcp.conf.sample dhcp.conf (for Fedora Core) dhcp.conf.sample dhcp.conf (for Fedora Core)
or
cp dhcp.conf.sample dhcp.conf (for FreeBSD)
Copy the sample configuration file to the DHCP server-configuration file, so that we can edit it to suit our network.
| 4. | Use your favorite editor to edit the DHCP server-configuration file.
| 5. | Change the following settings:
- option domain-name Set this to your domain name (you can make one up if your LAN is behind a firewall).
- option domain-name-servers The host names or IP addresses of one or more name servers.
- authoritative Uncomment this (delete the # character at the start of the line) if this is the only DHCP server on this network.
| 6. | Delete the rest of the file after the log-facility option's line.
| 7. | Add a subnet configuration to control the dynamic IPs that this DHCP server will dish out:
subnet 10.0.0.0 netmask 255.255.255.0 { range 10.0.0.100 10.0.0.200; option routers router_name; }
The IP address and netmask after the subnet option indicate the network for which this DHCP server provides addresses. In the example above, we're using the 255 addresses in the 10.0.0.* network.
The IP addresses in the range option indicate the possible range for the dynamic IPs. In this case, we can serve as many as 100 client systems, with IPs from 10.0.0.100 to 10.0.0.200.
The option routers line lets you provide the IP address or host name of one or more routers available to these client machines.
| 8. | Save the file, then restart (or start) the DHCP server to activate your new settings.
|
|