Installing the NNTP Service
|
|
The NNTP service is not installed by default when you install IIS; you must select the service manually during the initial server installation. After the NNTP service is installed, it will appear under the Services node of the Computer Management Microsoft Management Console (MMC) snap-in. If the NNTP service does not appear in the MMC, you can update your server by installing it, as shown in Figure 5-1.
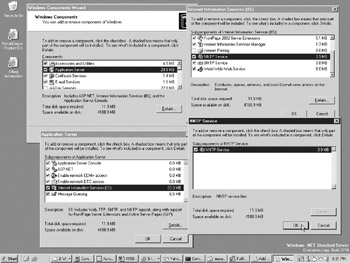
Figure 5-1: Windows component update windows used to install the NNTP service
Follow these steps:
-
In the Control Panel, open the Add And Remove Program applet and choose Add And Remove Windows Components. The Windows Component Wizard will open.
-
Select Application Server from the list of Components, and then click Details.
-
The Application Server window will open. Select Internet Information Services from the list of Subcomponents Of Application Server and click the Details button.
-
The Internet Information Services Windows will open. Select the checkbox next to NNTP Service from the list of Subcomponents Of Internet Information Services.
-
Click OK several times to close the succession of windows.
After NNTP is installed, a Default NNTP Virtual Server is created and set up. The Default NNTP Virtual Server is configured with the following values:
-
IP address: (All Unassigned)
-
Port: 119
-
Name: Default NNTP Virtual Server
-
Internal Files Path: <Inetpub root>\nntpfile
-
Storage Medium: File System
-
News Content Medium Path: <Inetpub root>\nntpfile\root
The value <Inetpub root> represents the file path to the root where IIS places all of the default instances of the IIS services, such as the File Transfer Protocol (FTP) service, Simple Mail Transport Protocol (SMTP) service, and World Wide Web (WWW) service.
|
|
EAN: 2147483647
Pages: 193