Creating and Configuring SMTP Virtual Servers
|
|
To allow a WS03 server to send e-mail using SMTP, the SMTP service must first be installed and running on the server. If the SMTP service is installed and running, an SMTP virtual server must be created to enable use of the SMTP service. By default, an SMTP virtual server is created on a WS03 server when the SMTP service is installed. If another SMTP virtual server must be added, the Computer Management MMC provides a wizard that walks the administrator through the process of defining a basic configuration of the SMTP virtual server. Unlike the FTP and web servers that are a part of IIS, SMTP virtual servers cannot be created from or exported to a configuration file. A script to administer SMTP and create SMTP virtual servers is also not available, so the New SMTP Virtual Server Wizard is the only option an administrator can use to create an SMTP virtual server.
New SMTP Virtual Server Wizard
Every property for a given SMTP virtual server except the home directory value can be changed at a later date using the Properties window of the Computer Management MMC. Entering an incorrect value in the wizard is not difficult to correct after the virtual server is created. Here’s how to start the New SMTP Virtual Server Wizard:
-
Right-click the Internet Information Services Manager node in the left pane of the MMC and choose New | SMTP Virtual Server.
-
The New SMTP Virtual Server Wizard will open, prompting you for the site name, as shown in Figure 4-3. Enter a descriptive name that will be useful for identifying the SMTP site. The value you enter will be displayed next to the node for the SMTP virtual server in the Computer Management MMC.
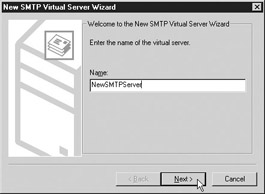
Figure 4-3: SMTP virtual server name prompt of the New SMTP Virtual Server Wizard -
Click the Next button to continue.
-
The next screen prompts for the IP address that the virtual server should use, as shown in Figure 4-4. Messages that are sent and received from the host server will use this IP address. The default value is (All Unassigned), but if multiple IP addresses exist, they will appear in the drop-down list. Because the list is an “exclusive” selection type, if the selection does not appear here, an administrator cannot type it into the box. For a host server with only one IP address (as in this example), the value (All Unassigned) is the only selection allowed. Allow the (All Unassigned) value to remain and click the Next button.
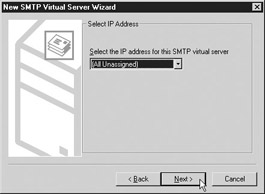
Figure 4-4: Select IP Address screen of the wizard -
The New SMTP Virtual Server Wizard will next display the Select Home Directory screen. The home directory for an SMTP virtual server is the file path on the host server where the messages and SMTP virtual server–related files are written by the SMTP service. The following subdirectories are created subordinate to the chosen home directory for any SMTP virtual server:
-
BadMail Directory in which messages are placed when they are returned with a non-delivery report
-
Drop Directory in which all incoming messages for a given domain are written
-
Pickup Directory in which messages are written that are to be picked up by a given messaging service
-
Queue Directory on the server in which e-mail is queued for pickup in a remote triggered delivery when a remote domain is being supported
Select a file path, as shown in Figure 4-5, for the SMTP virtual server to use as the home directory. Click the Browse button to locate the path, if necessary.
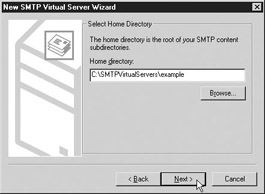
Figure 4-5: Choose home directory screen of the new SMTP virtual server wizard -
-
After selecting the file path, click the Next button to reveal the Default Domain screen. The default domain is the domain name appended to a given account name during authentication. Enter a value in the text box, as shown in Figure 4-6, and click the Finish button. The wizard will generate the new SMTP virtual server.
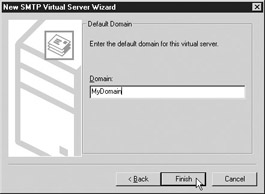
Figure 4-6: Set the default domain name
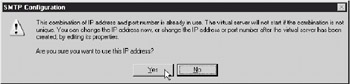
If an SMTP virtual server is already configured on the server host and the IP address that is used for the existing SMTP virtual server is the same address chosen in the Select IP Address screen, the error message shown in the following illustration is displayed. When in doubt, clicking Yes will cause no problems in the current services for the SMTP server virtual directories, and the IP and port for the new SMTP virtual directory may be changed at a later date. If the IP address chosen for a new SMTP server conflicts with an existing SMTP virtual server, the new virtual server will be stopped after it is created and will not cause any disruption in the existing SMTP virtual directory's service.
Configuring an SMTP Virtual Server
After the new SMTP virtual server has been created, the administrator will likely need to edit some of its functions. Configurations can be set in an SMTP virtual server in two ways: a Properties window is available for the SMTP virtual server itself, and Properties windows are available for each domain within an SMTP virtual server. Using these windows, an administrator can configure the SMTP virtual server to meet an organization’s messaging requirements with SMTP.
Opening the Properties Window for an SMTP Virtual Server
Here’s how to open the Properties window for an SMTP virtual server:
-
Open the Computer Manager MMC snap-in, and click the Services And Applications node in the left pane to expose the available subordinate nodes.
-
The Internet Information Services Management node should be found subordinate to the Services And Applications node. Click the Internet Information Services Management node to expand the subordinate nodes.
-
Right-click the SMTP virtual server node in the left pane and select Properties. The Properties window will open, where you can administer configuration options for the SMTP virtual server to which the window pertains.
Opening the Properties Window for a Domain in an SMTP Virtual Server
Here’s how to open the properties window for the domain of an SMTP virtual server:
-
Open the Computer Manager MMC and navigate through the nodes to the SMTP virtual server to which the domain pertains.
-
Click the SMTP virtual server node in the left pane of the MMC to reveal the nodes subordinate to the SMTP virtual server. You’ll see two subordinate nodes to each SMTP virtual server, called Domains and Current Sessions.
-
Click the Domains node to reveal the domains that are used in the SMTP virtual server, which are listed in the right pane.
-
Right-click the respective domain name in the right pane of the MMC, and then choose Properties to open the Properties window.
Connection Settings
An SMTP server is primarily designed to send and receive messages for a specified domain. The number of concurrent connections supported by an SMTP virtual server and the allowable connection timeout can have a great impact on the host server’s overall resource utilization. If too many clients are simultaneously attempting to send or receive messages from the server, the server may not be able to support other important tasks. Limiting the number of concurrent connections that an SMTP virtual server can support also protects the server from Denial-of-Service (DoS) attacks that are designed to attack the server by wasting its resources in processing an overwhelming number of bogus requests. The number of concurrent connections that the SMTP virtual server can support is set by limiting the number of maximum connections allowed and the maximum time allowed for a connection to remain open while inactive. Setting a connection timeout will cause the server to terminate connections with clients that remain inactive for the allotted time period, thereby eliminating connections that are unfruitful for both the client and the server.
Connections for Inbound Messages
Here’s how to set the number of connections that an SMTP virtual server can support for clients that desire to send messages:
-
Open the Properties window for the SMTP virtual server, as described previously.
-
By default, the General tab is open. On this tab, you’ll see a checkbox below the IP address for the SMTP virtual server labeled Limit Number Of Connections To. Check it to enable a text box to its right.
-
Enter a number in the text box that represents the maximum number of concurrent connections the server will allow to connect to send messages. By default, no limit on the number of concurrent connections is imposed. Enter a value between 1 and 1999999999 as a maximum number of connections. It is difficult to suggest a good limit because it is largely dependent on many factors exclusive to the environment, such as server usage, network, and server resource.
-
The default connection timeout is set at 10 minutes. This setting is also located on the General tab of the Properties window below the Limit Number Of Connections To checkbox. Enter a value in the text box labeled Connection Time-Out (Minutes) to specify the maximum amount of time the server will allow a connection to be maintained without any activity. Clients may initiate a connection and due to connectivity failures, may not be able to complete the request or properly close the connection. Without the timeout setting, the SMTP server could wait indefinitely to respond to a connection request for a client that cannot complete the request; with a timeout set, the SMTP server will terminate the connection after the specified time.
Connections for Outbound Messages
A limit for the number of connections for outbound messages may be set using the Properties window for the SMTP virtual server.
-
Open the Properties window and select the Delivery tab.
-
Click the Outbound Connections button at the bottom of the window to open the Outbound Connections window.
-
The Limit Number Of Connections To checkbox is checked by default and set to 1000 connections, and Time-Out (Minutes) is set to 10. Set a limit on the number of connections for outbound messages.The range of valid limits is the same as it is for inbound messages: 1 through 1999999999.
-
In the Outbound Connections window, the administrator can set the number of connections for a given domain and the port number that is used to handle outbound connections. Set the number of connections for a given domain to a number less than the total number of connections allowed for outbound connections. The port used for outbound connections is 25 by default, which is the same port used for inbound. If you need to change the port for security or other restriction conditions, choose a port different from the port used for inbound messaging.
Logging Configuration
As is the case with WWW (World Wide Web) and the FTP (File Transfer Protocol) services, IIS also maintains logs of SMTP events and interactions with an SMTP virtual server for a given connection. A single log is generated for each SMTP virtual server if logging is enabled. Using the Properties window for a given SMTP virtual server, the administrator can choose to log or not to log, the log style, the file location or database for the log, and the data to be included in the log.
Here’s how to configure logging for an SMTP virtual server: Open the Properties window. At the bottom of the General tab, you’ll see the Enable Logging area and checkbox. Check the Enable Logging checkbox to turn on logging and enable log configuration. By default, the Enable Logging checkbox is not checked, so logging is not turned on. The Active Log Format drop-down box determines whether the log is written to a database table or text file format. Please see Chapter 11 for more information about setting up logging.
Managing Inbound Messages
Configurations based on message parameters may also be set for an SMTP virtual server. Depending on the characteristics of a given message, the SMTP virtual server can handle a message in a particular way. The message configurations may be set as follows:
-
Limit Of Message Size Maximum message size accepted by the SMTP virtual server. Messages that are larger than this size are not accepted, and the client will received an error message from the SMTP virtual server.
-
Limit On Session Size Maximum size of all messages’ bodies added up for a given connection allowed by the SMTP virtual server.
-
Limit On The Number of Message For A Given Connection Maximum number of messages allowed by the SMTP virtual server for a given connection.
-
Limit On The Number of Recipients Per Message Maximum number of recipients per any given message being handled by the SMTP virtual server.
-
Address For Sending A Non-Delivery Report To E-mail address that all non-delivery reports for the SMTP virtual server will be sent.
-
Directory For Storing Non-Delivery Reports File path on the host server that all non-delivery reports for the SMTP virtual server will be written.
To change any of the message configurations, open the Properties window for the SMTP virtual server, as described previously. Choose the Messages tab, as shown in Figure 4-7, to access the settings that pertain to message parameters.
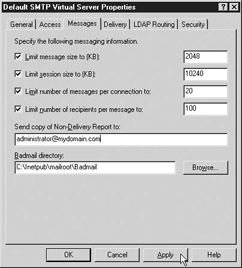
Figure 4-7: Messages tab of the Properties window for an SMTP virtual server
Setting Message Size Limits
The message size limit is set to 2048K by default. The minimum value that can be set is 1K. This value is the maximum size for a single message that the SMTP virtual server will accept. The SMTP virtual server will reject messages larger than the set size and send an error to the client that sent the message. The value for this setting is identified in the Limit Message Size To (KB) field on Messages tab, as shown in Figure 4-7. If you don’t want to set a limit, uncheck this checkbox and none will be imposed.
Size restrictions may also be imposed based on session. A message session size is the sum of all message bodies for a given connection. The Limit Session Size To (KB) field identifies the maximum size in kilobytes that the SMTP virtual server will allow for a given connection. The default value is 10240K. The minimum value must be larger than the Limit Message Size setting. To impose the session size, the checkbox must be selected. To remove any restrictions on session size, uncheck the checkbox. If the setting is exceeded in a given session, the SMTP virtual server will respond with an error to the client and will fail to complete the transaction requested by the client.
Limiting the Number of Messages per Connection
The number of messages sent for a given connection may also be used as a restrictive measure for limiting resource utilization on a given server. Using the amount indicated in the Limit Number Of Messages Per Connection To setting, the SMTP virtual server will process up to the maximum number of messages for a given connection. If the number of messages being sent exceeds the set limit, a new connection will be established and the remaining messages will be processed in the subsequently created session as long as the number of remaining messages does not exceed the limit allowed for a given connection. This behavior forces the SMTP server to process smaller batches of messages, which reduces the overall resource utilization for a given server. By default, this restriction is turned on and set to a value of 20 messages.
The total number of recipients on a message can also be limited for a given connection. The Limit Number Of Recipients Per Message To checkbox turns on the ability for the SMTP virtual server to process the number of recipients up to the limit specified before another connection will be created to complete the remaining number of recipients. By default, this setting is checked and therefore enabled. The default value is 100, which means that up to 100 recipients will be processed for a given message on a given connection. If more than 100 recipients occur, the SMTP virtual server will create another connection and complete sending the messages to the recipients specified.
Non-delivery Reports
When a failure occurs in sending a message, depending on the nature of the failure, a non-delivery event may occur. When non-delivery event occurs, a report may be generated that describes the failure. Non-delivery reports may be forwarded to an e-mail address specified in the Send Copy Of Non-Delivery Report To field. If no e-mail is specified in the field, no non-delivery report is forwarded.
When a message cannot be delivered or returned to the sender, the message itself is stored in the file directory specified as the badmail directory. The badmail directory is a file path specified on the host server’s file system, typically subordinate to the SMTP virtual server home directory. Examining the messages in the badmail directory is a useful endeavor for the administrator to determine whether security problems exist with a given client or other types of systematic failures occur with the messaging system, such as a client that is constructing the message incorrectly.
Managing Message Delivery
In addition to receiving messages, the SMTP service sends messages. To send messages, an SMTP virtual server establishes a connection with another server and validates that the receiving server is prepared to accept the messages. The configurations that affect the way the SMTP virtual server sends a message are found on the Delivery tab of the Properties window for the SMTP virtual server, as shown in Figure 4-8.
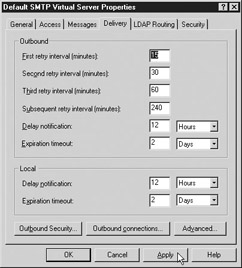
Figure 4-8: Delivery tab for an SMTP virtual server Properties window
Configuring Retry Attempts and Intervals
All the settings found in the Outbound area of the Delivery tab relate to message delivery. The First Retry Interval (Minutes) setting indicates the number of minutes the server will wait to retry delivery of a message that failed on the first delivery attempt. The default value is 15 minutes, and the valid range for this setting is 1 through 9999. If a message fails to be delivered on the second attempt, the server will wait until the amount of time indicated in the Second Retry Interval (Minutes) setting is reached. The default setting for the second retry interval is 30 minutes, and the allowable range for the value is from 1 through 9999. If a message fails to be delivered on the third attempt, the server will wait until the amount of time indicated in the Third Retry Interval (Minutes) setting is reached. The default setting for the third retry interval is 60 minutes, and the allowable range for the value is between 1 and 9999.
The retry attempts are customizable for the first three message delivery failures. After three failures, only one retry configuration can be set for all subsequent retries using the Subsequent Retry Interval (Minutes) setting—also found in the Outbound area of the Delivery tab. The default value for the subsequent retry interval is 240 minutes, and the allowable range for setting the value is between 1 and 9999 minutes. Since a message may be undeliverable regardless of the number of retry attempts, a maximum duration of time may be set for the subsequent retries to occur within. Using the Expiration Timeout value and the applicable units for the expiration value, the subsequent message delivery retries may be ended after a given period of time. The expiration timeout may also be set for the local network by editing the setting in the Local area. The default value is two days, during which the message subsequent retries will be performed. If the message is delivered, the delivery notification can be delayed to accommodate network delays. Since the delays on a local network may be considerably different from the delays experienced on a network otherwise, the Delay Notification may be set for either type of network independently of the other. Use the Delay Notification setting in either the Local or Outbound area on the Delivery tab to set a time period that must expire before the delivery notification is sent. The default setting is 12 hours.
Configuring Advanced Delivery Settings
Configuring advanced settings for message delivery is achieved by clicking the Advanced button located at the bottom left of the Properties window’s Delivery tab. After you click the Advanced button, a window will open, where the administrator can set the following configurations:
-
Maximum Hop Count Maximum number of routers on which a message is allowed to travel.
-
Masquerade Domain Domain name to replace the local domain name in the message From line.
-
Fully-Qualified Domain Name Name that should be used for a mail exchange (MX) record lookup other than the network identification name of the host.
-
Smart Host Server specified for all outbound messaging. The SMTP server may be set to attempt direct delivery prior to using a smart host server.
-
Reverse DNS Lookup Verifies that the client’s domain or IP address matches the identified IP or domain described in the EHLO or HELO command.
Note EHLO and HELO are SMTP commands that are used to communicate with a given SMTP virtual server. HELO is short for Hello, and EHLO is an advanced version of HELO. After a client successfully authenticates and connects to an SMTP server, the command is issued with a domain name for the message sender’s SMTP server.
If a message is sent through more routers than the limit set in Maximum Hop Count, a non-delivery report is generated and the message will not be sent. The message and the non-delivery report will be sent to the sender. The default value is 15 hops.
Setting a value in the Masquerade Domain text box causes the domain used in the From line of a message to be replaced with the value set in the text box. If a recipient replies to the message, it will be routed to an SMTP virtual server that uses the domain name set in the Masquerade Domain setting. The value replaces the domain name on the first hop only. By default, the value is blank, and no masquerade domain name is set.
The Fully-Qualified Domain Name setting enables an administrator to have greater control of the Domain Name Service (DNS) lookup that takes place when a message is sent. The value in the Fully-Qualified Domain Name setting is the same name specified for the host’s network identification, by default. Using the default host’s network identification name works because the SMTP server must obtain the IP address and resolve the address to a domain name to perform a message delivery. The IP address of the host may be obtained from the network identification name, and that address may be used to find the address (A) record in the MX record. During a typical send event, however, the SMTP virtual server performs a lookup in the MX record before performing an A record lookup. By setting a fully qualified name for an SMTP virtual server, that value will be looked up in the MX record first, thereby eliminating the second IP address lookup effort. The MX record also enables the administrator greater control over the domain lookup, since multiple domains may be associated with the same IP address.
Setting a Smart Host value causes the SMTP virtual server to use the specified smart host to perform the message delivery. By default, the Smart Host value is not set. When a value is entered in the text box, the Attempt Direct Delivery Before Send Directly To Smart Host checkbox is enabled. Checking the box will cause the SMTP virtual server to attempt to send directly prior to using the smart host specified in the text box. The benefit an administrator can realize from configuring a smart host is the ability to offload the resources required to perform a message delivery to another host or network. The smart host assumes the burden of connecting and sending the message for the client as opposed to the SMTP server that the client connected with initially.
Specifying Reverse DNS Lookup causes the SMTP virtual server to perform a DNS lookup on the incoming messages and compare the results to the EHLO/HELO command identified DNS value. If a difference is found, the received header of the message will be marked with the value RDNS failed. If the DNS lookup yields no value to compare to the DNS identified in the EHLO/HELO command, the received header of the message will be marked with the value unverified. If the DNS lookup matches the DNS identified in the EHLO/HELO command, the received header of the message will remain unchanged. By default, the reverse DNS lookup is not enabled. Note that enabling reverse DNS lookup could cause a great resource burden on the host server.
Configuring Delivery Security
Some servers may require the SMTP server to authenticate to send a message. To access SMTP virtual server authentication configurations for sending messages, click the Outbound Security button on the Delivery tab. The Outbound Security window allows the administrator to set the required authentication for sending a message and indicate whether the message should be encrypted using transport layer security (TLS). By default, the authentication level for outbound messages is set to Anonymous Access. The other choices for authenticating during outbound messaging transactions are as follows:
-
Basic Authentication Specified username and password are transmitted to the host server for authentication using clear text
-
Integrated Windows Authentication Authentication is performed using a special Windows cryptic technique for transmitting information without sending the specified password to the host server for authentication
The selection of the authentication method is mutually exclusive, so only one type may be chosen. The receiving server host’s requirements determine the needed authentication level, so if the receiving system fails using anonymous authentication, the administrator for the receiving server must be contacted to determine their authentication requirements.
If basic authentication or Integrated Windows Authentication is chosen, the username and password to be used in the authentication must be specified in the respective text boxes on the Outbound Security dialog box, as shown in Figure 4-9. Click the Browse button to open the Select User dialog box to help you choose the correct username for authentication. The credentials do not need to come from the Select User dialog box, however, and the credentials do not need to belong to the host server.
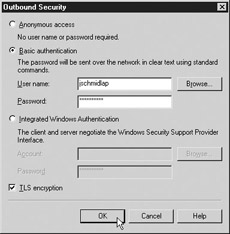
Figure 4-9: Outbound Security dialog box
Checking the TLS Encryption checkbox will cause the SMTP virtual server to use TLS encryption, which applies to SMTP communication protocol in the same way the Secure Sockets Layer (SSL) protocol applies to HTTP communication. TLS is useful for encrypting clear text communications so that transmissions of important information between hosts cannot be intercepted. A good use for TLS would be for a situation in which an SMTP virtual server authenticating with another host was using basic authentication. The credentials sent for authentication are in the form of text, and if they were intercepted by a person of ill intent, the credentials would be compromised and could be used exploit the receiving server and possibly the sending server. By default, TLS encryption is not enabled. To use TLS encryption, key pairs must be created and key certificates must be configured. Refer to Chapter 2 for more information about setting key pairs and certificates.
|
|
EAN: 2147483647
Pages: 193