4.5.7 Organizing text with lists
Organizing text with lists
Word provides several alternatives for structuring text into lists. They re combined in the Bullets and Numbering dialog on the Format menu. Bullets provide a way of ticking off items that don t have a particular order, while the numbered list options are for items that need to appear in a specific order, like instructions. The third page in that dialog the Outline Numbered tab offers options that are even more structured and ties into Word s ability to link styles with document structure. As noted in the previous section, you need to use outline numbering in order to have pages chapter numbered.
Two sets of objects are involved in creating lists. One hierarchy (ListGalleries, ListTemplates, and ListLevels and their members) provides a set of choices for the appearance of the list, while the other (Lists and ListParagraphs and their members) contains the actual list items. This structure mirrors the way styles are applied to document contents. A variety of Style objects are available and can be applied to the contents, but any given range has only a single style. Similarly, there are a variety of list templates, but any given list has only one template applied to it.
Defining list structures
Three collections and their contents provide a wide variety of choices for formatting lists. Figure 10 shows the hierarchy involved. The ListGalleries collection, accessed through the Application object s ListGalleries property, starts things off. Each ListGallery object represents one page in the Bullets and Numbering dialog. The constants wdBulletGallery (1), wdNumberGallery (2), and wdOutlineNumberGallery (3) are used to access them.
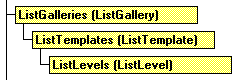
Figure 10
. Defining list structures. These three collections contain the definitions for all of the bulleted, numbered, and outline-structured lists you can create.Each ListTemplate object describes the way a single list is laid out. Like ListGallery, though, ListTemplate has few properties and methods itself. The only property worthy of note is OutlineNumbered, which indicates whether or not the template specifies a multi-level outline list. If not, it s restricted to a single level (which is true for all the lists shown on the first two pages of the Bullets and Numbering dialog). Figure 11 shows the first page of the Bullets and Numbering dialog, which is not outline numbered, while Figure 12 shows the last page, which is.
The ListLevels collection is comprised of ListLevel objects, the actual stuff of which lists are made. Table 14 shows the interesting properties of ListLevel. If you don t like the list structures provided, this is the place to change things. For example, in the first outline numbered list (shown in the second position of the first row in Figure 12), to change the list to use square brackets rather than parentheses, you could use code like this:
#DEFINE wdOutlineNumberedGallery 3
LOCAL oLevel
WITH oWord.ListGalleries[ wdOutlineNumberedGallery ].ListTemplates[ 1 ]
FOR EACH oLevel IN .ListLevels
WITH oLevel
* Change ")" to "]"
.NumberFormat = STRTRAN(.NumberFormat, ")", "]")
.NumberFormat = STRTRAN(.NumberFormat, "(", "[")
ENDWITH
ENDFOR
ENDWITH
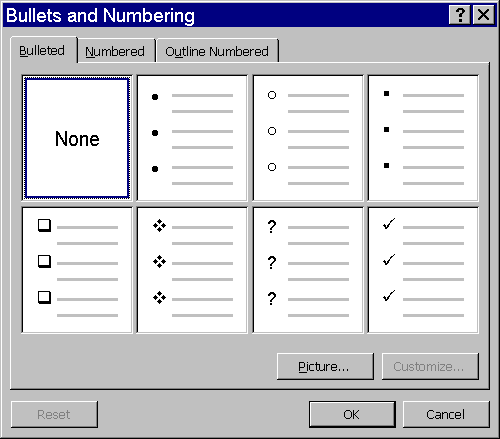
Figure 11
. List Galleries without outlines. The first two pages of the Bullets and Numbering dialog provide single-level lists. The ListGalleries collection has one member for each page of the dialog. Each choice shown (except the "None" option) is represented by one ListTemplate object.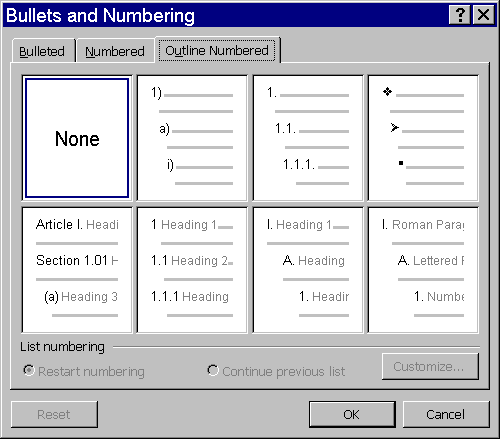
Figure 12
. Multi-level lists. The third page of the dialog offers outline numbering and provides the third member of the ListGalleries collection.Each level can be linked to a style using the LinkedStyle property, so that using that style automatically indicates numbering level and vice versa. Doing so provides several useful abilities. First, as noted previously, numbering within chapters is enabled. Second, Word s Outline View and Document Map become useful tools. While neither of these strictly requires numbering, both are based on the idea that a document is organized hierarchically and that the styles chosen reflect that hierarchy. (See "Organizing a document using styles" in Chapter 6 for more on this topic.) By default, the last four list templates on the Outline Numbered page are linked to the built-in Heading styles.
Table 14
. Defining list structures. ListLevel specifies how one level in a list is laid out.| Property | Type | Description |
| NumberStyle | Numeric | The style for the number for this level. wdListNumberStyleBullet 23 wdListNumberStyleArabic 0 wdListNumberStyleUppercaseRoman 1 wdListNumberStyleLowercaseRoman 2 wdListNumberStyleUppercaseLetter 3 wdListNumberStyleLowercaseLetter 4
|
| NumberFormat | Character | A string showing how to insert the level number in the proper style. Use % followed by a digit to represent the level number, except when NumberStyle is wdListNumberStyleBullet. (In that case, NumberFormat is limited to a single character.) |
| TrailingCharacter | Numeric | The character that follows the number. Use one of these constants: wdTrailingTab 0 wdTrailingSpace 1 wdTrailingNone 2
|
| StartAt | Numeric | The starting number for the list. |
| Alignment | Numeric | The alignment of the level number or bullet. wdListLevelAlignLeft 0 wdListLevelAlignCenter 1 wdListLevelAlignRight 2
|
| NumberPosition | Numeric | The indentation (in points) of the level number or bullet. |
| TabPosition | Numeric | The indentation (in points) of the tab following the level number or bullet that is, where the text should begin on that line. |
| TextPosition | Numeric | The indentation (in points) of text on the second and subsequent lines of numbered or bulleted text. |
| Font | Object | The font to use for the level number. |
| LinkedStyle | Character | The name of the style linked to this level. (See the text for an explanation.) |
Creating lists
The Lists collection of Document references all the lists in a document. Each List object refers to a single list. The key property of List is ListParagraphs, a collection of the paragraphs in the list. Once a list exists, you can modify its appearance by working with the properties of these objects.
The process of adding a new list to a document is roundabout, especially if you want a multi-level list. You can t just set the format you want and start adding items, as you can interactively. You need to add the text to the document, and then apply the appropriate list template. Then, for a multi-level list, you need to go back and do appropriate indenting.
Once you have the text range ready to format, use the Range s ListFormat property to access the ApplyListTemplate method. This method takes a range and turns it into a list by applying the specified ListTemplate object to it. An optional fourth parameter (not shown here) allows the list to be formatted in a way more appropriate for web pages.
oRange.ApplyListTemplate( oListTemplate [, lContinuePreviousList
[, nApplyTo ] ] )
| oListTemplate | Object | Reference to a ListTemplate object. |
| lContinuePreviousList | Logical | Indicates whether to continue numbering from the previous list or start over at 1. |
| nApplyTo | Numeric | The portion of the list the specified template should be applied to. Uses the following Word constants: wdListApplyToWholeList (0), wdListApplyToThisPointForward (1), wdListApplyToSelection (2). This parameter lets you change the formatting of part of a list, not necessarily the most aesthetically pleasing idea. |
The other important methods are ListIndent and ListOutdent, which let you demote and promote items by one level at a time in an outline list.
Here s a brief example that creates a multi-level list:
#DEFINE CR CHR(13)
#DEFINE wdListApplyToWholeList 0
* Start with an empty range
oDocument = oWord.Documents.Add()
oRange = oDocument.Range()
* Now create a string containing the items to list
cItems = "First item" + CR + ;
"Second item "+ CR + ;
"first sub-item for item 2 " + CR + ;
"second sub-item for item 2" + CR + ;
"Third item" + CR
* Send the string to Word
oRange.InsertAfter(cItems)
* Apply a list template
oRange.ListFormat.ApplyListTemplate( oWord.ListGalleries[3].ListTemplates[1], ;
.F., wdListApplyToWholeList )
* Now handle subitems
oRange.ListParagraphs[3].Range().ListFormat.ListIndent()
oRange.ListParagraphs[4].Range().ListFormat.ListIndent()
Here are the results:
- First item
- Second item
- first sub-item for item 2
- second sub-item for item 2
- Third item
There is an alternative to using ListIndent. Remember the ability to link styles to list levels by using LinkedStyle? Once you ve done so, if you apply the specified styles to a paragraph and ApplyListTemplate, that paragraph is automatically numbered. Here s an example that shows this approach. The resulting list is shown in Figure 13.
#DEFINE CR CHR(13)
#DEFINE wdCollapseEnd 0
#DEFINE wdParagraph 4
#DEFINE wdListApplyToWholeList 0
* Start with an empty range
oDocument = oWord.Documents.Add()
oRange = oDocument.Range()
* Now create a string containing the items to list
oRange.Style = "Heading 1"
oRange.InsertAfter("First item" + CR + ;
"Second item "+ CR )
oRange.Collapse( wdCollapseEnd )
oRange.Style = "Heading 2"
oRange.InsertAfter("first sub-item for item 2 " + CR + ;
"second sub-item for item 2" + CR )
oRange.Collapse( wdCollapseEnd )
oRange.Style = "Heading 1"
oRange.InsertAfter("Third item")
* Now make a range of the whole thing
oRange.MoveStart( wdParagraph, -4 )
* Apply a list template that has linked styles
oRange.ListFormat.ApplyListTemplate( oWord.ListGalleries[3].ListTemplates[6], ;
.F., wdListApplyToWholeList )
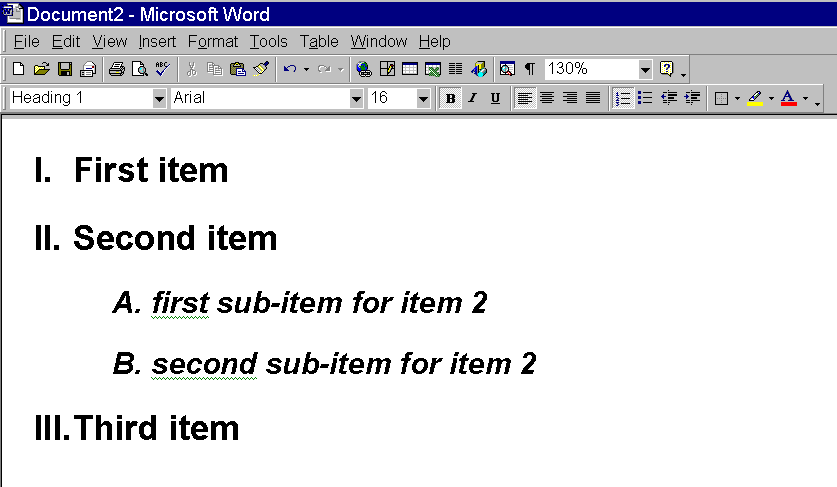
Figure 13
. Using styles to create lists. By linking styles to list levels, you can have items indented automatically when you apply the list template.The ListFormat object has properties to describe the appearance and structure of the level number. Table 15 describes those you re likely to want to use. A range may contain many different lists, but it has only a single ListFormat object. The properties of ListFormat refer only to the first list in the range. To look at all the different lists in a complex range, break the range down into smaller ranges.
ListFormat is primarily concerned with the value and formatting of the paragraph number, but it also provides properties to access the list itself and the list template on which the list is based.
Table 15
. ListFormat properties. The ListFormat object, referenced through Range, controls the appearance of lists.| Property | Type | Description |
| ListType | Numeric | The kind of list. wdListNoNumbering 0 wdListSimpleNumbering 3 wdListNumOnly 1 wdListOutlineNumbering 4 wdListBullet 2 wdListMixedNumbering 5
|
| ListLevelNumber | Numeric | The indentation level for the first paragraph of this object. |
| ListValue | Numeric | The paragraph number without any formatting. |
| ListString | Character | The paragraph number with the specified formatting. |
| ListTemplate | Object | Reference to the ListTemplate with which the list was formatted. |
| List | Object | Reference to the first List contained in the ListFormat object. |
Copyright 2000 by Tamar E. Granor and Della Martin All Rights Reserved
EAN: 2147483647
Pages: 128