Windows
|
This section will walk you through downloading and installing Java on Windows-based computers.
You download Java for Windows from http://java.sun.com/j2se/1.4/download.html. This page contains a list of platforms for which the current version of Java is available. For most of these platforms, you can download a JRE (Java Runtime Environment) or an SDK (Software Developer's Kit). You want the SDK, not the JRE. At or near the top of the list, you will find Windows (U.S. English only) and Windows (all languages, including English). Click on the link for Windows (all languages, including English).
This opens a page for specifying optional personal information. Then you move on to a license agreement page. If you do not accept the license, you will not be allowed to proceed. The next page allows you to download the file you want. The file has a complicated name, something like j2sdk-1_4_1_02-windows-i586.exe.
Click on the link to start the download. If your browser asks you to choose between running the program from its current location or saving it to disk, save it to disk. You can save it anywhere you like, and you can delete it after you run it. You might as well save it in the \ directory of your C disk.
Execute the file by clicking on its icon in Windows Explorer. The installation wizard begins by asking you to accept the license policy (again). Then you're asked where you want the Java files to be placed. Put them in the \ directory of your C disk. We'll assume that you use the default. The default name is something complicated, like j2sdk1.4.1_02.
Next, you're asked to choose which parts of installation you want. You must select the program files. You don't need any of the other parts, but if you have the disk space, you might be interested in the demos.
Then the installation wizard finishes its work. When it's done, your disk contains a new structure that looks something like Figure A.1.
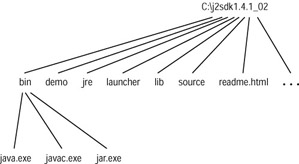
Figure A.1: Windows SDK file layout
The figure shows the three most important files in the bin subdirectory: the Java Virtual Machine (java.exe), the Java compiler (javac.exe), and the jar archive tool (jar.exe). Throughout this book, you will need the Java Virtual Machine and the compiler. You may need the archive tool shortly.
All the Java files are in place. Now create a directory where you will write Java programs. Again, you can call it whatever you want and put it wherever you like, but simpler is better. Here we'll assume your programming directory is called C:\MyJavaCode.
The next step is to create a batch file for setting your PATH and CLASSPATH environment variables. The PATH variable tells the operating system where to look for executable files when you run a program from the command line of a Command Prompt window. (And that is how you will run the animated illustrations and compile and execute your own programs.) The CLASSPATH variable tells Java where to look for class files. (That won't make sense unless you've read Chapter 8.) You can call your script anything you like, and you can store it anywhere you like. The whole point of a batch file is to simplify things and reduce typing, so call it something simple and save it somewhere easy to remember. We will call it \ja.bat. It looks like this:
SET PATH=$PATH$;C:\j2sdk1.4.1_02\bin SET CLASSPATH=.;D:\AnimatedIllustrations CD C:\MyJavaCode
You don't have to use exactly this script, but if you like it there's a copy on the CD-ROM, in the ExampleScripts\Windows subdirectory. If you want to use it as-is, just copy it to the root directory of your primary disk drive. You might want to copy it anyway and use a text editor such as Notepad to edit it, rather than typing in your version from scratch.
The first line of the script appends Java's bin directory to your PATH environment variable, so that you will be able to run programs like java, javac, and jar. Remember that you will be running them by typing command lines into a Command Prompt window, not by double-clicking on icons.
The second line sets the CLASSPATH environment variable to the current directory, plus the directory on this book's CD-ROM where the animated illustration programs are stored. (If your CD-ROM drive letter is something other than D, substitute the appropriate letter. Alternately, you can copy the AnimatedIllustrations directory to your hard drive. That way you don't have to make sure the CD-ROM is loaded whenever you want to run an animated illustration. If you copy the AnimatedIllustrations directory to your hard drive, replace D:\ AnimatedIllustrations in the script with the full path, including drive letter, of the copied version of the AnimatedIllustrations directory.)
The third line of the script takes you into the directory where you will create and store the Java programs that you will write, in answer to some of the questions at the end of each chapter.
To test your work, open a Command Prompt window. Run your batch file script by typing \ja. The script runs. Note that it only affects the one Command Prompt window you are working in. If you close that window, you will have to open another one and then run the batch file again.
To make sure your script ran properly, type java -version. You get a message that tells you which version of Java is running, along with some other obscure, cryptic information that probably means something important to someone. This message means that you have installed Java and your PATH variable is set correctly. If the command doesn't work, make sure the full pathname of the bin directory in your script is spelled correctly, and that the directory contains java.exe.
Now type java welcome.Welcome. You should see a simple welcoming screen. This means that your CLASSPATH variable is set correctly. If you don't see the welcoming screen, make sure the value assigned to CLASSPATH in your script is spelled correctly, and that the directory is the AnimatedIllustrations directory from the CD-ROM. If you are running the animated illustrations directly from the CD-ROM (that is, if you didn't copy the files to your hard drive), make sure the CD-ROM is in the correct drive.
That takes care of the Java program files. They are all you need until Chapter 12, where you will also need the API pages. These are a huge number of HTML pages to be viewed with the Web browser of your choice. You download them as a single zip file that you will have to extract.
You begin the download at the same page you visited before: http://java.sun.com/j2se/1.4/download.html. This page contains a list of several dozen products that you can download. Near the end of the list, you see J2SE 1.4.1 Documentation. Click on this item's Download link. After accepting another license agreement, you see a page with a link for downloading j2sdk-1_4_1-doc.zip. Click on the link. You're prompted to specify where you want to put the zip file. Put it in the directory where you stored your Java files. We recommend C:\j2sdk1.4.1_02.
Now you might have to extract the zip file. Some versions of Windows present a zip file as if it were a directory, extracting files only as needed. This saves a lot of space. If your system does this for you and it's satisfactory, you're done. To find out, open a Windows Explorer window and have it display your C:\j2sdk1.4.1_02 directory. If j2sdk-1_4_1-doc.zip looks like a directory rather than a single file, you don't need to extract if you don't want to. Otherwise, you need to extract.
To extract, you could double-click on the j2sdk-1_4_1-doc.zip icon and use Winzip to unpack the archive. But you might not have Winzip. Besides, there is a slicker way. If you haven't done so already, run your batch file script by typing \ja. Next, type cd into the directory that contains the j2sdk-1_4_1-doc.zip file. Unless you have done your own thing, the command to do so is
cd C:\j2sdk1.4.1_02
Now type the following command:
jar xvf j2sdk-1_4_1-doc.zip
The jar command is one of the useful Java executables. It became usable when you ran the script and added C:\j2sdk1.4.1_02\bin to your path. Jar stands for JavaArchive. It is like Winzip, but you run it from the command line. Fortunately, the jar file format is compatible with the .zip format, so you can use jar to extract any .zip archive.
Creating Program Files
Congratulations! You are ready to go. Right now you can run any animated illustration in the book. And please do... they are an essential part of your Ground-Up Java experience.
The other essential part of your experience is writing your own Java programs. You will do this when you work on the "write-a-program" questions at the end of the chapters, and of course you can write programs that implement your own ideas. We have already recommended that you do this in a directory called \MyJavaCode, and have your script "cd" in that directory. But now the question is, how do you create Java code? Chapter 2 explained that writing a Java program means creating one or more files, called source files, in plain text format, with names that end with .java.
There are two ways to create Java source files:
-
Use a general-purpose editor.
-
Use an Integrated Development Environment (IDE).
You have several general-purpose editors installed on your system, including Notepad and Wordpad. It's a good idea to start with one of these; they are good enough for small programs. Use a fixed-width font like Courier to make your code line up nicely.
As you will learn from experience, you don't just write a program. The development process is an ongoing cycle of writing, testing, and modifying. So when you think you have finished writing your program, don't close your editing window. Leave it around, because in all likelihood you will want to make modifications or fix bugs. (Yes, this could happen even to you.)
After a while, you might get a vague sense that life could be better somehow. You might be ready for an IDE, or Integrated Development Environment. IDEs are products that help you create, maintain, debug, and keep track of Java programs. Many common operations (such as compiling) are achieved with a single button click. There are lots of IDEs on the market, ranging in price from free to expensive. It would be inappropriate to recommend one here, but if you type Java + IDE into your favorite Web search engine, you will get plenty of information.
A good IDE is a good thing, and a great IDE will greatly enhance your productivity. But a word of warning: Your goal right now is not to create large Java programs efficiently. Your goal is to learn as much as possible about Java. IDEs shield you from repetitive tasks. Before you start using them, it's a good idea to spend some time learning all the ins and outs and
details of Java, so that you'll know what the IDE is shielding you from. Spend some time with a general-purpose editor before you move on to an IDE.
The rest of this appendix is about installing Java on Macintosh. If you only have a Windows PC, you can skip the rest. Have fun!
|