Action Listeners and Action Events
|
Java uses many types of events. The simplest is the action event, which is used by buttons and several other components to indicate that simple user input activity has occurred. The other event types are slightly more complicated than action events, but they are used in analogous ways. The nice thing about Java's event mechanism is that once you've learned how to handle one kind of event, it's easy to handle the other kinds.
Every button has a list of objects that are interested in being notified when the button is pushed. These objects are the button's action listeners. In general, a listener is an object that should be notified when a component is stimulated in some way.
Not all objects are eligible to be a button's action listener. An action listener must implement the java.awt.event.ActionListener interface. Note that this interface lives in the java.awt.event package, along with all the other classes and interfaces that make up Java's event mechanism. So a GUI application is likely to use the following two import lines:
import java.awt.*; import java.awt.event.*;
The first line imports all the component classes; the second imports the event-related classes and interfaces.
The java.awt.event.ActionListener interface defines a single method:
public void actionPerformed(ActionEvent e);
When a button is pressed, the Event dispatch thread constructs an instance of java.awt .event.ActionEvent. This is a very simple class that contains a small amount of information about the button activity. Then the Event dispatch thread calls the actionPerformed() method of each of the button's action listeners, passing the instance of ActionEvent as the method call's argument.
When a button is constructed, its list of action listeners is empty. This explains why none of the buttons created in the example code in the previous chapter actually caused anything to happen. To add an action listener to a button's list, call the button's addActionListener() method, passing as an argument the listener to be added. The listener must implement the ActionListener interface.
Here is a class that implements the interface, and so is eligible to be a button's action listener:
import java.awt.event.*; class SimpleActionListener implements ActionListener { public void actionPerformed(ActionEvent e) { System.out.println("The button was pushed."); } } The following code creates a button that uses an instance of SimpleActionListener as its action listener:
import java.awt.*; public class UsesListener extends Frame { UsesListener () { setLayout(new FlowLayout()); Button btn = new Button("Push Me"); SimpleActionListener sal = new SimpleActionListener(); btn.addActionListener(sal); add(btn); setSize(300, 100); } public static void main(String[] args) { (new UsesListener ()).setVisible(true); } } Figure 16.2 shows the GUI.
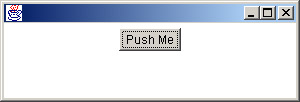
Figure 16.2: A button that sends events
The important thing to notice about Figure 16.2 is that there is nothing important to notice. The button looks perfectly ordinary. There is nothing to tell us that it has feel as well as look. But when you push it, the following message appears in your console:
The button was pushed.
Congratulations! You have now seen your first example of a GUI that has both look and feel.
In addition to the addActionListener() method, the Button class also has a removeActionListener() method, which can be called when a listener no longer wants to get called when the button is pushed.
| Note | In practice, buttons rarely have multiple action listeners, and removeActionListener() is rarely called. In most cases, a button has a single action listener that is added just after the button is constructed and is never removed. |
The procedure for writing code with a button that responds to user input can be summarized as follows:
-
Construct a button.
-
Create a listener class that implements the ActionListener interface.
-
Construct an instance of your listener class.
-
Call the button's addActionListener() method, passing in the instance of your listener class.
The Simple Event Lab animated illustration lets you experiment with buttons and listeners without writing code. Start the program by typing java events.SimpleEventLab. You will see the display shown in Figure 16.3.
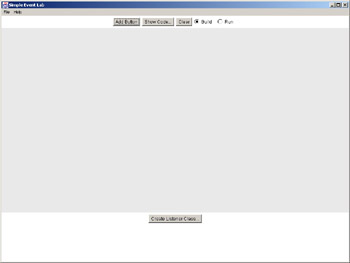
Figure 16.3: Simple Event Lab: initial screen
The program lets you create simulated buttons and listener classes. You can create simulated instances of the simulated listener classes, click on the buttons, and observe how calls are made to the listeners.
Begin by creating some buttons. Click on Add Button three times. You will see things that look somewhat like buttons, as shown in Figure 16.4.
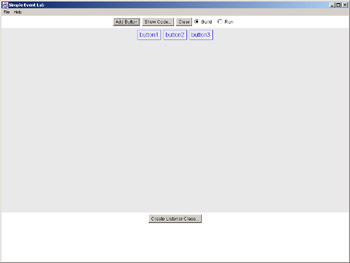
Figure 16.4: Simple Event Lab with simulated buttons
Now create a (simulated) listener class. In real life, you would do this by writing a class that implements ActionListener. In Simple Event Lab, you do it by clicking on Create Listener Class... in the lower part of the frame. The button label ends with dot-dot-dot (officially called ellipsis). As you learned in the previous chapter, this means that the button causes a new frame or dialog box to appear. Indeed, clicking the button brings up a dialog box that lets you choose the name of the class. After you dismiss the dialog, a picture of the class appears at the bottom of the screen, as shown in Figure 16.5.
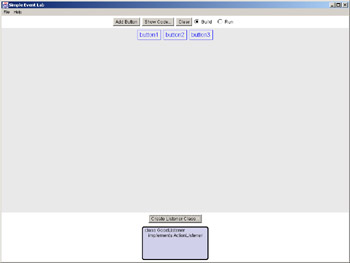
Figure 16.5: Simple Event Lab with a listener class
The figure shows that a listener class called GoodListener has been created. Create your own class, choosing any name you like.
Now it's time to create an instance of the listener class. Click on the picture of the class. You will see a pop-up menu that lets you instantiate the class or delete it. Choose Construct Instance. A simulated instance of the class will appear below the simulated buttons in the main screen, as you can see in Figure 16.6.
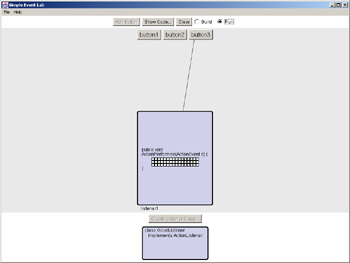
Figure 16.6: Simple Event Lab with a listener object
You can click on the picture of the listener object to change its name or to delete it.
Up to this point, you have simulated the first three steps listed earlier in this section. You have created buttons, you have created a listener class, and you have constructed an instance of the listener class. Now it's time to register the listener object as an action listener of one of the buttons.
Click on one of the simulated buttons. You will see a pop-up menu that invites you to add an action listener or delete the component. Choose Add Action Listener. The cursor will turn into crosshairs. As you move the mouse over the listener object, the object's outline will be highlighted, indicating that you are over a valid listener for the button. Click on the listener. You will see a line connecting the button to the listener.
Now the fun begins. Click the Run button at the top of the screen. The simulated buttons will turn into real buttons, as shown in Figure 16.7.
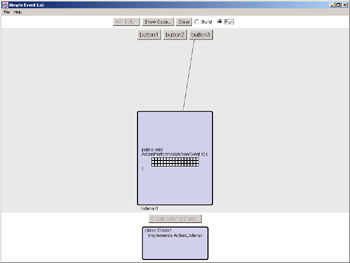
Figure 16.7: Simple Event Lab continued
Now click the button that you connected to the action listener object. The program will show a call being made to the listener's actionPerformed() method. The yellow ball represents the ActionEvent object.
Click on the Clear button to remove all simulated components, listener classes, and listener objects. Now that you have a clean slate, see if you can repeat the process of connecting a button to a listener without looking at this page.
Experiment with multiple listener classes and multiple listener objects. Can a single listener object be an action listener for more than one button? Can a button have more than one action listener? What does the Show Code... button do?
Getting Information from an Action Event
In the previous section, you were asked to use Simple Event Lab to determine whether a single listener object can be an action listener for more than one button. The answer is yes, as shown in Figure 16.8.
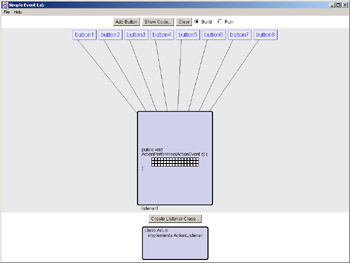
Figure 16.8: One listener object for many buttons
But now there is a problem. Obviously, the code needs to respond differently to different buttons. How does the listener's actionPerformed() method know which button was clicked?
The answer is found inside the method's argument. The ActionEvent class has a getSource() method that returns the button that was clicked. Many actionPerformed() methods have a structure that is similar to the following:
public void actionPerformed(ActionEvent e) { if (e.getSource() == okButton) doOkStuff(); else if (e.getSource() == cancelButton) doCancelStuff(); else if (e.getSource() == applyButton) doApplyStuff(); } The method determines which button was used and responds accordingly. For this to work, the method has to have access to references to the three buttons. The simplest way to make this happen is to put actionPerformed() in the frame subclass that creates the buttons. Make sure the frame subclass declares that it implements ActionListener (no problem, since it has an actionPerformed() method). Finally, when the buttons are created, the frame subclass itself is registered as their action listener. It looks like this:
1. import java.awt.*; 2. import java.awt.event.*; 3. 4. public class ListeningFrame extends Frame 5. implements ActionListener 6. { 7. private Button okButton, cancelButton, applyButton; 8. 9. ListeningFrame() 10. { 11. setLayout(new FlowLayout()); 12. okButton = new Button("Ok"); 13. okButton.addActionListener(this); 14. add(okButton); 15. cancelButton = new Button("Cancel"); 16. cancelButton.addActionListener(this); 17. add(cancelButton); 18. applyButton = new Button("Apply"); 19. applyButton.addActionListener(this); 20. add(applyButton); 21. setSize(300, 100); 22. } 23. 24. public void actionPerformed(ActionEvent e) 25. { 26. if (e.getSource() == okButton) 27. doOkStuff(); 28. else if (e.getSource() == cancelButton) 29. doCancelStuff(); 30. else if (e.getSource() == applyButton) 31. doApplyStuff(); 32. } 33. 34. public static void main(String[] args) 35. { 36. (new ListeningFrame()).setVisible(true); 37. } 38. } The implements ActionListener statement makes the ListeningFrame class eligible to be an action listener for buttons. Lines 13, 16, and 19 register this as each button's listener. Recall that this is a reference to an object that owns the code being executed. In other words, it's the instance of ListeningFrame that is being constructed. The doOkStuff(), doCancelStuff(), and doApplyStuff() methods are omitted.
Here is another example that uses the same design structure. The program plays a version of the game Nim. This game is played by placing 10 coins in a pile. Each player in turn takes one, two, or three coins. The player who takes the last coin is the winner. The GUI consists of four buttons: Take 1, Take 2, Take 3, and Quit. As each player takes a coin, the code prints out the number of remaining coins. Figure 16.9 shows the GUI.

Figure 16.9: Simple Nim GUI
Here's the code:
import java.awt.*; import java.awt.event.*; public class SimpleNim extends Frame implements ActionListener { private Button btn1, btn2, btn3, quitBtn; private int nCoins; SimpleNim() { nCoins = 10; setLayout(new FlowLayout()); btn1 = new Button("Take 1"); btn1.addActionListener(this); add(btn1); btn2 = new Button("Take 2"); btn2.addActionListener(this); add(btn2); btn3 = new Button("Take 3"); btn3.addActionListener(this); add(btn3); quitBtn = new Button("Quit"); quitBtn.addActionListener(this); add(quitBtn); setSize(300, 200); } public void actionPerformed(ActionEvent e) { if (e.getSource() == quitBtn) System.exit(0); if (e.getSource() == btn1) nCoins -= 1; else if (e.getSource() == btn2) nCoins -= 2; else if (e.getSource() == btn3) nCoins -= 3; System.out.println(nCoins + " left."); } public static void main(String[] args) { (new SimpleNim()).setVisible(true); } } The actionPerformed() method first determines if the event source was the Quit button. If so, System.exit() is called to terminate the program. In event-driven programming, calling System.exit() in response to user input is the appropriate way to end a program. If the event came from one of the Take buttons, the coin count nCoins is decremented and the remaining value is printed out.
This application works as an example of how to process events, but it is certainly no improvement over a pile of coins. (Unless you don't have 10 coins. But if you don't have 10 coins, you probably can't afford a computer.) The situation points out an important principle of GUI design, which is violated all to often on the World Wide Web: Only create a GUI if it makes life better.
In the next section, you will see the last example improved on in several ways. You might not think the final version is better than a pile of coins, but you will certainly find it an improvement over the original version. And, more importantly, you will learn some important techniques for creating useful GUIs.
Improving the GUI
In this section, the SimpleNim application will be improved in three stages. To keep life simple, the Nim Lab program on your CD-ROM gives you easy access to all four versions (the original and the three improvements). To run Nim Lab, type java events.NimLab. You will see the display shown in Figure 16.10.
![]()
Figure 16.10: Nim Lab
Each improvement will illustrate a general principle of GUI design. The first principle is that the results of user input activity should appear near where the activity happened. In this way, cause and effect are visually related. (The cause is the input, and the effect is the resulting change to the screen.) In the SimpleNim version, you clicked buttons in the GUI, but your output appeared at the console from which you ran the program. This is inconvenient, because you have to keep moving your eyes back and forth.
It would be better if the output could happen in the GUI. For this, you will use a text area. The TextArea class has a method called append() that appends text the component's contents, so let's modify the actionPerformed() method so that it calls append() rather than System.out.println().
Figure 16.11 shows the GUI after a game has been played.
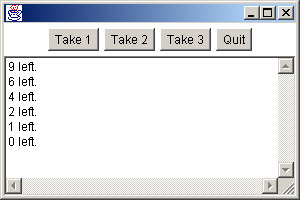
Figure 16.11: Nim, with output to a text area
Here is the code:
import java.awt.*; import java.awt.event.*; public class TextAreaNim extends Frame implements ActionListener { private Button btn1, btn2, btn3, quitBtn; private TextArea ta; private int nCoins; TextAreaNim() { nCoins = 10; Panel controls = new Panel(); btn1 = new Button("Take 1"); btn1.addActionListener(this); controls.add(btn1); btn2 = new Button("Take 2"); btn2.addActionListener(this); controls.add(btn2); btn3 = new Button("Take 3"); btn3.addActionListener(this); controls.add(btn3); quitBtn = new Button("Quit"); quitBtn.addActionListener(this); controls.add(quitBtn); add(controls, "North"); ta = new TextArea(40, 20); add(ta, "Center"); setSize(300, 200); } public void actionPerformed(ActionEvent e) { if (e.getSource() == quitBtn) System.exit(0); if (e.getSource() == btn1) nCoins -= 1; else if (e.getSource() == btn2) nCoins -= 2; else if (e.getSource() == btn3) nCoins -= 3; ta.append(nCoins + " left.\n"); } public static void main(String[] args) { (new TextAreaNim()).setVisible(true); } } The frame uses a border layout manager. There is a panel (controls) at North containing the buttons. The text area is at Center. Thus, when you make the frame bigger (try it!), most of the new space goes to the text area.
The original line
System.out.println(nCoins + " left.");
has been replaced by
ta.append(nCoins + " left.\n");
Notice the newline character (\n) in the new version. When you call System.out.println(), a newline is printed automatically. This does not happen when you call append() on a text area, so you have to provide your own newline.
This version is definitely an improvement. You no longer have to look up to do input and look down to read output. But the output is pure text.
The next principle of GUI design that we will apply is this: Show me, don't tell me. Our next improvement will be to draw coins on the screen, rather than displaying text that merely tells you about coins. This is not a book on graphic design, so the coins will just be filled circles. But the code will show what you could do if you were working with a graphics designer who provided you with code for painting exquisitely detailed coins.
Figure 16.12 shows the initial state of the new version.
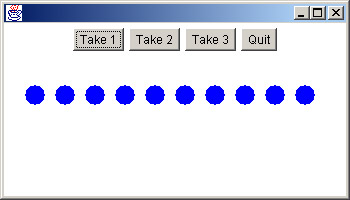
Figure 16.12: Nim with graphical output
Figure 16.13 shows the GUI after a few coins have been taken.
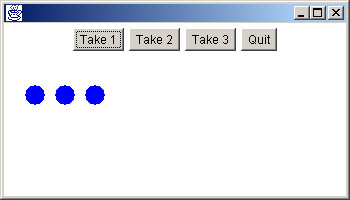
Figure 16.13: Nim with graphical output, game in progress
Figures 16.12 and 16.13 dramatically show that pictures are better than words. Here's the code:
import java.awt.*; import java.awt.event.*; public class GraphicOutputNim extends Frame implements ActionListener { private Button btn1, btn2, btn3, quitBtn; private int nCoins; GraphicOutputNim() { nCoins = 10; Panel controls = new Panel(); btn1 = new Button("Take 1"); btn1.addActionListener(this); controls.add(btn1); btn2 = new Button("Take 2"); btn2.addActionListener(this); controls.add(btn2); btn3 = new Button("Take 3"); btn3.addActionListener(this); controls.add(btn3); quitBtn = new Button("Quit"); quitBtn.addActionListener(this); controls.add(quitBtn); add(controls, "North"); setSize(350, 200); } public void actionPerformed(ActionEvent e) { if (e.getSource() == quitBtn) System.exit(0); if (e.getSource() == btn1) nCoins -= 1; else if (e.getSource() == btn2) nCoins -= 2; else if (e.getSource() == btn3) nCoins -= 3; repaint(); } public void paint(Graphics g) { int x = 25; int y = 85; g.setColor(Color.blue); for (int i=0; i<nCoins; i++) { g.fillOval(x, y, 20, 20); x += 30; } } public static void main(String[] args) { (new GraphicOutputNim ()).setVisible(true); } } The text area is gone. The line at the end of actionPerformed(), which originally called System.out.println() and then called the text area's append() method, is now the following:
repaint();
The repaint() method causes two things to happen:
-
The frame's interior is cleared to its background color. (Components contained in the frame are not affected.)
-
A call is made to the frame's paint() method.
Whenever you want a display to be refreshed in response to GUI input, calling repaint() is the best approach. It would be beyond the scope of this book to explain why. Here is an oversimplified explanation: When you call repaint(), eventually your paint() method will be called, at an appropriate time, with an appropriate Graphics argument. You never need to call paint() directly. You are always better off calling repaint() and letting the environment call paint().
The paint() method uses a loop to draw the appropriate number of blue-filled circles, based on the value of nCoins. The variable x determines the horizontal position of each circle's bounding box. It is increased by 30 each time a circle is drawn. To see the program in action, run Nim Lab and select Graphical Output....
Now let's make one last improvement to enforce what is perhaps the most important GUI principle of all. If you pay attention to the other principles, you might create a great GUI. But if you ignore the most important principle, you will certainly create a poor GUI.
Here's the most important principle: A GUI should never let a user perform illegal input.
The latest Nim version violates this rule. To see this, run Nim Lab and select Graphical Output.... Click the Take 3 button three times. Now there is only one coin left, but the GUI will let you take two or three coins. This should not be allowed. You also should not be allowed to take three coins if there are two coins left.
There are two ways to make illegal input impossible. At the appropriate time, the buttons can be either removed or disabled. Removing the buttons may sound like a good idea (after all, you can't push a button that isn't there), but extensive research has shown that users are uncomfortable with GUIs whose components pop in and out of existence. This approach creates too much movement in the peripheral field of vision. The commonly accepted technique is to disable components that should not be used. The components are still visible, but they are unresponsive. A disabled component has a slightly different appearance. It is somewhat grayer than its enabled counterpart. Figure 16.14 shows two buttons. The first is enabled, the second is disabled.

Figure 16.14: Enabled and disabled buttons
In the previous version of the Nim GUI, the Take buttons are enabled only if there are enough coins left. Figure 16.15 shows the program when one coin remains.
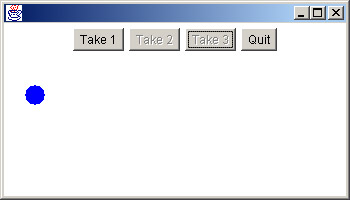
Figure 16.15: Nim with disabled buttons
Notice that the Take 2 and Take 3 buttons are disabled. To enable or disable any component, call its setEnabled() method. The method takes a boolean argument: true to enable, false to disable. Here's the code:
import java.awt.*; import java.awt.event.*; public class DisablingNim extends Frame implements ActionListener { private Button btn1, btn2, btn3, quitBtn; private int nCoins; DisablingNim() { nCoins = 10; Panel controls = new Panel(); btn1 = new Button("Take 1"); btn1.addActionListener(this); controls.add(btn1); btn2 = new Button("Take 2"); btn2.addActionListener(this); controls.add(btn2); btn3 = new Button("Take 3"); btn3.addActionListener(this); controls.add(btn3); quitBtn = new Button("Quit"); quitBtn.addActionListener(this); controls.add(quitBtn); add(controls, "North"); setSize(350, 200); } public void actionPerformed(ActionEvent e) { if (e.getSource() == quitBtn) System.exit(0); if (e.getSource() == btn1) nCoins -= 1; else if (e.getSource() == btn2) nCoins -= 2; else if (e.getSource() == btn3) nCoins -= 3; if (nCoins < 3) btn3.setEnabled(false); if (nCoins < 2) btn2.setEnabled(false); if (nCoins < 1) btn1.setEnabled(false); repaint(); } public void paint(Graphics g) { int x = 25; int y = 85; g.setColor(Color.blue); for (int i=0; i<nCoins; i++) { g.fillOval(x, y, 20, 20); x += 30; } } public static void main(String[] args) { (new DisablingNim()).setVisible(true); } } The new code appears at the end of actionPerformed():
if (nCoins < 3) btn3.setEnabled(false); if (nCoins < 2) btn2.setEnabled(false); if (nCoins < 1) btn1.setEnabled(false);
Further improvements to the GUI are possible. (See Exercise 5 at the end of this chapter.)
But enough about Nim. At this point, you know how to respond to GUI input from buttons. It will be easy to move on to responding to other component types.
|
- Chapter III Two Models of Online Patronage: Why Do Consumers Shop on the Internet?
- Chapter X Converting Browsers to Buyers: Key Considerations in Designing Business-to-Consumer Web Sites
- Chapter XIV Product Catalog and Shopping Cart Effective Design
- Chapter XVII Internet Markets and E-Loyalty
- Chapter XVIII Web Systems Design, Litigation, and Online Consumer Behavior