| JSTL makes available tags that allow you to construct URLs, import data from external sources, and redirect users to new Web pages. The <c:url> and <c:param> tags enable you to construct URLs. Using the <c:import> tag, your program can access data from external sources, and using <c:redirect>, you can redirect your user to new Web pages. Let's examine all four of these tags, beginning with the <c:import> tag. Using the <c:import> Tag The <c:import> tag lets you import the contents of another Web page into your page. This data can be displayed directly to your page or it can be copied to a variable. There are two forms of the <c:import> tag: Syntax 1: Resource content inlined or exported as a String object <c:import url="url" [context="context"] [var="varName"] [scope="{page|request|session|application}"] [charEncoding="charEncoding"]> optional body content for <c:param> subtags </c:import> Syntax 2: Resource content exported as a Reader object <c:import url="url" [context="context"] varReader="varReaderName" [charEncoding="charEncoding"]> body content where varReader is consumed by another action </c:import> The <c:import> tag accepts these attributes: | charEncoding | N | Allows you to specify the character encoding (for example, UTF16). | | context | N | Specifies the base URL that will be used to resolve a relative URL given by the url attribute. | | scope | N | Specifies the scope for the scoped variable referenced by the var attribute. The default is page. | | url | Y | Specifies the URL from which the import is to take place. | | var | N | Specifies a variable that will receive the output from the specified URL. | In the first syntax, the content of the Internet resource is written to the page unless a var attribute has been specified. In that case, the content of the Internet resource is written to the scoped variable specified by the var attribute. The second syntax stores the content of the Internet object as a java.io.Reader object. This Reader object does have an important restriction: It cannot be accessed beyond the closing <c:/import> tag. It is also important to remember that if you're using syntax 2, you cannot nest <c:param> tags. This is because these tags are not able to change the URL that has been requested. To address this problem, you should construct a URL using the <c:url> tag and use that URL as input to the <c:import> tag. To use the <c:import> tag to simply output to the browser, type the following command: <c:import url="http://www.yahoo.com"/> To copy the contents of a Web site to a variable, use this: <c:import url="http://www.yahoo.com" var="contents"/> This code copies the contents of http://www.yahoo.com/ into a variable named contents. It is also important to understand how character encoding and relative URLs are handled by the <c:import> tag. In the next two sections, we describe character encoding and relative URLs in greater detail. Character Encoding If no charEncoding attribute is specified, the following rules apply: -
If the response has content information (for example, URLConnection.getContentEncoding() has a non-null value), then the specified character encoding is used. -
Otherwise, ISO-8859-1 the default content type of a JSP page is used. NOTE The charEncoding attribute should normally be required only when you're accessing non-HTTP resources because HTTP resources generally specify their correct encoding.
WARNING Not all character encodings are supported by JSTL. One very common encoding that is not supported is GZIP. GZIP allows Web pages to compress their HTML files by applying the GZIP compression algorithm. If you attempt to access a Web page that uses GZIP encoding, an invalid encoding exception will be thrown. Short of implementing your own <c:import> tag, there is no workaround. This problem may not exist in all implementations or versions of JSTL.
Handling Relative and Absolute URLs Let's see how the <c:import> tag handles relative and absolute URLs. We'll start with a relative URL from the same context. Relative URL Same Context In this section, we'll show you what is meant by a relative URL that has the same context as the page using the URL. Consider two Internet resources that belong to the same Web application. When a relative URL occurs within the same context as the page using it, that URL is processed in the same way as the <jsp:include> include tag of the JSP specification. According to the JSP specification, there are two types of relative URL. Relative URLs can either be context-relative paths or page-relative paths. A context-relative path is a path that begins with a /. A URL such as this is to be interpreted as relative to the application to which the JSP page belongs. A page-relative path is a path that does not start with a / and that is interpreted as relative to the current JSP page, as defined by the rules of inclusion of the <jsp:include> action in the JSP specification. Keep in mind that the context for a relative URL is the Web Archive (WAR) file. If multiple Web applications are run from the same server, they will not share application- or session-scoped variables, even if they can be referenced using the same base as a relative URL. Relative URL Foreign Context If the resource being imported belongs to a different Web application, then its context is considered foreign. In this case, you have to specify the context name via the context attribute. The relative URL must be context-relative and start with a / since the including page does not belong to the same context. Likewise, the context name must also start with a /. Absolute URLs Absolute URLs are those stored in the java.net.URL and java.net.URLConnection classes. Because JSP 1.2 (upon which JSTL is built) requires a J2SE platform at a minimum, the <c:import> action supports at a minimum the protocols offered in that platform for absolute URLs. More protocols can still be available to a Web application, but this will depend on the class libraries made available to the Webapp by the platform the container runs on. An example of this is the HTTPS protocol, which is not supported by most older JDKs yet could be added. Let's look at a simple example that uses the <c:import> tag. (We'll examine a more complex example toward the end of this chapter.) Our first example asks the user to enter an HTTP address into a simple form. Once the user enters this address, the program will attempt to import the data of that Web page into the current one. The result is a page that displays the form near the top and the contents of the entered Web site at the bottom. Only the HTML of the target Web site is retrieved. As a result, many of the images won't display. Further, if the site uses external JavaScript code that is accessed from a different page, these features won't be available either. Generally, a program will not directly access HTML data from Web sites; the JSP page will access XML data that will be reprocessed and displayed, as we saw in Chapter 8, "Accessing Data with XML Tags." However, for this example we simply repeat the HTML data located at the specified URL. You can see this program running in Figure 9.1. 
As you can see in Figure 9.1, the Web page is being instructed to import and then display the contents of the Sams Publishing Web page at http://www.samspublishing.com/. The images are not displayed, and the user sees a JavaScript error message, indicating that external JavaScript code cannot be accessed. However, despite these shortcomings you can clearly see that the <c:import> tag has successfully imported the HTML of the Sams Publishing site. This program is shown in Listing 9.1. Listing 9.1 Importing Data (import.jsp)<%@ taglib uri="http://java.sun.com/jstl/core" prefix="c" %> <%@ taglib uri="http://java.sun.com/jstl/fmt" prefix="fmt" %> <html> <head> <title>Import a Page</title> </head> <body> <form method="POST"> <table border="1" cellpadding="0" cellspacing="0" style="border-collapse: collapse" bordercolor="#111111" width="62%" > <tr> <td width="100%" colspan="2" bgcolor="#0000FF"> <p align="center"> <b> <font color="#FFFFFF" size="4">Import </font> </b> </p> </td> </tr> <tr> <td width="47%">Enter a site to import:</td> <td width="53%"> <input type="text" name="url" size="20" value="http://www.samspublishing.com"/> </td> </tr> <tr> <td width="100%" colspan="2"> <p align="center"> <input type="submit" value="Submit" name="submit" /> <input type="reset" value="Reset" name="reset" /> </p> </td> </tr> </table> <p> </p> </form> <c:if test="${pageContext.request.method=='POST'}"> <hr> <c:import url="${param.url}"/> </c:if> </body> </html> Like many of the examples in this book, Listing 9.1 displays a form from a JSP page and instructs the JSP page to post to itself. A <c:if> tag near the bottom of the sample program shows where the page checks to see whether it is being posted to: <c:if test="${pageContext.request.method=='POST'}"> <hr> <c:import url="${param.url}"/> </c:if> The <c:import> tag we used here is quite simple. The only attribute we specified is the url attribute, which indicates which URL we want to use to retrieve the Internet resource. The contents of this page will be written right to the page since no var attribute was specified. Using the <c:url> Tag The <c:url> tag is used to format a URL. Using this tag, you can easily construct URLs that resolve relative paths and parameters. There are two forms of the <c:url> tag: // Syntax 1: Without body content <c:url value="value" [context="context"] [var="varName"] [scope="{page|request|session|application}"]/> // Syntax 2: With body content to specify query string parameters <c:url value="value" [context="context"] [var="varName"] [scope="{page|request|session|application}"]> <c:param> subtags </c:url> The attributes accepted by the <c:url> tag are as follows: | context | N | Specifies the base URL that will be used to resolve a relative URL given by the value attribute. | | scope | N | Specifies the scope for the scoped variable referenced by the var attribute. The default is page. | | value | Y | Specifies the URL that the import is to take place from. | | var | N | Specifies a variable that will receive the output from the specified URL. | In the first syntax, the entire URL is specified inline. For simple parameterless URLs, you would probably use the first syntax. The second syntax lets you specify <c:param> tags. These tags will be discussed in the next section. The URL will be written to the scoped variable referenced by the var attribute. The base URL that is to be processed should be stored in the value tag. The scope attribute determines what scope the scoped variable referenced by the var tag should attain. We will not look at an example of the <c:url> tag by itself. The <c:url> tag is almost always used in conjunction with the <c:param> tag. In the next section, we examine the <c:param> tag. Using the <c:param> Tag The <c:param> tag can be attached to either the <c:import> tag or the <c:url> tag to specify URL parameters. These parameters are of type http://www.jeffheaton.com/cgi-bin/test.cgi?parama=test¶mb=testing. This URL would specify two parameters, named parama and paramb, that would hold the values test and testing. There are two forms of the <c:param> tag: Syntax 1: Parameter value specified in attribute value <c:param name="name" value="value"/> Syntax 2: Parameter value specified in the body content <c:param name="name"> parameter value </c:param> The <c:param> tag accepts these attributes: | name | Y | Specifies the name of this parameter. | | value | N | Specifies the value of this parameter. | The first syntax produces a URL using the value attribute to specify the value of the tag. This works well for short values. If the value that you would like to assign is long, you should use the second version of the <c:param> tag, which uses the body of the tag to specify its value. If you are using the second syntax, you must not specify a value attribute. One important reason to use the <c:param> tag involves URL encoding. URL encoding is the process by which characters that are not allowed on a URL line are encoded properly. For example, the parameter Hello World would be encoded to Hello%20World, since the space is not a valid character for a URL. Let's now examine a sample program that use the <c:import> and <c:param> tags. This program constructs a parameterized URL based on the specified base URL and parameters. Figure 9.2 shows our program, and Listing 9.2 shows how it was constructed. Listing 9.2 Constructing URLs (url.jsp)<%@ taglib uri="http://java.sun.com/jstl/core" prefix="c" %> <%@ taglib uri="http://java.sun.com/jstl/fmt" prefix="fmt" %> <html> <head> <title>Create a URL</title> </head> <body> <form method="POST"> <table border="1" cellpadding="0" cellspacing="0" style="border-collapse: collapse" bordercolor="#111111" width="62%" > <tr> <td width="100%" colspan="2" bgcolor="#0000FF"> <p align="center"> <b> <font color="#FFFFFF" size="4">URL </font> </b> </p> </td> </tr> <tr> <td width="47%">Enter a base URL:</td> <td width="53%"> <input type="text" name="url" size="20" value="http://www.samspublishing.com"/> </td> </tr> <tr> <td width="47%">Enter a value for parameter "parm1"</td> <td width="53%"> <input type="text" name="parm1" size="20" /> </td> </tr> <tr> <td width="47%">Enter a value for parameter "parm2"</td> <td width="53%"> <input type="text" name="parm2" size="20"/> </td> </tr> <tr> <td width="47%">Enter a value for parameter "parm3"</td> <td width="53%"> <input type="text" name="parm3" size="20"/> </td> </tr> <tr> <td width="100%" colspan="2"> <p align="center"> <input type="submit" value="Submit" name="submit" /> <input type="reset" value="Reset" name="reset" /> </p> </td> </tr> </table> <p> </p> </form> <c:if test="${pageContext.request.method=='POST'}"> <hr> <c:url value="${param.url}" var="url"> <c:param name="parm1" value="${param.parm1}"/> <c:param name="parm2" value="${param.parm2}"/> <c:param name="parm3" value="${param.parm3}"/> </c:url> <br/><b>The resulting URL is:</b> <c:out value="${url}"/> </c:if> </body> </html> 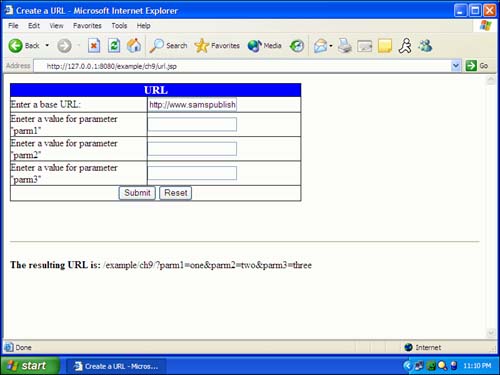
The program in Listing 9.2 works like many other examples in this book in that it displays a form and posts back to itself. After the page displays, the form checks to see whether any data was posted to it: <c:if test="${pageContext.request.method=='POST'}"> If data was posted to the page, then we read the base URL and three parameters from the form data. This data is used to construct a URL. The following code reads in the parameters and constructs the URL: <hr> <c:url value="${param.url}" var="url"> <c:param name="parm1" value="${param.parm1}"/> <c:param name="parm2" value="${param.parm2}"/> <c:param name="parm3" value="${param.parm3}"/> </c:url> As you can see, this code implements a single <c:url> tag that has three nested <c:param> tags. This allows a URL to be constructed that has three parameters. All of the data that is to be formed into the URL comes from the param collection, which contains the data that was posted from the form: <br/><b>The resulting URL is:</b> <c:out value="${url}"/> </c:if> Using the <c:redirect> Tag It is often useful to redirect the user from one Web page to another. An example of this might be a login page to a Web site. The page displays a form that asks users to enter their login information; the form posts to the same JSP page that displays it. The JSP page validates the user, and if a successful login is achieved, the user is redirected to the main page of the secure area of the Web site. The <c:redirect> tag has two forms: // Syntax 1: Without body content <c:redirect url="value" [context="context"] /> // Syntax 2: With body content to specify query string parameters <c:redirect url="value" [context="context"] /> <c:param> subtags </c:redirect> The attributes accepted by the <c:redirect> tag are as follows: | context | N | Specifies the base URL that will be used to resolve a relative URL given by the url attribute. | | url | Y | Specifies the URL that the user is taken to. | The <c:redirect> tag works much like the <c:url> tag in that it can accept parameters in the form of <c:param> tags. You append these parameters to the URL in the same way you do for the <c:url> tag. Keep in mind that once a <c:redirect> tag completes, the current page stops execution. A successful <c:redirect> will always be the last line executed for the current page because it transfers control to the redirected page. Let's look at an example that uses the <c:redirect> tag. This program presents a simple login screen (similar to our forum example from Chapter 7, "Accessing Data with SQL Tags"). This login form allows the user to enter an ID and a password. If the user is not already registered with the system, the user has the option of clicking the Register button. Clicking this button takes users to a screen that allows them to create a user account. Getting to this registration screen is accomplished with the <c:redirect> tag. Our login program is shown in Figure 9.3. 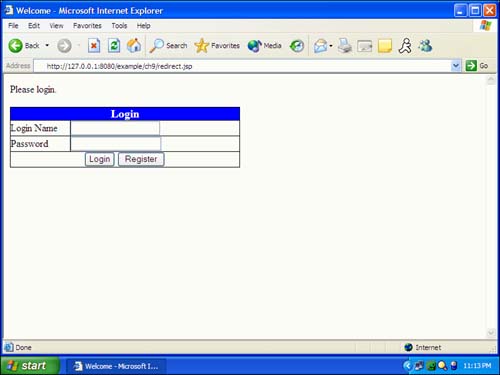
When users click the Register button, they are redirected to a file named register.html. Let's take a look at Listing 9.3 to see how this redirection fits into the logical flow of the login process. Listing 9.3 Redirecting (redirect.jsp)<%@ taglib uri="http://java.sun.com/jstl/core" prefix="c" %> <%@ taglib uri="http://java.sun.com/jstl/core-rt" prefix="c-rt" %> <%@ taglib uri="http://java.sun.com/jstl/sql" prefix="sql" %> <c:if test="${pageContext.request.method=='POST'}"> <c:if test="${param.reg!=null}"> <c:redirect url="register.html" /> </c:if> <h3 color="red">Sorry, we have no one registered with that name.</h3> </c:if> <html> <head> <title>Welcome</title> </head> <body> Please login.<br> <form method="POST"> <table border="1" cellpadding="0" cellspacing="0" style="border-collapse: collapse" bordercolor="#111111" width="49%" > <tr> <td width="100%" colspan="2" bgcolor="#0000FF"> <p align="center"> <b> <font color="#FFFFFF" size="4">Login</font> </b> </p> </td> </tr> <tr> <td width="26%">Login Name</td> <td width="74%"> <input type="text" name="uid" size="20" /> </td> </tr> <tr> <td width="26%">Password</td> <td width="74%"> <input type="password" name="pwd" size="20" /> </td> </tr> <tr> <td width="100%" colspan="2"> <p align="center"> <input type="submit" value="Login" name="Login" /> <input type="submit" value="Register" name="reg" /> </p> </td> </tr> </table> <p> </p> </form> </body> </html> The program in Listing 9.3 begins by displaying an ordinary login form. The user ID is stored in the parameter uid, and the password is stored in the parameter pwd. When the user clicks either of the input buttons, this form posts back to the same page, which is redirect.jsp. Once this page posts back to itself, the program executes the following JSTL code: <c:if test="${pageContext.request.method=='POST'}"> Once the program has determined that data has been posted to the page, the following code is executed: <c:if test="${param.reg!=null}"> First, we must determine whether the user clicked the Register button. If a button is clicked, a parameter is registered that has the same name as the button. So, to determine whether the user clicked the Register button, we simply check to see whether the param.reg variable is equal to null. If this value is not null, then we know that the Register button was clicked: <c:redirect url="register.html" /> Now that we have determined that the user clicked the Register button, we can redirect the user to a page that can handle the registration. Our <c:redirect> tag transfers the user to the register.html page. This is the page that the user is viewing. The browser also reflects this in the URL line by indicating that the user is now viewing the register.html page: </c:if> It is important to note that the <c:redirect> tag causes execution of the current JSP page to stop immediately. Any statements that follow the <c:redirect> tag will never be executed. This includes the following lines of JSTL code: <h3 color="red">Sorry, we have no one registered with that name.</h3> </c:if> This code displays a message that the user ID is invalid. Since this example serves only to show how the redirect works, we did not implement the actual login logic, as we did in Chapter 7. This program simply shows how to redirect to a new page depending on which button the user clicks. The preceding sections have shown you how to use the URL-related tags of JSTL. We have seen some examples that carry out basic URL- and Internet-related functions. Now, let's look at an example that shows how to access real, publicly available data that is stored on the Internet. To do this, we must discuss the sources of information available for access by the URL-related tags. | 