Images


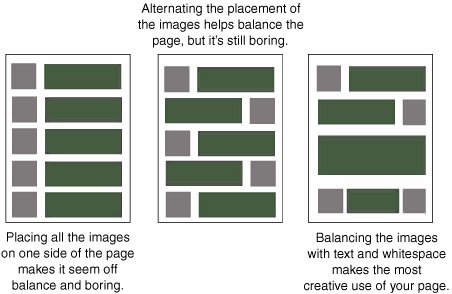
Like the other design elements discussed in this lesson, you should use images sparingly when they support the theme you've already established. In Lesson 8, you learned how to add images to your Web pages and use HTML and style sheet properties to align them with your text. Figure 13.3 shows the difference that balance and diversity make to your overall Web page layout.

Figure 13.3. Adding diversity to your graphical layout helps add interest.


Caution

Whenever you are working with graphics on a Web page, you need to be mindful of the overall size of the page. Most people will visit your Web site using a slow modem connection and might not be willing to wait for your page to finish loading. When you open your page using a modem, it should take no longer than five seconds to load. If your pages take much longer to load, you might try to reduce the image size, add thumbnails, or include some type of warning as to the fact that the page will take longer to load.


Background Images

Earlier, you learned how to add background color to your pages, but sometimes you'll want to add an image to the background of your page. The most prolific example of a background image is the page border (see Figure 13.4).

Figure 13.4. Use the background-image and margin style sheet properties to create a colored border on your Web page.


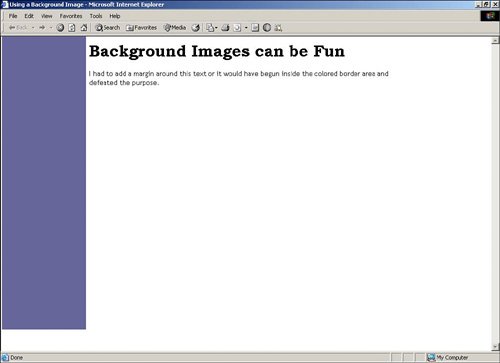
Here's how the source code looks for that page:

<!DOCTYPE html      PUBLIC "-//W3C//DTD XHTML 1.0 Transitional//EN"      "http://www.w3.org/TR/xhtml1/DTD/xhtml1- transitional.dtd"> <html xmlns="http://www.w3.org/1999/xhtml"        xml:lang="en" lang="en"> <head> <title>Using a Background Image</title> <style type="text/css"> body {font-family:Trebuchet MS, Arial;        color:black;        font-size:14;        background-image:url(images\background.gif);        background-repeat:no repeat);        background-position:left top;        margin:10px,160px} h1   {font-family:Bookman Old Style, Times New Roman;        color:#A00068;        font-size:18;        background:white} </style> </head> <body> <h1>Background Images can be Fun</h1> <p>I had to add a margin around this text or it would have    begun inside the colored border area and defeated    the purpose.</p> </body> </html>


The background.gif image is the colored border background. It is a GIF file, which makes it small (only 5KB) so that it will load quickly. I made it in Paint Shop Pro by drawing a rectangle down the side of the page, as shown in Figure 13.5.

Figure 13.5. The background.gif file was created in Paint Shop Pro.


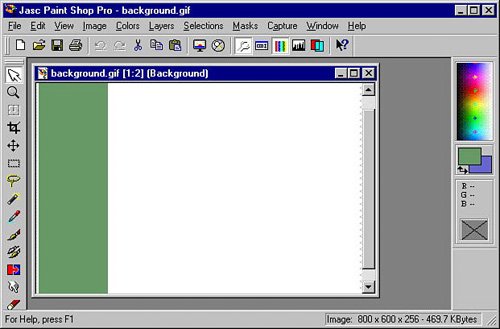
You've already seen how you can use style sheet properties to set the fonts and colors of the page, but look at the previous HTML source code for Figure 13.4 again to see that we've added four new style sheet properties for you to learn:

  • Background-image:url (URL of file) The property tells the browser where to find the background image you want to use on your page. It must be used as part of the body style.

  • Background-position This property tells the browser where to place the background image. This is assumed to be the top left (or left top), but you can specify any combination of the following vertical values: top, bottom, or center, and these horizontal values: left, right, or center.

  • Background-repeat This property determines whether or not the background image will repeat in a tiled manner to file the entire browser window or appear on the background just once.

  • Margin You can specify the margin property in inches (in), centimeters (cm), ems (em), points (pt), or pixels (px). If no unit of measure is specified, the pixel unit is assumed. You can set the top, right, bottom, and left margins. I only set two of the margins for my background (0, 160). The browser knows that I wanted top=0px, right=160px, bottom=0px, and left=160px. The browser copied the first two values and applied the same values to the last two options. If I had entered only one value, the browser would have applied the same value to all four options.

If I hadn't set the margin property, the text on my page would have overlapped my image, as shown in Figure 13.6.

Figure 13.6. Without the margin property, text starts at the left edge of the page.
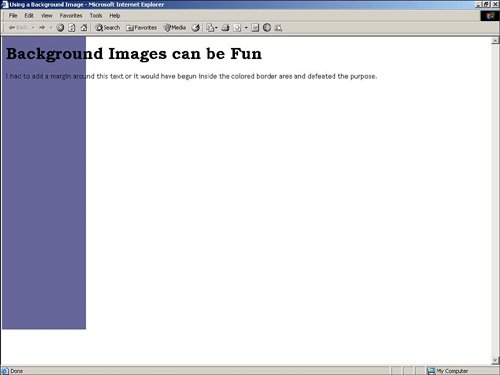

Tip

Don't forget to check out Lesson 5 if you want to know more about HTML style sheets.


In this lesson, you've learned:

  • The layout, images, navigation buttons, bullets, lines, colors, and even the fonts that you choose should support the overall design theme of your site.

  • Create interest in your Web pages by alternating the alignment of text and images, and by adding bulleted lists and tables.

  • Just because you can specify a font doesn't mean that your visitor will have that font on his or her computer. To be on the safe side, always use Arial or Times New Roman as your alternate font.


Sams Teach Yourself HTML in 10 Minutes
Sams Teach Yourself HTML in 10 Minutes (4th Edition)
ISBN: 067232878X
EAN: 2147483647
Year: 2004
Pages: 151
Authors: Deidre Hayes

flylib.com © 2008-2017.
If you may any questions please contact us: flylib@qtcs.net