The SubTractor Analog Synthesizer
| [ LiB ] |
The SubTractor analog synthesizer is modeled after the classic analog synthesizers that made their boom in the late 70s and early to mid-80s. Earlier in this chapter, you loaded the SubTractor into the rack. Now you will start your tour of the devices with this classic-sounding synthesizer.
If all went well during the setup, you should now be able to hear the SubTractor synthesizer by playing your master MIDI keyboard. If not, check your connections and settings by reviewing "Configuring MIDI" in Chapter 1.
To get better acquainted with the SubTractor, you can load a simple bass guitar patch and see how adjusting some of the parameters affects the sound.
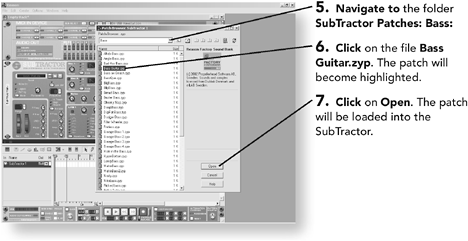
Loading the Example Patch
First you will need to load the patch into the SubTractor.
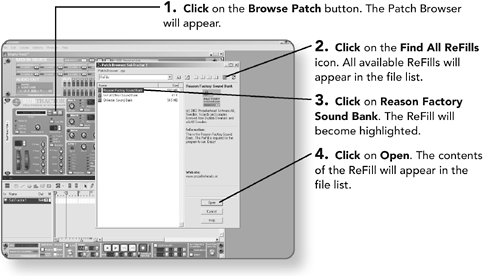
NOTE
After the first time you load a patch for any device from the original installation CDs, you can access a pop-up menu displaying all available patches in the last folder loaded by clicking on the patch name window.
After the patch is loaded, play a few notes from your MIDI controller to familiarize yourself with the sound of the patch before you start experimenting with the parameters.
The Oscillators
All sounds created in SubTractor are generated from the oscillator section. Think of an oscillator as an engine that is used to produce waveforms. These waveforms produce the actual sounds that you hear. SubTractor comes with two individual oscillators: OSC 1 and OSC 2. By adjusting the frequencies of these oscillators, you can change the pitch of the sounds they create.
Tuning the Patch
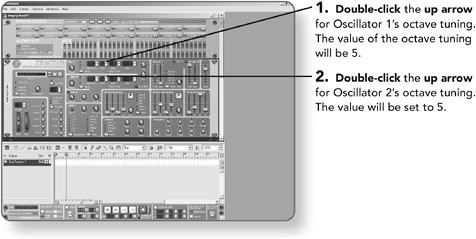
Now when you play a note from your MIDI controller, the pitch of the bass guitar will be two octaves higher than before.
Doubling
In addition to tuning each oscillator to its own pitch, you can also create a doubling in the bass sound in which each oscillator plays the same note but on a different octave.
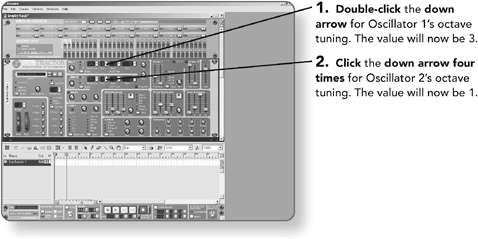
Now play a key on your MIDI controller. The SubTractor will produce two bass tones, two octaves apart. Doubling is a great technique for fattening the sound of the SubTractor.
NOTE
Each oscillator on the SubTractor can also be tuned in semi steps as well as cents. The Semi tuning parameter will tune either up or down in semi-tones (one note). Cents are generally used for very fine amounts of tuning.
Mixing the Two Octave Tones
Now that you have created two separate tones by tuning each oscillator to a different octave, you can control the balance of the two.

Playing the Same Pitch from Any Key Keyboard Tracking
The SubTractor will automatically readjust the tuning to match the note you're playing from your MIDI controllerthat is, if you play a C note, the SubTractor will retune the oscillators to produce a C; this is referred to as Keyboard Tracking. However, if you wish to play the same note regardless of the key you play, you need to disable Keyboard Tracking.
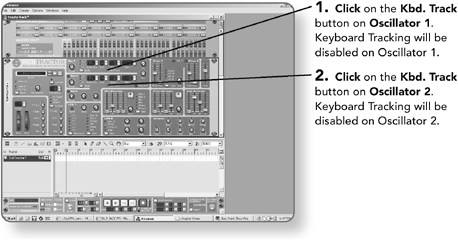
Now play several different notes from your MIDI controller. No matter which note you play, the same tone will be produced by the oscillators.
NOTE
In most cases you will want to leave Keyboard Tracking turned on; however, a good experiment to try is to have keyboard tracking enabled on only one of the oscillators, which will create a thicker detuning sound. It's also helpful to adjust the Mix knob to create a good blend between the two tones.
Playing Parameters
The SubTractor has several parameters that control the playing style of the instrument. Here is a look at some of these.
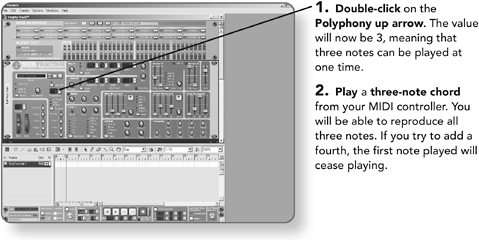
Single Notes or ChordsPolyphony
The bass patch that you loaded into the SubTractor will allow you to play only a single note at one time. (The number of notes playable at one time is known as the instrument's polyphony.) Typically, bass players play one note at a time, so single-note polyphony (known as monophony) is usually not a problem with a bass patch; however, perhaps you would like to play some chords with your bass.
NOTE
Since you are using a bass patch as an example, low polyphony settings will be sufficient. However, if you are using the SubTractor to play a pad or string sound, you may want to set the polyphony value to a higher number in order to be able to play more notes simultaneously .
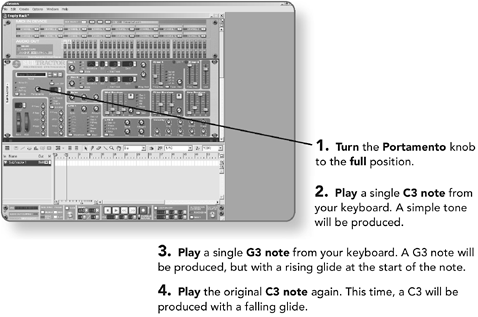
Portamento
Portamento applies a small pitch glide when you move from one note to another on your MIDI keyboard. The direction of the pitch glide depends on whether you move up or down to the next note.
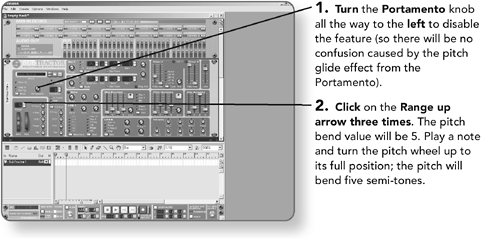
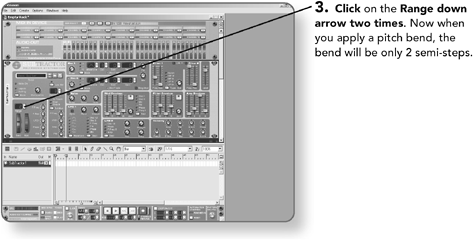
Pitch WheelAdjusting the Amount of Pitch
The pitch wheel is designed to raise or lower the pitch of the note being played . Most MIDI controllers are equipped with a pitch wheel that allows you to control SubTractor's pitch wheel ( please check your MIDI controller's documentation to verify that your controller supports a pitch wheel).
Noise
Noise is just thatnoise. If you have ever fallen asleep late at night with the TV on and awakened a few hours later to find only white snow on the screen along with some kind of awful noise, then you know the noise I am referring to. This is called "white noise," and it can create quite an interesting effect when added to your sounds in SubTractor.
Adding the Noise
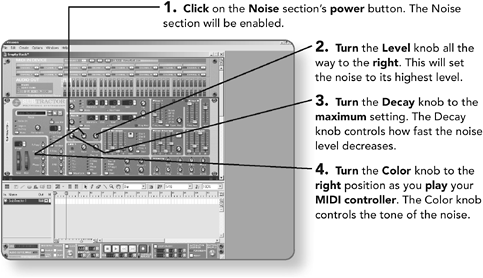
Play a note on your MIDI controller, and you will hear noise mixed with your bass guitar.
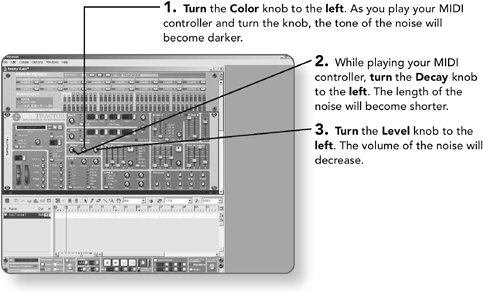
Noise: Tone, Decay, and Volume
Using these knobs , you can control the level and tone of the noise as well as how long it lasts after you initially strike the key.
NOTE
Short decay time can be effective when using the noise to add punch to the attack of the SubTractor's tone.
ModulationLFO
LFO stands for Low Frequency Oscillator, which is yet another engine that creates waveforms; however, unlike OSC 1 and OSC 2, these waveforms are of a lower frequency and are used to modulate (change the character of) Oscillators 1 and 2 by merging the low-frequency waveform with the waveforms they create.
Adding Vibrato
LFOs are often used to add vibrato to the sound.
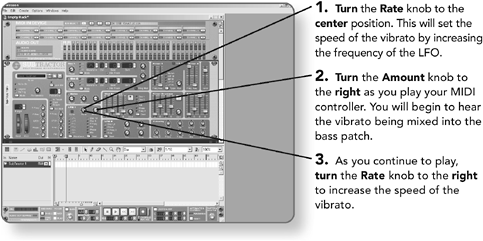
You can add vibrato to the tones from both of the oscillators or the tone from just Oscillator 2.
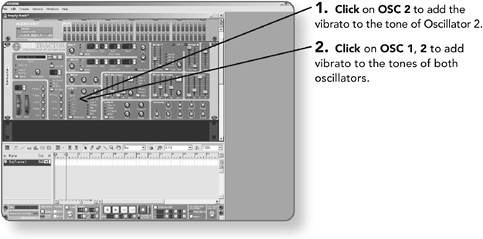
NOTE
Clicking on the Waveform button will scroll through the different waveform shapes for the vibrato. For more information on the effects of the different waveforms, consult Reason's documentation.
Adding a Second Vibrato
By using the LFO 2 section you can add a second vibrato to create something really interesting.

Sync'ing the Vibrato to the Song's Tempo
Using the Rate knob you can control the speed of the vibratos; however, you can have more control by sync'ing the speed to the tempo of the song.

NOTE
The outputs of the LFO section can be routed to other areas of the SubTractor, such as the filters. Use the Dest. button to indicate where in SubTractor you want the LFO's output to go.
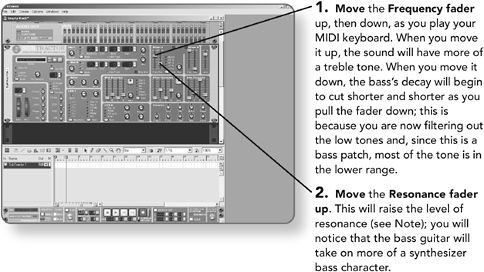
Filtering
The SubTractor is equipped with two filters that provide basic tonal control over the instrument. The filters allow you to cut or boost certain frequencies in the sound. Before you continue, I recommend resetting the LFO parameters (see "Resetting Device Parameters," earlier in this chapter).
NOTE
The Resonance control enhances the frequencies around the "cut off" point of the filter, creating a thinner sound.
NOTE
The SubTractor has two filters, allowing you to filter or enhance more than one frequency. The two filters can be linked by clicking on the Link button. When the filters are linked, any changes made to Filter 1's frequency setting will also affect Filter 2's frequency setting in relation to Filter 1. (Even though the filters can be linked, moving one fader will not physically move the fader of the other filter.)
Working with Envelopes
Envelopes allow you to alter the volume of a patch over time, create a fade in, or even change the length of the note. In addition to controlling volume levels, Envelopes can be used to control various parameters such as the SubTractor's tuning. (Before moving on to the Envelope exercises, the filters should be reset.)
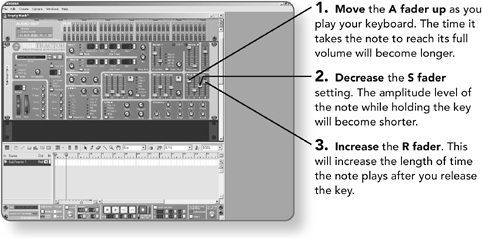
Envelopes Fader LabelsWhat Do They Mean?
Here's what the Envelope faders ' labels mean:
-
A: Attack controls how fast the Envelope opens. A larger value produces slower opening times.
-
D: Decay controls how fast the attack's peak amplitude level falls to the sustain level.
-
S: Sustain controls amplitude level the note will play while holding the key. If this value is lower than the decay value, then the decay value will determine the note's length.
-
R: Release controls how long you can hear the note after the key is released.
Fade In and Note LengthAmp Envelope
This Envelope is used to control the overall volume of the SubTractor device.
Rising and Falling PitchMod Envelope
With the Modulation Envelope you can change the tuning of the device over time. To demonstrate this, you are going to make the pitch of the bass slowly rise and fall. (Reset the Amp Envelope settings before continuing.)
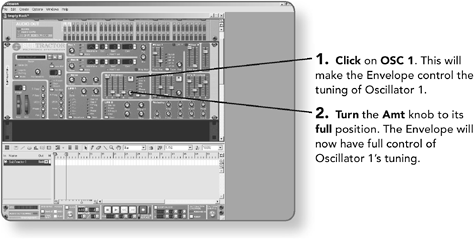
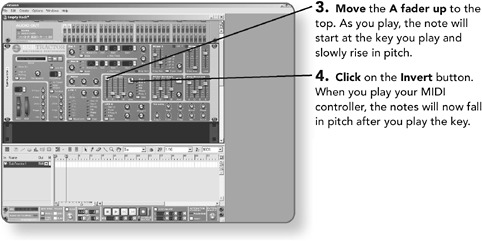
NOTE
In the previous exercise you used the Modulation section to change the pitch of the SubTractor. The modulator can also be used to create other interesting effects; experimentation is always encouraged.
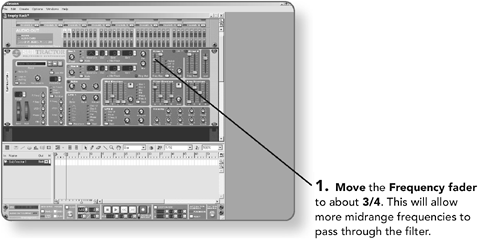
Sweeping Synthesizer BassFilter Envelope
The Filter Envelope allows you to control the filter's setting over time. As an example, you will turn the bass guitar into a sweeping synthesizer bass.
First you need to set the filter's settings so that the bass sounds more like a synthesizer bass. (Before continuing, please reset the Modulation Envelope Amt. knob.)
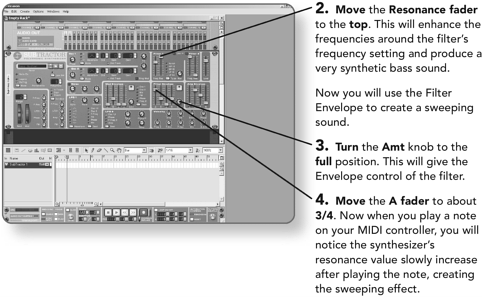
NOTE
When increasing the Filter Envelope's amount, you are increasing the level of the filter and could easily overdo the volume of the SubTractor. Please be careful when increasing the filter amount.
| [ LiB ] |
- Structures, Processes and Relational Mechanisms for IT Governance
- An Emerging Strategy for E-Business IT Governance
- Assessing Business-IT Alignment Maturity
- Linking the IT Balanced Scorecard to the Business Objectives at a Major Canadian Financial Group
- Technical Issues Related to IT Governance Tactics: Product Metrics, Measurements and Process Control