Binding Data to the User Interface The process of data binding involves the creation of a link between the data model and the user interface. You need to understand several types of data binding, including the following: Simple Data Binding Simple data binding involves connecting a single value from the data model to a single property of a control. By default, a new control is unbound . To bind a control, you can add a new Binding object to its ControlDataBindings collection, which is accessed through its DataBinding property. Using the Add method for the Binding class requires the following items: Simple data binding in .NET offers many more choices than previous implementations of data binding. In the next section, we'll look at some of the data sources you can use with simple data binding. Bindable Entities and Properties The Binding class can accept many data sources, including the following: -
An instance of a class that implements the IBindingList or ITypedList interface, including DataSet , DataTable , DataView , and DataViewManager -
A class that implements the IList interface on an indexed collection of objects, such as classes that inherit from System.Array -
An IList of strongly typed objects, such as an array of Customer objects You can perform a simple data binding operation by completing the following steps: -
Launch Visual Studio .NET and add a new Visual Basic .NET Windows application project, including a form. -
Add a TextBox control named txtVendorName to your form. -
Add a new class named Vendor.vb and provide the following code for the class: Public Class Vendor Private mstrVendorName As String Public Property VendorName() As String Get VendorName = mstrVendorName End Get Set(ByVal Value As String) mstrVendorName = Value End Set End Property Sub New(ByVal VendorName As String) mstrVendorName = VendorName End Sub End Class -
Add the following code to the form's code module: Private Sub Form1_Load(ByVal sender As System.Object, _ ByVal e As System.EventArgs) Handles MyBase.Load Dim aVendors(3) As Vendor aVendors(0) = New Vendor("Microsoft") aVendors(1) = New Vendor("Rational") aVendors(2) = New Vendor("Premia") txtVendorName.DataBindings.Add("Text", aVendors, "VendorName") End Sub -
Set the form as the startup object for the project and then run the project. The TextBox control is now bound to the array, displaying its first value. It is possible to bind data to any control that has a DataBindings property, which includes all controls derived from the System.Windows.Forms.Control class. Data Binding Architecture When a control is bound to a data source, the .NET Framework creates a pair of objects to manage this link: -
BindingContext object This object keeps track of the CurrencyManager objects on a form, allowing navigation through the elements within the data source. Container controls (such as GroupBox, Panel, and TabControl) can have their own BindingContext object, thus allowing separate views of the same data on a form. -
CurrencyManager object This object keeps track of which element from a data source is currently bound to a control. All controls on a form that are bound to the same data source can share the same CurrencyManager object. The BindingContext class provides a means to retrieve the CurrencyManager objects on a form. Table 5.1 details some of the more important members of this class. Table 5.1. Selected Members of the BindingContext Class | Member | Type | Description | | Contains | Method | Indicates whether the BindingContext object contains a specific BindingManagerBase object | | Item | Property | Returns a BindingManagerBase object | You can use a BindingManagerBase object (obtained from the Item property of a BindingContext object) to manipulate the current value of an individual property rather than the property of the current object in a list. Table 5.2 details some of the more important members of the BindingManagerBase class. Table 5.2. Selected Members of the BindingManagerBase Class | Member | Type | Description | | AddNew | Method | Adds a new object to the underlying list | | Bindings | Property | The collection of bindings being managed by this class | | CancelCurrentEdit | Method | Cancels any edit in progress | | Count | Property | The number of rows managed by the class | | Current | Property | Gets the current object | | CurrentChanged | Event | Fires when the bound value changes | | EndCurrentEdit | Method | Commits any edit in progress | | GetItemProperties | Method | A list of item properties for the current object in the list | | Position | Property | Gets or sets the position in the underlying list that is bound with this class | | PositionChanged | Event | Fires when the Position property changes | | RemoveAt | Method | Removes the object at the specified position from the underlying list | | ResumeBinding | Method | Resumes data binding | | SuspendBinding | Method | Suspends data binding | On Windows forms, you'll actually work with a CurrencyManager object instead of a BindingManagerBase object. The CurrencyManager class extends the BindingManagerBase class to include some additional members. Table 5.3 details the additional members added in the CurrencyMember class. Table 5.3. Additional members of the CurrencyManager Class | Member | Type | Description | | ItemChanged | Event | Occurs when the current item has been altered | | List | Property | Gets the IList interface from the data source | | Refresh | Method | Repopulates the bound controls |  | Remember that the ItemChanged event fires when the data itself is changed by some external action, the CurrentChanged event fires when the data is changed within the user interface, and the PositionChanged event fires when the Position property is changed (which also fires the CurrentChanged event). |
Complex Data Binding Complex data binding involves binding a control to an entire collection of data rather than to a single data item. Figure 5.1 shows an example of a complex binding between a DataGrid control and the Suppliers table within the Northwind database. Figure 5.1. A DataGrid control displaying the Northwind database's Suppliers table.  Binding to a Control The ComboBox and ListBox controls are used to allow the user to select a value from a list of values, which may be bound to the control through complex binding. You can perform a complex data binding operation using a ListBox control by following these steps: -
Launch Visual Studio .NET and add a new Visual Basic .NET project, including a form. -
Add a ListBox control named lbExams to your form. -
Add a new class named Exam.vb and provide the following code for the class: Public Class Exam Private mstrExamNumber As String Private mstrExamName As String Public ReadOnly Property ExamNumber() As String Get ExamNumber = mstrExamNumber End Get End Property Public ReadOnly Property ExamName() As String Get ExamName = mstrExamName End Get End Property Sub New(ByVal ExamNumber As String, ByVal ExamName As String) mstrExamNumber = ExamNumber mstrExamName = ExamName End Sub End Class -
Add the following code to the form's module: Private Sub MyForm_Load(ByVal sender As System.Object, _ ByVal e As System.EventArgs) Handles MyBase.Load Dim aExams() As Exam = _ {New Exam("305", "Web Applications With VB .NET"), _ New Exam("306", "Windows Applications With VB .NET"), _ New Exam("310", "XML With VB .NET"), _ New Exam("315", "Web Applications With Visual C# .NET"), _ New Exam("316", "Windows Applications With Visual C# .NET"), _ New Exam("320", "XML With Visual C# .NET")} With lbExams .DataSource = aExams .DisplayMember = "ExamName" End With End Sub -
Set the form as the startup object for the project and then run the project. The ListBox control will display the ExamName property of all the objects in the array. It is also possible to bind multiple data sources to the same control by using the properties of the control to provide a link between the data bindings. To do this, you can modify the preceding ListBox example. Here are the steps to follow: -
Reopen your project, add a second class, named Candidate.vb , and provide the following code for the new class: Public Class Candidate Private mstrExamNumber As String Private mstrCandidateName As String Public Property ExamNumber() As String Get ExamNumber = mstrExamNumber End Get Set(ByVal Value As String) mstrExamNumber = Value End Set End Property Public Property CandidateName() As String Get CandidateName = mstrCandidateName End Get Set(ByVal Value As String) mstrCandidateName = Value End Set End Property Sub New(ByVal CandidateName As String, _ Optional ByVal ExamNumber As String = "") mstrCandidateName = CandidateName mstrExamNumber = ExamNumber End Sub End Class -
Add two Label controls, two Button controls (btnPrevious and btnNext), and two TextBox controls (txtCandidateName and txtExamNumber) to your form. Figure 5.2 shows a design for this form. Figure 5.2. A form with multiple data bindings. 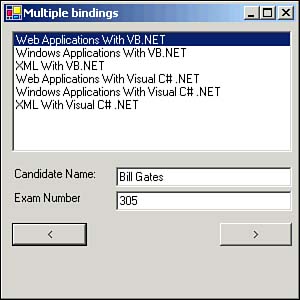 -
Modify the form's code module to this: Private maCandidates() As Candidate = _ {New Candidate("Bill Gates", "305"), _ New Candidate("Steve Ballmer", "320")} Private Sub Myform_Load(ByVal sender As System.Object, _ ByVal e As System.EventArgs) Handles MyBase.Load Dim aExams() As Exam = _ {New Exam("305", "Web Applications With VB .NET"), _ New Exam("306", "Windows Applications With VB .NET"), _ New Exam("310", "XML With VB .NET"), _ New Exam("315", "Web Applications With Visual C# .NET"), _ New Exam("316", "Windows Applications With Visual C# .NET"), _ New Exam("320", "XML With Visual C# .NET")} With lbExams .DataSource = aExams .DisplayMember = "ExamName" .ValueMember = "ExamNumber" End With txtCandidateName.DataBindings.Add( _ "Text", maCandidates, "CandidateName") txtExamNumber.DataBindings.Add( _ "Text", maCandidates, "ExamNumber") lbExams.DataBindings.Add( _ "SelectedValue", maCandidates, "ExamNumber") End Sub Private Sub btnPrevious_Click(ByVal sender As System.Object, _ ByVal e As System.EventArgs) Handles btnPrevious.Click Me.BindingContext(maCandidates).Position -= 1 End Sub Private Sub btnNext_Click(ByVal sender As System.Object, _ ByVal e As System.EventArgs) Handles btnNext.Click Me.BindingContext(maCandidates).Position += 1 End Sub -
Set the form as the startup object for the project and then run the project. The ListBox control will display the ExamName property of all objects in the array as before, but if you change the selected value within either the ListBox or txtExamNumber control, the change will be reflected in the other one as soon as the change is committed by tabbing to another control. | | You increment the Position property of BindingContext to move to the next element, and you decrement the property to move to the previous element. |
Using the DataGrid Control The DataGrid control is also used to present complex bound data. Its AutoFormat capability allows you to select from many different formats, as shown in Figure 5.3. Figure 5.3. Three DataGrid controls formatted using different AutoFormat selections.  If you want to set the formatting options of a DataGrid control more directly, many useful settings are available. Table 5.4 details some of the more useful display properties of the DataGrid control. Table 5.4. DataGrid Control Display Properties | Property | Explanation | | AlternatingBackColor | The background color to use for even-numbered rows in the grid. | | BackColor | The background color to use for odd-numbered rows in the grid. | | BackgroundColor | The color to use for any portion of the control not filled with data. | | BorderStyle | Select from None, FixedSingle, and Fixed3D for the border's style. | | CaptionBackColor | The background color for the caption portion of the control. | | CaptionFont | The font for the caption portion of the control. | | CaptionText | The display text for the caption portion of the control. | | CaptionVisible | A Boolean property that controls whether a caption will be displayed. | | ColumnHeadersVisible | A Boolean property that controls whether each column will have a header. | | FlatMode | A Boolean property that controls whether the grid will have a 3D or a flat appearance. | | Font | The font for text in the control. | | ForeColor | The foreground color for text in the control. | | GridlineColor | The color for the lines of the grid. | | GridlineStyle | Select from None and Solid. | | HeaderBackColor | The background color for the column and row headers. | | HeaderFont | The font for the column and row headers. | | HeaderForeColor | The foreground color for the column and row headers. | | LinkColor | The color to use for hyperlinks between sections of the control. | | ParentRowBackColor | The background color to use for the parent row's area. | | ParentRowsForeColor | The text color to use for the parent row's area. | | ParentRowsLabelStyle | Select from None, TableName, ColumnName, and Both. | | ParentRowsVisible | A Boolean property that controls whether the parent row's area is visible. | | PreferredColumnWidth | The default width for columns (pixels). | | PreferredRowHeight | The default height for rows (pixels). | | RowHeadersVisible | A Boolean property that controls whether each row will have a header. | | RowHeaderWidth | The default width for row headers (pixels). | | SelectionBackColor | The background color for the selected cells . | | SelectionForeColor | The text color for the selected cells. | One-way and Two-way Data Binding Data binding can be either one-way or two-way. In one-way data binding, changes to the underlying data model will be reflected in the bound property of the control, but changes to the bound property are not propagated back to the data model. In two-way data binding, changes to the bound property value of the control will be reflected in the underlying data model, as well as the other way around. This is typically accomplished through the Update method of the DataAdapter object, which will be covered in Chapter 6.  | In some cases, such as with ADO.NET classes, the data model and the actual, original source of the data are not the same. Additional code will be required to change values in the original data source to reflect changed values within the data model. |
The Data Form Wizard Visual Studio .NET includes a utility that automates much of the configuration necessary when creating data-bound formsthe Data Form Wizard. This utility can be used to create single-table forms as well as multitable forms. Multitable forms rely on key field relationships between tables in order to associate records in one table with those in another.  | A database is a collection of tables. Tables contain rows of data called records , and records are made up of elements (called fields ) that are arranged in columnar layout. Relational databases use a key column to link related data between tablesthe foreign key column in one table will relate records in that table to a record in another table that has a matching primary key value. |
|