Faxing
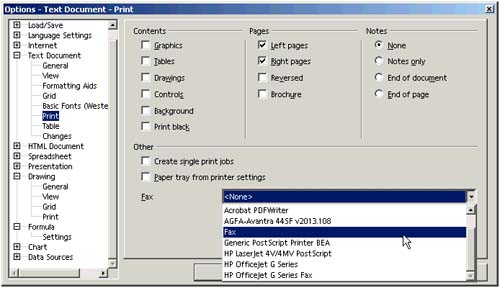
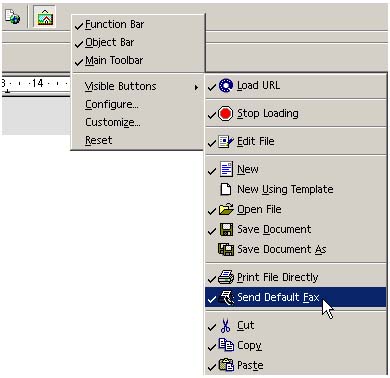
If you have a fax modem connected to your computer, you can fax your current document directly from your computer. To set up faxing in Solaris or Linux, see Setting Up Faxing Capabilities on page 63; in Windows, use the existing capabilities tools provided with your operating system or fax software (you should have a printer just titled "Fax" in your printer list). One-Click Faxing SetupYou can fax by clicking an icon on the function bar; these steps cover specifying the fax device to use, and displaying the faxing icon.
Regular Faxing From Writer or Web
Choose File > Print and select the fax driver in the
You can also click the default fax icon, shown at right, to print to the default fax you set up in One-Click Faxing Setup .
Faxing Documents Containing Data Source FieldsSee Printing on page 399, in Chapter 10, Mail Merges, Business Cards, and More . |
Font Substitution
Note These procedures are for all operating systems. UNIX users can also use the features in Setting Up Per-Printer Font Substitution on page 72. The font substitution appears to let you substitute one font for another onscreen and have it print normally; or have the substitution take place all the time (onscreen and printing). However, the way it works is that you can either substitute some of the fonts all of the time, or none of the fonts none of the time (i.e. the Screen only setting doesn't work). Setting up OpenOffice.org-Wide Font Substitution
Removing OpenOffice.org-Wide Font SubstitutionUse this procedure to delete a font replacement.
If you want to leave font substitution information intact but disabled, deselect the Apply replacement table option and click OK. |
Page Layout Setup OptionsThis section covers everything to do with what happens inside the page margins. If you're having problems getting printing to happen how you want, the answer is probably in one of the following sections. Specifying Portrait or Landscape OrientationThere are a lot of places you can set page orientation (portrait or landscape). It can get a little confusing, so we've provided Table 4-1 to show you (all in one place) where you can go to set document and printer margins.
Table 4-1. Orientation-setting
Setting Margins
You can set the margins for each printer in Printer Setup
(Figure 4-13 on page 61). However, most of the same windows that
let you set orientation let you set margins, as well (for most
applications, choose Format > Page and click the Page tab).
Those settings
Figure 4-13. Entering printer margins
The margin information for printers sets the maximum possible area for printing; margin information for documents can set margins within those bounds, but not outside. Keep track of the margin options for both, when you print. If you're using headers and footers, keep in mind that those need to be within the printer margins, as well.
Note In Draw and Impress, the margin settings occasionally go crazy and provide defaults for new documents that just aren't usable. Be sure to check margins in all documents, but in Draw and Impress in particular, if you're having problems getting the results you want. Fitting Multiple Pages Onto One SheetThe program provides brochure printing, handout printing, and page preview features. Use the following cross-references to find the information you need. Table 4-2. Printing multiple pages on one sheet
Fitting a Document Onto One PageThe program provides different ways for you to "scrunch" data that overflows one page so that it will print using only one sheet of paper. Table 4-3. Information for fitting a document onto one page
Note In Draw or Impress, you'll be prompted if a slide won't fit onto the page. See Selecting an Option in the Print Warning Window on page 94.
Printing Left or Right Pages, or in
|