Note There are many controls you can add to a form, as well as hundreds of other modifications you can make to them. We don't cover them all, either the controls or the possibilities for programming, evaluating data, etc. Use the examples provided here to get started, then use the online help, or consult a mailing list at www.openoffice.org.
Adding Data Entry Fields to a Form After you create a form with AutoPilot, you may want to add data source fields not originally included when you created the form. Here's how. -
In the form you want to modify, click the Form Design button to get into editable design mode. 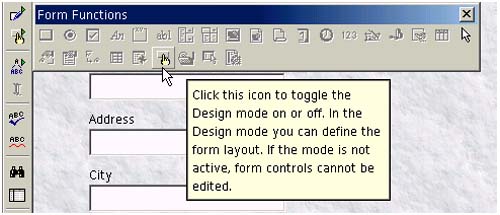 -
In the Form tearoff menu, click the Add Field icon circled in Figure 36-20. Figure 36-20. Adding a field to a form  -
The Add Field window will appear, with the current data source displayed in the window. Drag the field you want to the form. (If you're working with a new document without an assigned data source, you'll be prompted to specify one.) The program knows which type of control to create based on the type of field you're adding. -
Position and modify the control as necessary. See the text following this procedure for more information. -
When you're finished, click the Save Document icon on the function bar.After you add a field, its label may not be lined up the way you want it. To move the label, select the control, right-click it, and choose Group > Ungroup. Then select the label, which is now a separate object from the control, and move it to where you want it. The label or control may not have the background you want. For example, if the other fields in the form are 3D, the new field may not be. To change that, select the new field or its label, right-click, choose Control, and change the Border or Background Color properties. You can also change the controls used in a form. For example, you can convert a text box to a drop-down list of predefined values, letting you enter data by choosing rather than typing. See Creating a Pick List of Values, next . Adding a Button Add a push button to a form, then connect a macro to it, connect SQL to it, just open a file with it, or another task. You have a lot of options. -
Click the Button icon on the Form tearoff menu.  -
Draw the button. -
Right-click the button and choose Control. In the General tab in Figure 36-21, enter the label and other information you want for the button. Figure 36-21. Specifying display and action options for a button that opens a URL 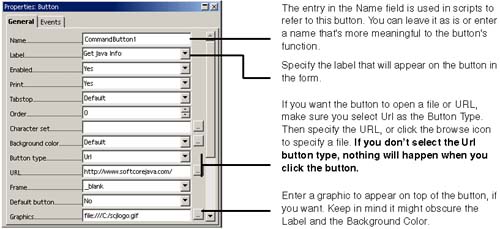 -
If you want to attach a macro to the button so that a macro runs when an event occurs, click the Events tab as well, as shown in Figure 36-22, and specify a macro. Attaching macros is covered in more detail in Macro and Events Basics on page 947. Figure 36-22. Attaching a macro to a button event 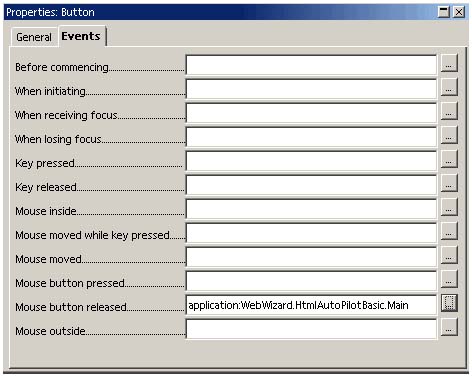 Creating a Pick List of Values One of the most useful changes you can make to a form is converting a text box control to a list box control. When you have a known set of values and data entry must remain consistent (that is, typos aren't allowed), a control that lets you select from a list rather than manually typing data is essential. This procedure shows you how to make that conversion. Note How the data gets in and out of your data sourceor doesn'tis up to you to determine, based on your data source and users' needs. See Getting in Deeper With SQL, Macros, and Events on page 927.
-
Ungroup the control from its label by selecting the control, right-clicking, and choosing Group > Ungroup. -
Right-click the text box control, choose Replace With, and choose List Box. -
Right-click the control again, and choose Control. -
In the Properties window, select the General tab, and click the List Entries field. -
In the List Entries, enter the list of items you want in the pick list, as shown in Figure 36-23. Figure 36-23. Creating a pick list of values for a field 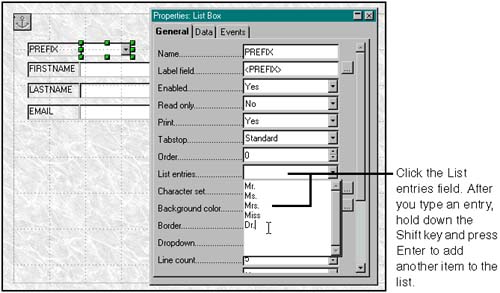 -
In the same window, select Yes in the list labeled Dropdown. -
Select the Data tab, and in the List Content field, create the same list you did in the General tab (in the List Entries field), using Shift + Enter again. -
Make sure the Type of List Contents field is set to Valuelist. -
Close the Properties window, and click the Save Document icon on the function bar. -
To test the new field, click the Edit File icon on the function bar, which gets you out of edit mode and lets you use the form. Adding a Check Box A check box was added to the form in Figure 36-4 on page 926 which wasn't in the original database. You have the option to store the data entered in that check box in the database in an available field or to store it just for use in the form. -
Click the Check Box icon on the Form tearoff menu. 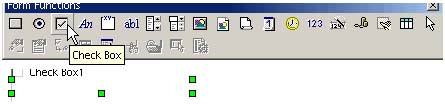 -
Draw the check box. -
Right-click the check box and select Form. Enter the appropriate values as shown in Figure 36-26. Figure 36-26. Specifying values for a group box 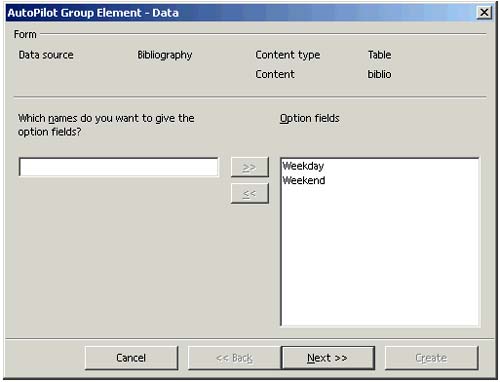 Figure 36-24. Specifying form values for a check box 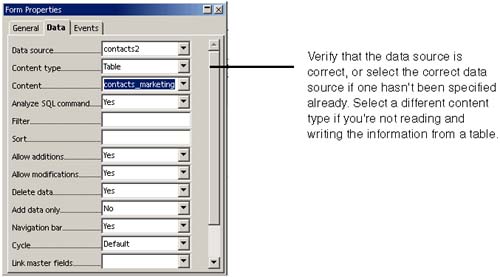 -
Close the Form properties window. Right-click the check box and select Control. Enter the appropriate values as shown in Figure 36-25. Figure 36-25. Specifying control values for a check box 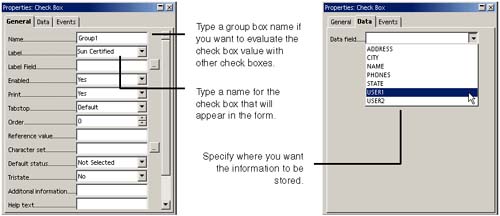 Adding a Group Box Use a group box to group check boxes or radio buttons for processing as a unit. In the Name field of the control's Properties window, enter the same group box name for every check box or radio button in order to group them. -
Click the Group Box icon on the Form tearoff menu.  -
The fields window appears where you're prompted to specify the data for the control. Type the values you want and click Next; see Figure 36-26. -
Select the default value you want and click Next; see Figure 36-27. Figure 36-27. Specifying default value for a group box  -
The next window lets you specify which existing field in your specified data source should be used to store the data from the new control. Select an appropriate field and click Next, or select No if you don't want the data stored and just want to use it in the form. See Figure 36-28. Figure 36-28. Specifying where the control's data will be stored 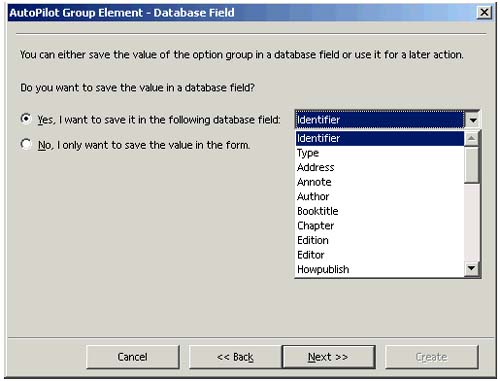 -
Specify the label for the control you want to appear in the form, and click Create. See Figure 36-29. Figure 36-29. Specifying values for a group box 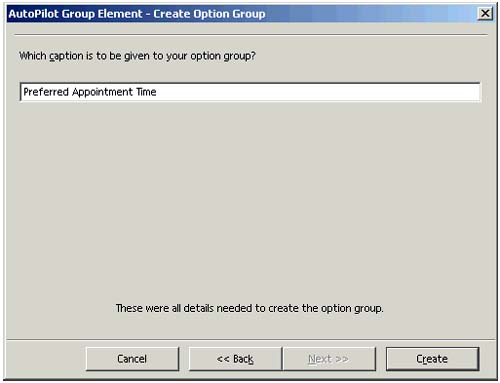 The control will appear in the form.  Adding a List Box -
Click the List Box icon on the Form tearoff menu.  -
If you haven't specified a data source for the document, you'll be prompted to do so in the first window. Select a data source and click Next. See Figure 36-30. Figure 36-30. Selecting a data source for the list box 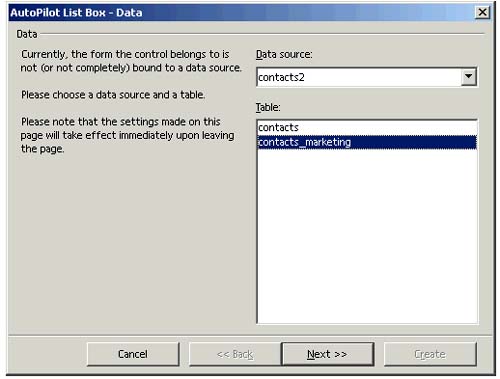 -
Select the table to use and click Next. See Figure 36-31. Select the same table as in Figure 36-30. We have no idea why you're allowed to select a table again, because if it's not exactly the same as the table in Figure 36-30, no data shows up in your list box once you've created it. Figure 36-31. Selecting the table to use 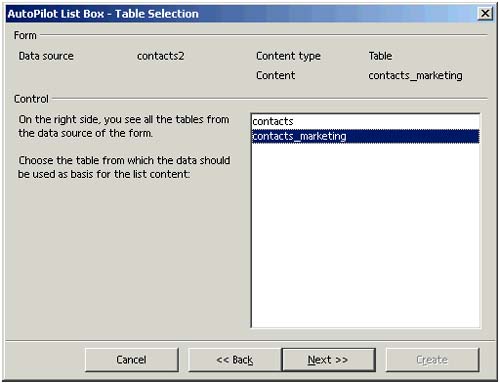 -
The next two windows prompt you to enter the field that's the source of data for the field...and then will prompt you to specify two more fields. Review the following information, then go to the next step and make your selections. -
Figure 36-33 shows where the data goes afterwards. You can right-click the list box after you've created it and choose Control, then click the Data tab and fiddle with it as you like. Consult the help for more information. Figure 36-33. Selecting the field to display 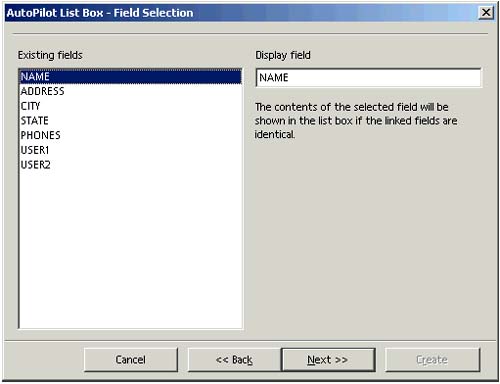 -
However, mostly you should just select the same field every time you're asked, and not worry about anything else. Figure 36-32. How list boxes work 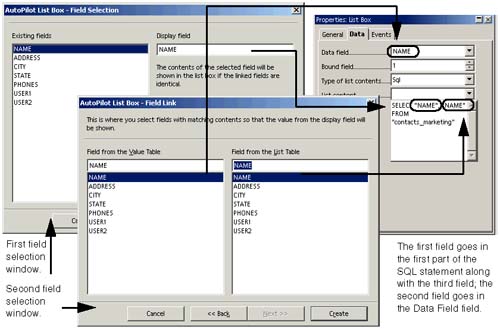 -
Select the field to display and click Next. See Figure 36-33. -
Unless you're a power user and have a good reason next to, your selections in Figure 36-34 for Field From Value Table and Field From List Table should be the same field you've already selected. Click Create. Figure 36-34. Select the same fields again 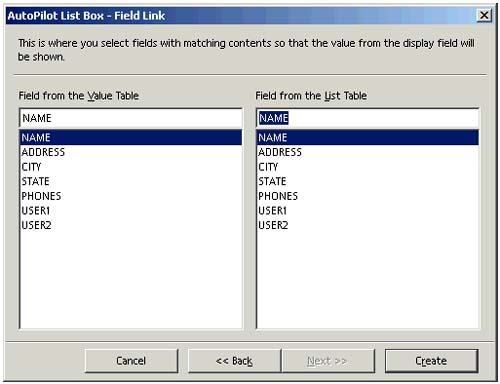 -
The control will appear.  Here you indicate via which fields, tables of values and list tables are linked. The value table is the table of the current form where the list field is inserted. The list table is the table whose data should be shown in the list field. Both tables must be linked over a mutual data field. These links are to be entered on this page of the AutoPilot. The field names must not necessarily be the same (this depends upon how the field names are defined in both tables), but both fields must have the same field type. Macro and Events Basics Right-click a control and choose Form or Control, and you'll get the properties window in Figure 36-35. The window shows the events that a control or form can have; you can attach a macro to each one, to control what happens when that event occurs. Figure 36-35. Entering URL and display properties for a control 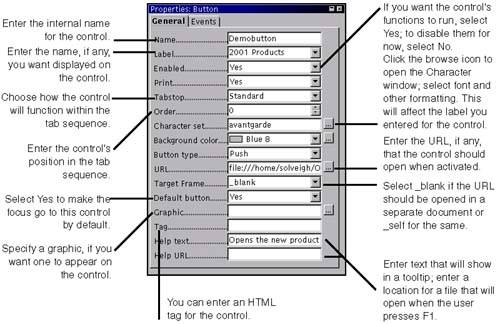 Overview of Events In addition to just specifying a URL for the control, you can specify macros, either existing ones or your own macros, to be executed when certain events happen. Events are actions like clicking the mouse, releasing the mouse, moving the focus (pressing Tab), and typing. Table 36-1 lists the events and what each means. All events are not available for each control. Table 36-1. Control events | Event | Description | | Before update | This event takes place before the content of the control field is updated from a linked data base. | | After update | This event takes place, after the content of a control field was updated from attached data. | | Item status changed | This event takes place if the status of the control field is changed.This event takes place if you select a new entry in a list or a combo box or with a check box or option field if the condition of the control field changes. | | Text modified | This event takes place if you enter or modify text in an input field. | | Before commencing (also called Action started) | This event takes place if an action is executed by clicking the control field. Initiating an action is not the same as executing an action. If you click a Submit button, it initiates the "send" action but the send process will start when the "Action performed" event occurs. With "Action started" you have the possibility to choose. If the linked method sends back FALSE, "Action performed" will not be executed. | | When initiating (also called Action performed) | This event takes place if an action actually starts executing. If, for example, you have a Submit button type in your form, the send process executes the action. The "When executing" event corresponds to the start of the send process. This field is only available if you have inserted normal buttons. It isn't available with graphic buttons. | | Focus gained | This event takes place if a control field receives the focus (if it is selected or gets the focus because a user tabs to it). The focus is the thin dotted line visible around the selected item in a window. | | Focus lost | This event takes place if a control field loses the focus (if you tab to another field, for example). | | Key typed | This event takes place if the user presses any key. For example, this event can be related with a macro input verification. | | Key released | This event takes place when the user releases the pressed key. | | Mouse inside | This event takes place if the user presses any key. For example, this event can be related with a macro input verification. | | Mouse dragged while key pressed | This event takes place if the mouse is dragged while a key is pressed. | | Mouse movement | This event takes place if the mouse is moved. | | Mouse pressed | This event takes place if any mouse button is pressed. | | Mouse released | This event takes place if a pressed mouse button is released. | | Mouse outside | This event takes place when the mouse is outside the control field. | | Before resetting | This event occurs before a formula is reset. The linked macro can, for example, prevent this action by returning "FALSE". A formula is reset if one of the following conditions is met: -
The user presses an (HTML) button that is defined as a reset button -
A new and empty record is created in a formula that is linked to a data source. In the last record, for example, the Next Record button may be pressed. | | After resetting | This event occurs after a formula has been reset. | | Modified | This event takes place, when the control loses the focus and the contents of the control were changed since it lost the focus. | Adding a Macro to an Event Follow these steps to assign macros to events. Use Figure 36-36 for guidance. -
Right-click the control and choose Control. -
Click the Events tab (Figure 36-36). -
Select an event to assign a macro to. -
Enter the appropriate information, then close the window. Figure 36-36. Assigning a macro to a control's events 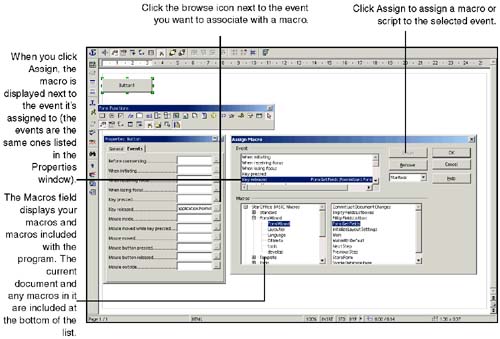  |