Suppressing a Context Menu for Web Pages
|
Item Selection and Addition to the Cart
The most important part of a shopping cart is its ability to hold things. You can think of an online shopping cart as a collection of those paper tags you take at certain stores so that you don't have to walk around with a plasma TV or lawn tractor in your arms. The virtual shopping cart does not hold the actual items themselves; it only holds pointers to or reminders of what will eventually be purchased. This makes your job as a programmer easier, believe it or not.
The first part of developing an online shopping cart is to decide where and how to store the data. URL parameters might be a logical choice for where to store the data: URL parameters take care of the "how" part and are fairly easy to use. Unfortunately, URL parameters have too many drawbacks for this type of problem. They have a limit to how long they can be, and their use can become tricky when multiple pages are involved.
Because file I/O in JavaScript is out, there is really only one option for storing shopping cart data—cookies. With cookies, you know that data is stored in a name=value pair, but with our online shopping cart, we need to know not only what the item is, but also how much it costs. As a solution to this problem, I chose the format number=description,cost to store data in. The number part of my format is the item number in the list of items, description is the name of the item, and cost is the cost of the item.
After deciding how to store the data, it would be a good idea to write a function that will add an item to the cart. If you used the preceding format, a function such as the following would work perfectly:
function addItem( name, price ) { var i = 1; for( ; getCookieValue( "item" + i ) != "" ; i++ ); document.cookie = "item" + i + "=" + name + "," + price; document.cookie = "items=" + i; } This function puts items into the cookie-cart in the following format:
item# = Item description string,#.##
One thing to remember if you're using this format is that the item description string must not contain any commas in it. If your description string does contain commas, displaying a list of items later on will become tricky. The function above not only adds the item to the cookie-cart in the first available slot, but it also stores a running total of how many items are in the cart. This behavior will not become useful until later, but is used to make sure that all the items in the cart are displayed. The function also uses a separate function, getCookieValue(), which you should be familiar with and which is used in almost every program that uses cookies in this book:
function getCookieValue( name ) { var c = document.cookie; var begin = c.indexOf( name ); if( begin < 0 ) return( "" ); begin += name.length + 1; var end = c.indexOf( ";", begin ); if( end == -1 ) end = c.length; return( c.slice( begin, end ) ); } The problem of parsing our proprietary item format will be handled in the next section.
Once you have decided on an item format and have written a function to add items to the cookie-cart, creating the rest of the code for the online store becomes simple. Here is a complete example that we have developed for our Center Park project (Figure 17.1 illustrates this code):
<html> <head> <title>Center Park - Store</title> <script language="JavaScript"> <!-- function addItem( name, price ) { var i = 1; for( ; getCookieValue( "item" + i ) != "" ; i++ ); document.cookie = "item" + i + "=" + name + "," + price; document.cookie = "items=" + i; } function getCookieValue( name ) { var c = document.cookie; var begin = c.indexOf( name ); if( begin < 0 ) return( "" ); begin += name.length + 1; var end = c.indexOf( ";", begin ); if( end == -1 ) end = c.length; return( c.slice( begin, end ) ); } // --> </script> </head> <body> <b><font size="6">Center Park School Store -</font></b> <font size="4">for all your school paraphernalia needs</font><br><br> <form> <table border="2" width="100%"> <tr> <td>School Hat - One size fits all, school emblem on front.</td> <td> $9.99</td><td align="center"> <input type="button" value="Add" onClick="JavaScript: addItem( 'School Hat One size fits ' + 'all school emblem on front.', 9.99 );"> </td> </tr> <tr> <td> School T-Shirt - Small-Medium-Large, school emblem on front.</td> <td> $19.99</td><td align="center"> <input type="button" value="Add" onClick="JavaScript: addItem( 'School T-Shirt ' + 'Small-Medium-Large school emblem on front.', 19.99 );"> </td> </tr> <tr> <td> Football Season Tickets - Watch the Bobcats all season long. </td> <td> $12.99</td><td align="center"> <input type="button" value="Add" onClick="JavaScript: addItem( 'Football Season Tickets ' + 'Watch the Bobcats all season long.', 12.99 );"> </td> </tr> <tr><td colspan="3" align="center"> <input type="button" value="View Cart" onClick="JavaScript: document.location='ViewCart.html';"> <input type="button" value="Check Out" onClick="JavaScript: document.location='CheckOut.html';"> </td></tr> </table> </form> </body> </html> 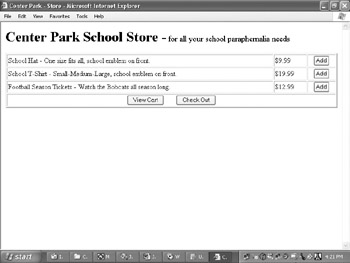
Figure 17.1: Note the major functionality of an online store neatly and simply presented: Items for sale are readily visible, a mechanism for selecting them is apparent (the Add button), and the overall order process is represented by the View Cart and Check Out buttons.
This online store offers three items that you might find in any online school store. A button next to each item lets a shopper add an item to the cart by calling the addItem() function. Additionally, two buttons at the bottom of the page allow the shopper to view his cart's contents and to check out when done shopping. The functionality of these two buttons is discussed in the next two sections.
|
EAN: 2147483647
Pages: 130